Bulk embroidery (stumpwork), as it turns out, is very rare in our country type of needlework.
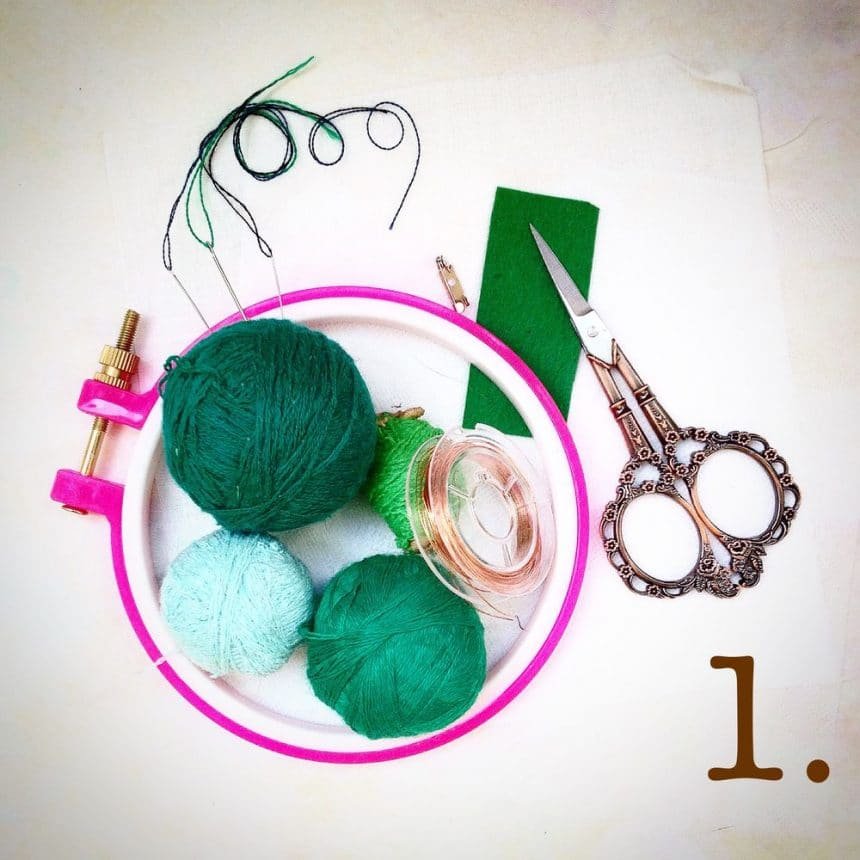
materials:
– a piece of the base fabric (cotton batiste white for me). You can use any plain weave fabric, thin, with a slight parting of the filaments. The thinner the warp and weft, and less extendable, the smaller the holes in the whole embroidery is neater and more elegant;
– thread (my grandmother acrylic 4 colors). If you are new to embroidery, it is better to take the line of the same quality and thickness;
– copper wire of 0.3 mm. (. I have a green color, but you can take and conventional, uncoated, as it will be on the wrong side and covered with embroidery It will not be seen);
– a piece of green felt the thickness of 1 mm 2 area of 1-denominated coins;
– a piece of a water-soluble nonwoven fabric of the same size as the base fabric piece to be able to fill in the hoop;
– thread for basting usual (I have coil plain white sewing thread);
– the basis for the brooches in the form of pins 15 mm. Or you can use any basis for brooches.
adaptations:
– hoop (I have a small 12 cm in diameter);
– scissors for the cutting thread;
– scissors or clippers to trim the wire;
– tracing;
– copy paper;
– sewing needle (select considering the thickness of yarn and fabrics);
– a pen or pencil.
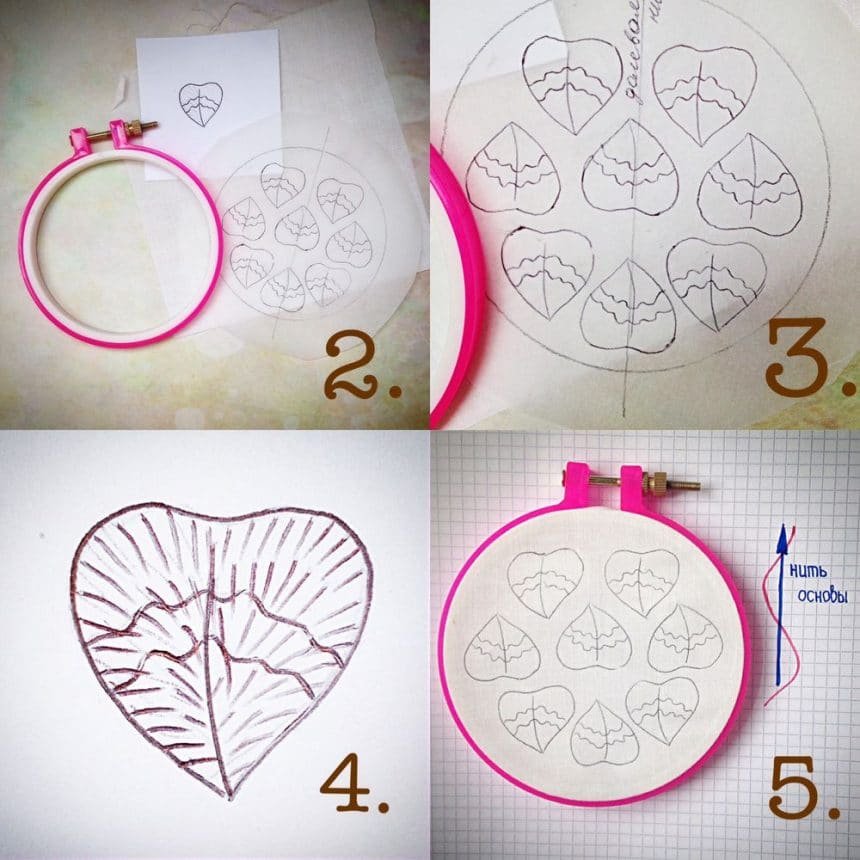
2, 3. Fig. There are no secrets there special. The draw leaves like anyone and anything. I paint on an ordinary sheet of paper. On tracing boundary designate severally designate thread and relative to translate all leaves in one direction. If the leaves are arranged in a chaotic manner, they will not be the same. Figure in the process of embroidery is deformed in different ways. Although clover is not critical, as the plant should not be perfect.
4. Drawing a leaf. dashed line – this line of stitches of embroidery. I imagine them to tissues do not always draw. Who doubt their abilities – draw.
5. Transfer of pattern on the fabric and dressed in fabric in the hoop. I translate using carbon paper. I fold the paper so that the image transferred from the front and the reverse side. The hoop dressed with cloth so that there were no bias warp yarns of fabric (in the figure the blue line is correct, no red.
6, 7. Starting to embroider shade number 2.
8. The end of the thread is fastened. A few small stitches across the deck of the future.
9. Perform one stitch back, sticking a needle in the thread, as if leaving it. All that now it will be fixed and will not go anywhere.

10. Begin flooring laid with stitches of different lengths at different levels. The length of the stitches is not more than 7 mm. gaps between the stitches do not need to, they must lie close to each other but do not “run down” on each other so that the flooring is not Bouguereau. In principle, the gaps can be filled by returning back but then will turn inside out and pull the diagonal wrong side get less accurate. Ideally, it is not necessary to go back at all, then the surface of a two-way turn. The photo shows that the first row of stitches I do not exactly stack to the edge, and departing from it. An extreme number of stitches will be done later, along with the wire. A distance from the first row to the contour line should not exceed 7 mm for all sites.
11. Continue to embroider the first row.
12 13. Fasten the thread along the same lines as in the beginning, but in reverse order.

14. Take the thread color number 3 and begin to embroider the second row, the second stitch – continuation of the first, ie the need for a needle stick is not the end of the hole, and from the first stitch, and, splitting thread, just going to the stitch. It is a guarantee that there will be holes in the finished embroidery, regardless of the quality of the fabric.
15. The same stitches of the second series of different lengths. “Pour” one color to another.
16. The third row executes thread color number 1.
17. Again, take shade thread number 3.

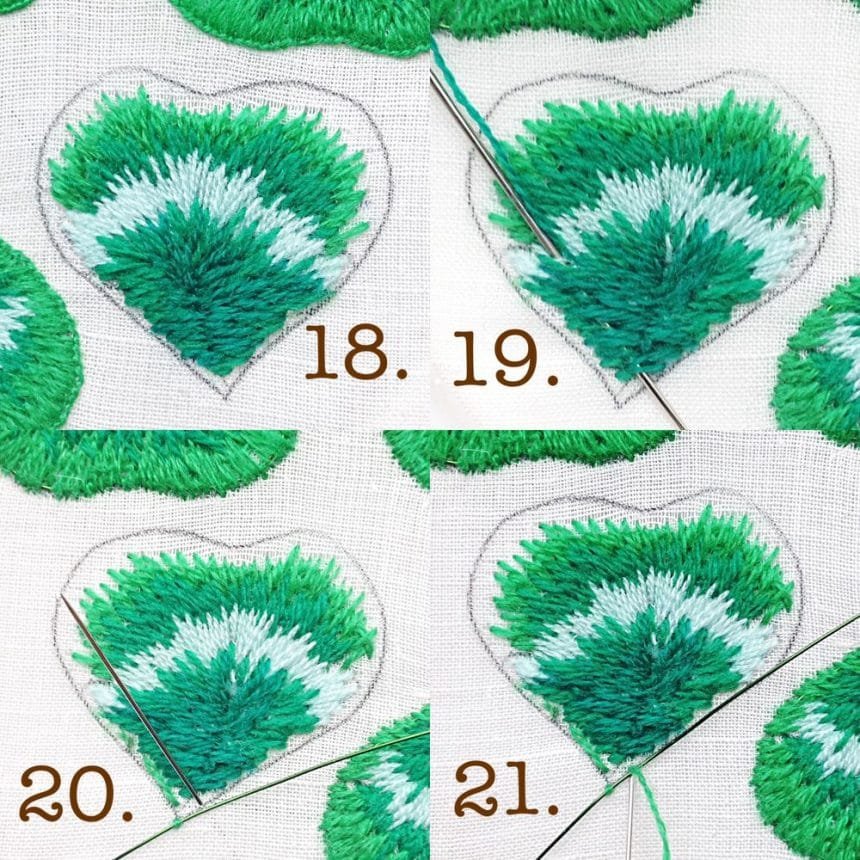
18. Shade number 4 finish embroidery leaf.
Shades, their number, and location are advisory in nature. Do so, as required by your imagination, skill and vision of beauty 🙂
19.Pryachem ends of thread on the wrong side under the flooring.
20. We turn embroidery inside out (obtain from the hoop, and then dressed with previously but has the wrong side up). Cut a piece of wire. The free ends are too long, you should not do – 2-3 cm is enough.
21. sews thread color number 2 couched stitch technique zero stitch. That is, a needle is stuck there, where pulled out, rounded the wire at the same time. In the picture is clear, like. The distance between the stitches can be varied. the greater bending, the more stitches. But not more than 6 mm.
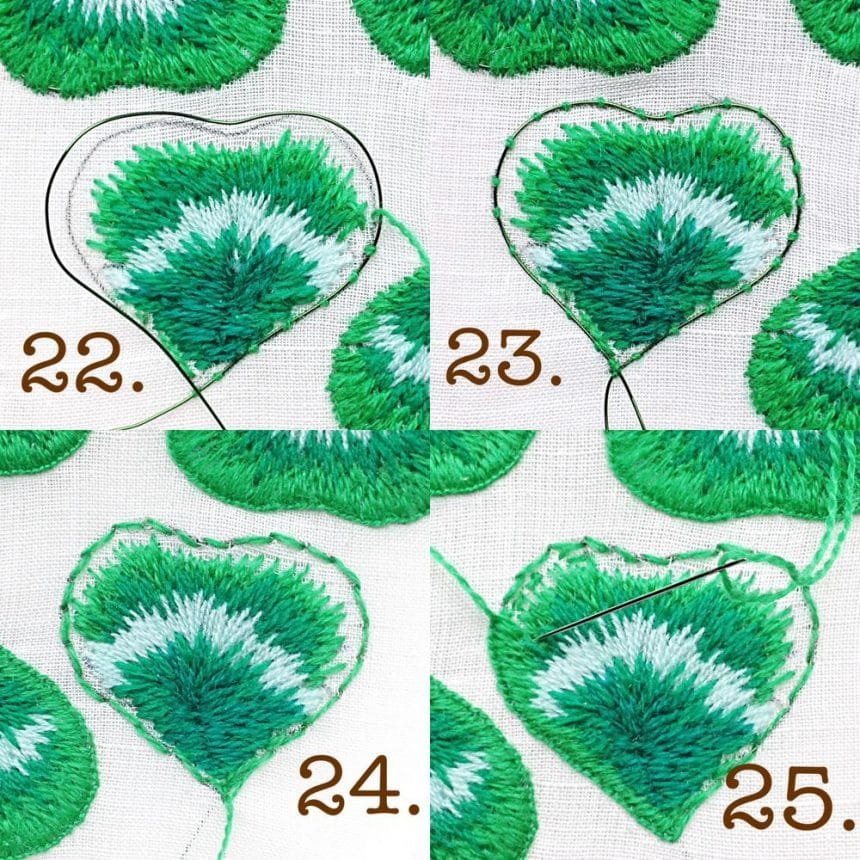
22. The wire is placed around the contour line, which we have translated and inside out too. Remember? I sew the wire at this stage, when the basic embroidery is ready to wire ends do not interfere.
How many have seen, everywhere do it at the very beginning – to embroidery. Treat the first stitch the edges together with wire and then embroider the center. On the one hand, it is clear – embroidery less deformed. But I’m not comfortable. Wires sticking out – a thread for it cling irritate 🙂 Take your pick.
23. A wire was sewn. Thread, I was not cut, but simply infer the front of the embroidery – then come in handy.
24. Type of wire sewn embroidery on the front side.
25, 26. Again we turn over embroidery. On the front side. And the loop stitches embroidery leaf edge thread color number 2. Technology is the same – to stick a needle in the previous stitch in the thread, not next to it.
27. On the reverse side, the needle goes very close to the wire on the outer edge. In order to get exactly, embroidery turn is not necessarily, the wire is well detectable. Or a needle leads to the center of the leaf tissue, and it touches the wire, make a puncture. The stitches should be laid close to each other. If the gaps are formed, do not worry, later we’ll close them.
28. The front side of the embroidery stitches a loop with the treated leaves.
29. Wrong side embroidery.

30. Take out of the embroidery hoop. Small sharp scissors cut the leaves as close to the pigtail of the stitch seam. Cut, holding embroidery facing up. If you’re on the wrong side of cut 100% damage the thread on the edge. If reading tips slice the filament, then immediately fall onto nail varnish or glue in place “injury.” I do not never embroidery stabbed.
31. The cut sheet of paper from the front side. base fabric remnants virtually invisible.
32. The cut sheet of paper on the reverse side. Here the base fabric is already very well visible and it looks messy.
33. The edge of a leaf. Visible white rim tissue.Vot stripes from this, we will get rid of a water-soluble nonwoven fabric.

34. We put in a water-soluble nonwoven hoop. Wire tails skip through the fabric inside out so as not to interfere with work.
35. Regular sewing thread of any color, basting stitches slanting leaf on interlining that in the process will not run away.
36. Baste leaf. View from the inside out.
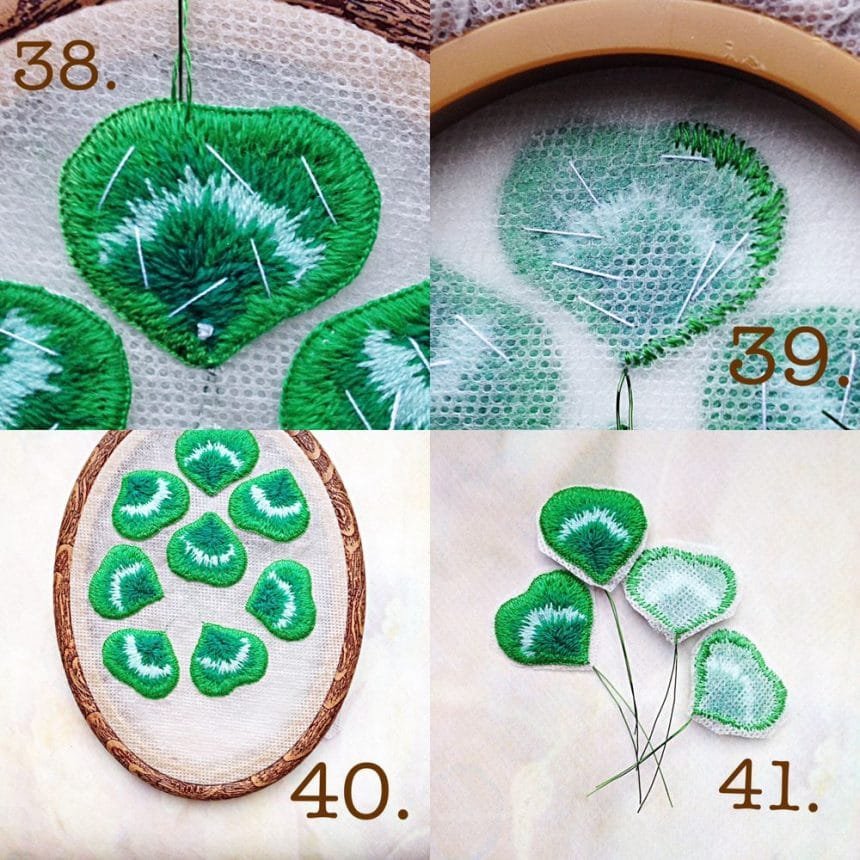
37, 38. And now again looped stitches of different lengths, thread color number 2 runs along the edge. Fill the gaps, if sinned signed previous step. From the edge of the sheet is strongly not retreat, ideal to do at the very edge of the sheet. If you are going away to retreat, the edge is fuzzy, loose and wavy. This effect can also be used, for example, in colors. The end of the thread at the beginning and at the end hiding under the deck.
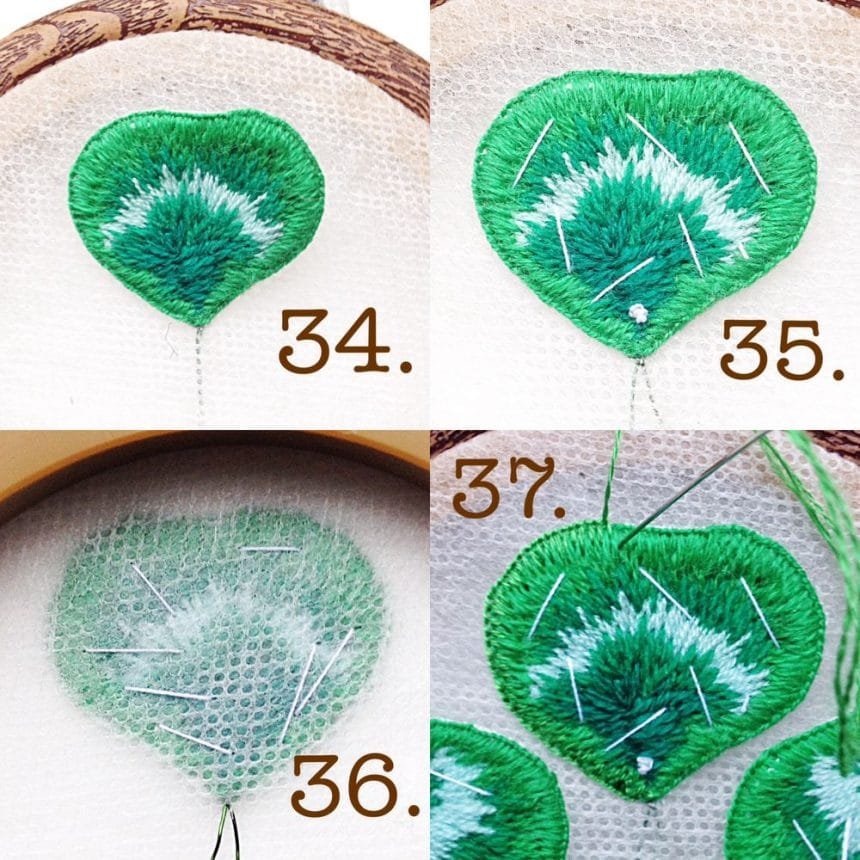
39. View from the wrong side.
40.Vynimaem basting thread leaves.
41.vynimaem of the embroidery hoop. Cut leaves. you can not very gently, important not to damage the embroidery.
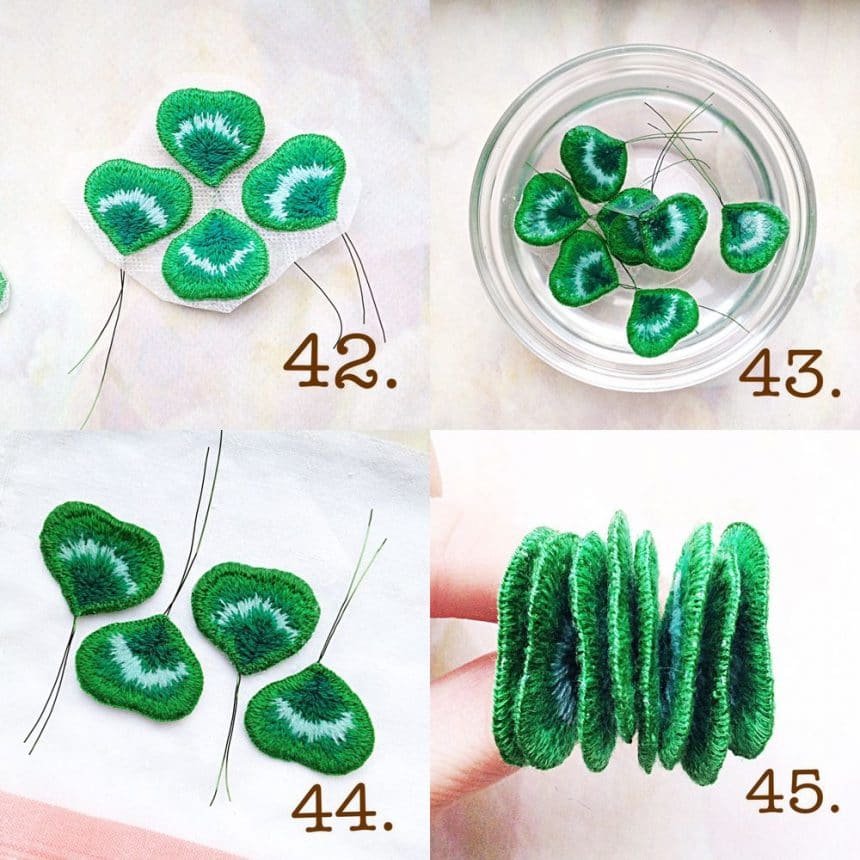
42. If it is absolutely unbearable, or laziness, they can be all one does not cut, and completely with the entire piece of nonwoven lowered into the water. All the same, he will dissolve, but I prefer to cut and then spend less time in the tap water.
43. Put the leaves in a bowl of water at room temperature. Fleece can be different and dissolved over different time. See its technical specifications. I lay in a bowl for 2 minutes. I then I wash the leaves under running water until complete washout fleece.
44. We spread the leaves on a towel or cloth, blotted the excess moisture. Dry them. I dry, wrapped in a towel, directly on the battery.
45. The result of applying a water-soluble nonwoven fabric here is a beautiful, neat edge without fringe and protruding thread, which is not exactly. And interlining little embroidery.
Can we do without it?
– if you do not particularly bother with accuracy;
– if the edges of negligence fits into the image of the character and style of your products;
– possible as the base fabric to choose is not white, and green, and then the warp is hardly seen from the end;
– to paint over the contour of the base fabric marker or paint the color of the edge threads. Then, too, the fabric will not be visible;
– walk a loop stitch around the edge without a fleece, a holding sheet of paper in his hands. In this case, the edge will be loose and not very smooth, but as an option is well suited.
46. Cut the green felt two thin slices with a size of a 1-ruble coin. The clasp may be any as pins, needles, and others.
47. Mark up on one circle cut line on the size of a pin. cut the length of 5 mm. In general, depending on the size of a pin. Cut.
48. Insert the pin into the hole.
49. Firmly sew thread in tone.

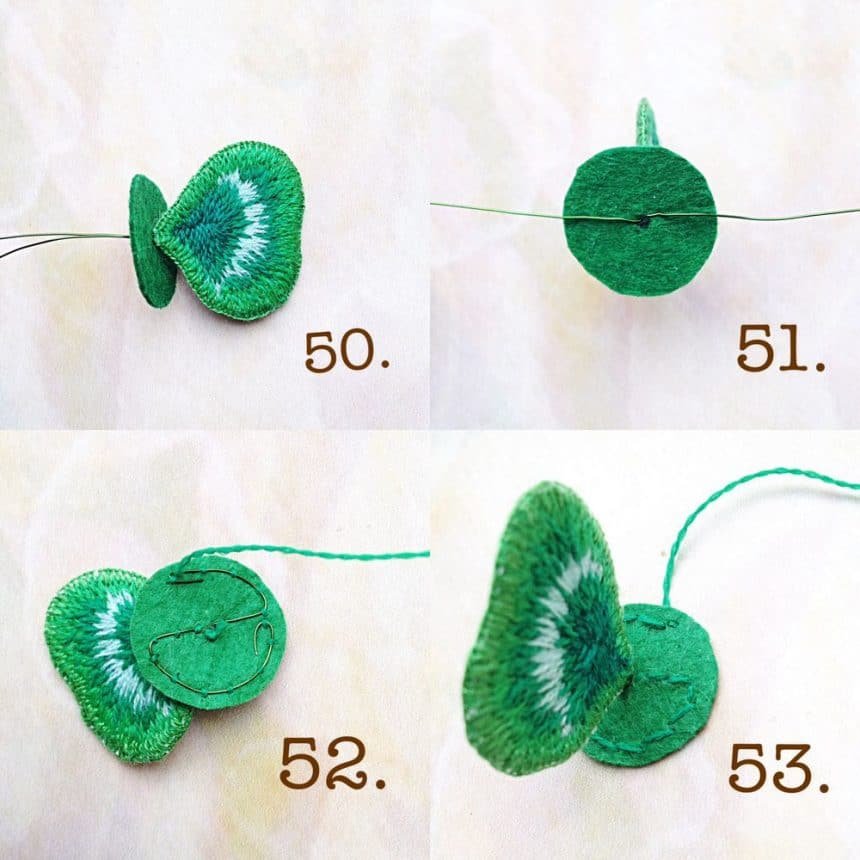
50. Take the second felt circle. Pierce the middle of the hole and insert the wire ends from the first leaf to stop.
51. unbent wire antennae.
52.the nitkami color of felt sewn wire. Required bends the tip of the wire loop.
53. The view from the front side of the felt circles.
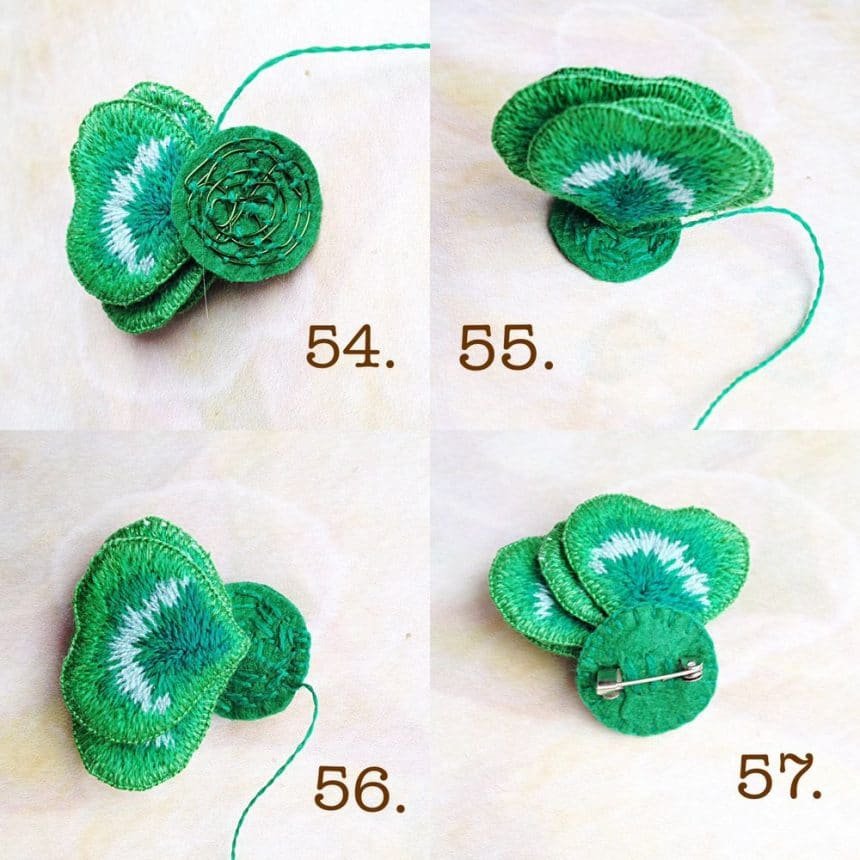
54. secure all the leaves and all the ends of the wire.
55. The view from the front side. You can leave and so, and you can embroider the felt circle further. For example, the French knots.
56. Take the second circle with a buckle. You can drop into the center of the adhesive. I use the glue gun. And you can not stick at all. Sew a loop stitch over the edge of one circle to another.
57. The underside of the brooch with buckle.
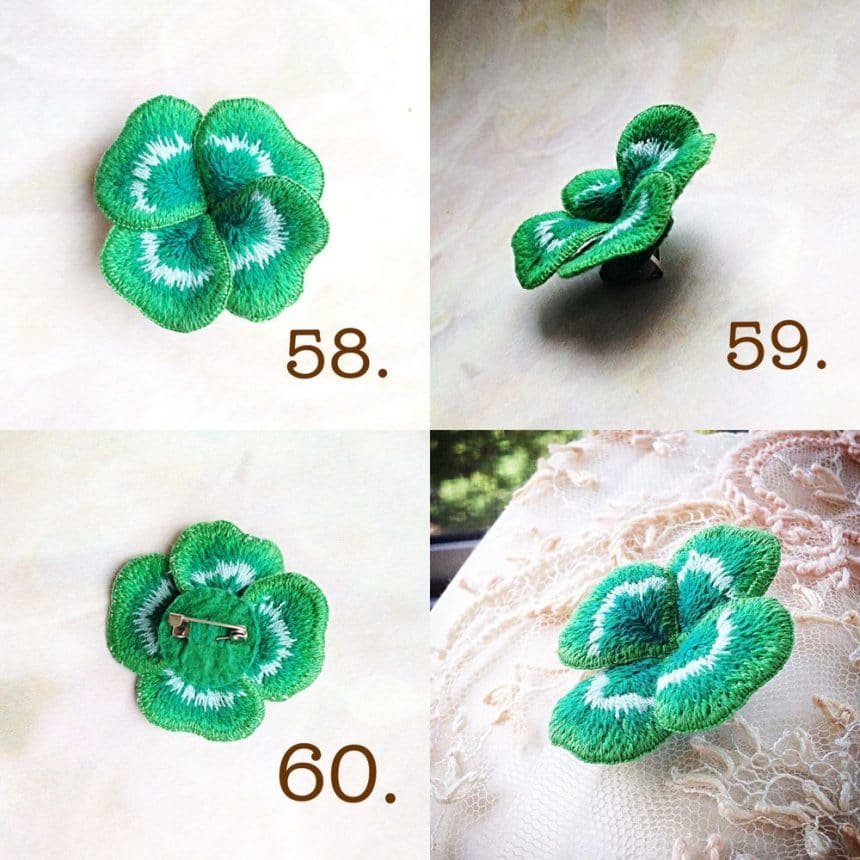
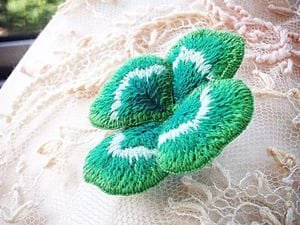
58 59.Raspravlyaem and fold the leaves to your liking.
60. Wrong side brooches.