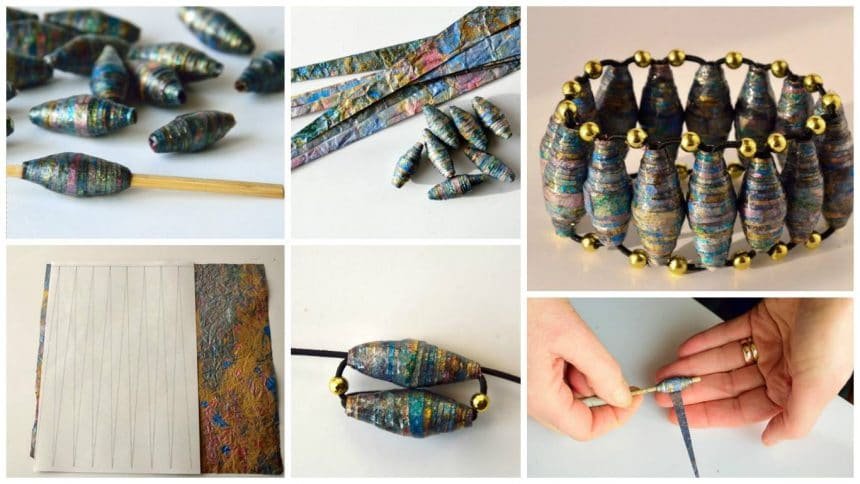
Paper beading is my absolute favorite of all crafts. It’s a brilliant hobby for many reasons. It is probably the least expensive craft there is because you can make some beautiful pieces of jewelry from your own art, as I have done here or from waste paper.
Junk mail comes into its own for paper bead makers. Even if you were sitting at home with no money and no craft supplies you could simply wait for the mailman to come and shove junk through your door. I don’t see it as junk anymore; I see it as free craft resources delivered straight to my door.
As long as you have a toothpick, some white glue, a craft knife and regular deliveries of pizza ads and other junk through your mail box you will always be able to create. Add felt tips and paint into the mix and things get even better. Add a computer and a printer and you are motoring!
Paper bead making can be as basic or fancy as you make it and that is what I love. It suits all pocket books. It also gives junk mail a reason for being. I see my junk mail bracelets as tributes to the trees we trash in the name of big business.
For me, there is also another dimension. I love painting and drawing in the abstract. I also am addicted to abstract photography. I have boxes full of my colorings and images that would be useless were it not for being able to wear them. I collect all sorts of ‘rubbish’ to draw on and make things out of and it makes waste less frustrating to look at.
My big passion is pulling together all my hobbies and using the resulting images to create beautiful wearable art in the form of bracelets, earrings, and necklaces made from my paper beads.
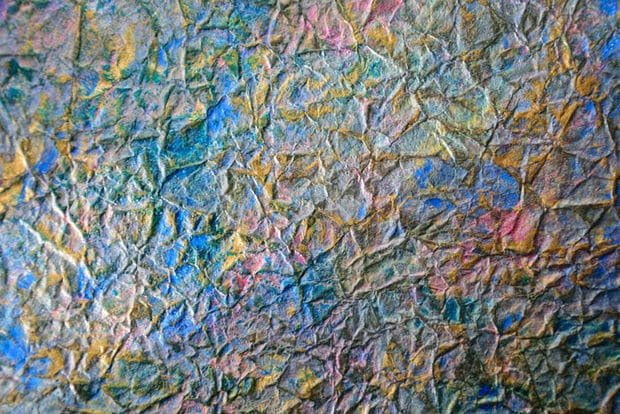
This is based on my previous post which showed how to create ‘fabric’ from brown paper. I have used the same piece of art that I created in that to produce the bracelet pictured here. I collect the brown paper that Amazon uses to deliver fragile stuff. They usually put reams of it in even the smallest box. However, a roll of brown parcel paper is very cheap and will make thousands of beads.
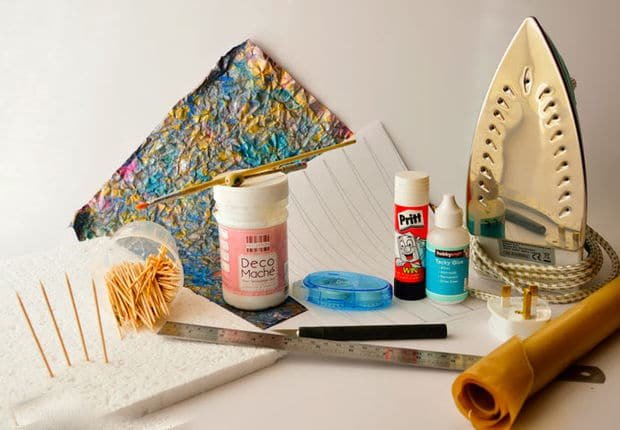
Step 1: Gather Your Stuff Together
You Will Need:
A large piece of brown paper ‘fabric’ (see the previous)
A 1 inch A4/US Letter size tapered bead template or pencil and ruler for marking out by hand
A tooth pick or bead rolling tool
Some tacky white glue in a small nozzle squeezy bottle or Pritt Stick
A tub of tooth picks (waxed – see tip below)
A piece of packing styrofoam for sticking the tooth picks in while drying beads
A large piece of waxed baking parchment
A metal ruler and craft knife or an A3 size paper trimmer
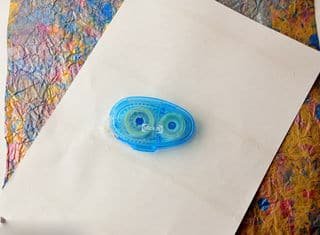
Re-positionable roll-on sticky tape
Glossy decoupage glue
An iron
A small paintbrush
A bamboo skewer
Not pictured:
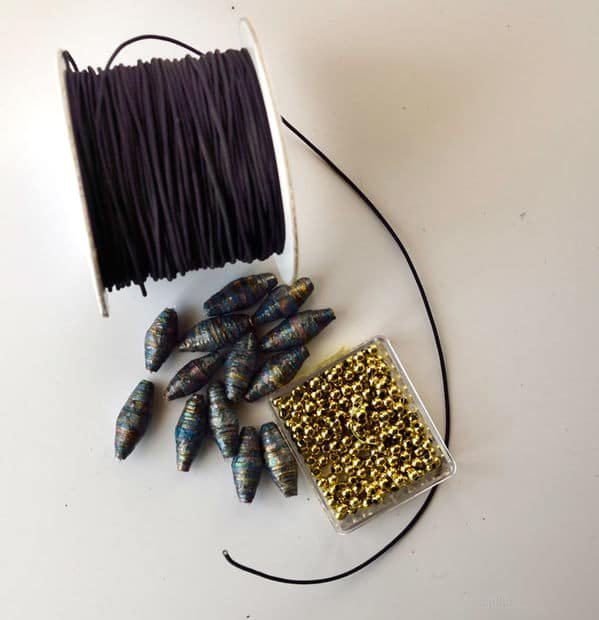
4.5 feet of 1mm black elastic
Some small gold beads big enough to take 1mm elastic
Diamond glaze (optional)
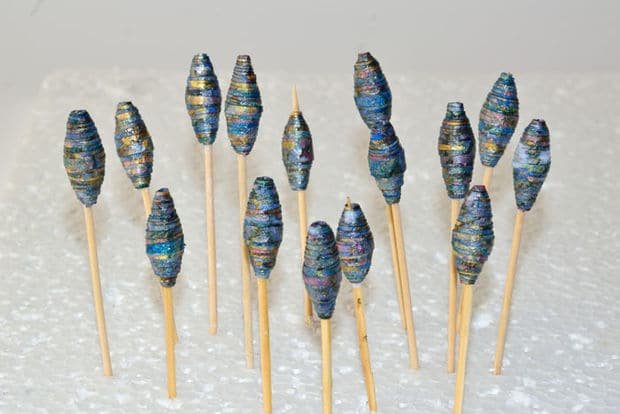
Tip: When your beads are rolled, you will be sealing them to make them waterproof and durable and then perhaps glazing them to give added shine. To do this I put them on toothpicks. To save a lot of misery with beads sticking to tooth picks, I wax all mine before they ever get near my craft room. This prevents sticking when glue and glazes inevitably come into contact with the tooth picks. Before I began waxing mine, I had middles pull out of beads and some beads that just wouldn’t budge. Now, my beads come off the tooth picks easily every time. I use bee’s wax melted in a double boiler. I dunk all the sticks in at once and pull them out with tweezers. Then I stand them up in white foam Styrofoam packing until they are dry – which is very soon after.
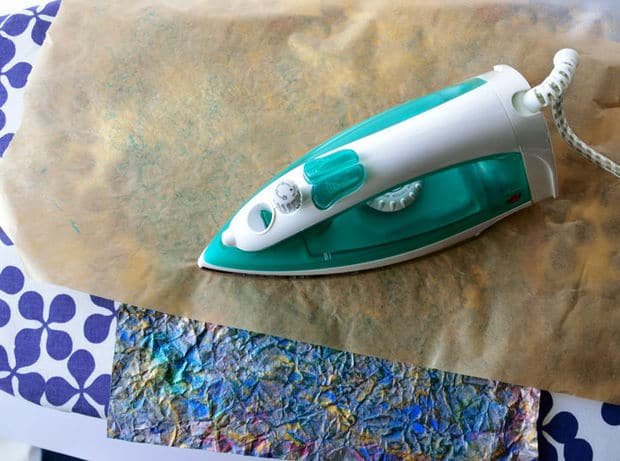
Step 2: Iron Your Brown Paper Fabric
Lay your brown paper fabric on an ironing board face up. Take the baking parchment and lay it over the top. With the iron on a high heat, iron all over the paper through the baking parchment until it is flattened. You will still have the lovely texture but the big ridges will go flat.
Tip: I keep an old ironing board and iron especially for crafts. If you use your regular household items you may end up with all sorts of colorful glittery stuff on your clothes no matter how ‘careful’ you think you will be with your good iron. I don’t mind a bit of embossing powder and glitter on my jeans but my husband isn’t that keen to have it on his shirts. Not sure why.
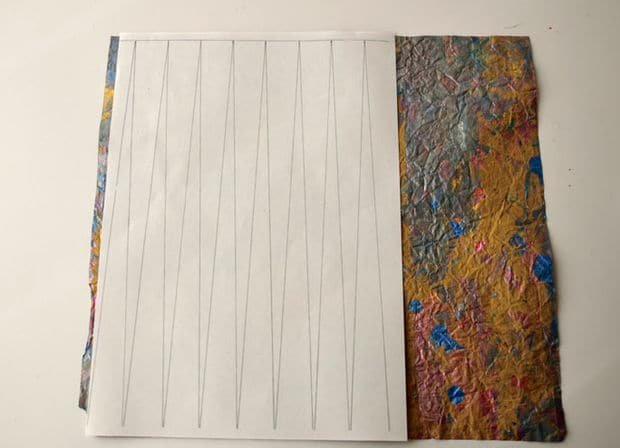
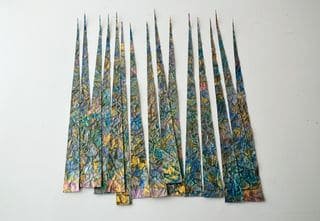
Step 3: Cut the Strips You Will Make Into Beads
Take the flattened brown paper fabric and a 1 inch tapered bead template. If you do not have a template, you will need to measure out some triangles on the back of the paper. To do this, measure 1 inch sections along one edge and then half inch sections opposite, along the top edge. Using a ruler, draw lines to create long triangles all across the width of the paper.
For info on how to get the templates for various size beads, see my web address at the end.
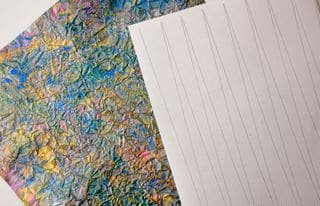
If you are using a template (I would recommend getting templates or making your own if you are going to make lots of beads), turn your brown paper fabric over so the messy side is facing you. Turn the template over to the blank side and using the roll-on re-positionable glue tape, put four lines of glue across the template,
Stick it with light pressure to the back of the brown paper fabric.
Using a craft knife and metal ruler or a paper trimmer, carefully cut along the black lines to create your bead strips.
Step 4: Roll Your Beads
Using either a toothpick or a bead roller, carefully roll each strip reasonably tightly.
Although many people get along very well using toothpicks, I have never been able to get the knack of getting the end rolled under nice and tightly to start rolling.
I gave up and started looking at bead rollers. There are many for sale online but in the end, I set out to make my own. I used a few different things in the beginning (including a cotter pin from the hardware store). That little slit is just perfect for trapping the end of the paper so you can roll quickly and easily but I found I couldn’t get it off the cotter pin. In the end, I made a bamboo bead roller (shown in the pictures here) and it has taken the frustration out of using the toothpick method. If you have the knack, then carry on with the toothpick. My fingers just couldn’t get it!
My home-made rolling tool is similar to many for sale online. It has a large removable bead on one end and a fixed rolled paper handle at the other. I simply remove the bead, slide my paper strip into place and start rolling it fairly firmly until it is nicely caught up. Before it gets too far into the winding, I remove the bead and then gently wiggle the paper strip down nearer to the end of the tool for easy removal once it is fully wound. Practice does make perfect and once you are actually doing it, it’s all quite intuitive anyway. You kind of ‘feel’ your way with the beads.
Just try to roll them nice and evenly so you get a good taper at either end. Keep them firm. If your bead gets a bit uneven, just ease it back and re-roll it. It really does become second nature. You will find yourself easing back and adjusting as you go to produce beautifully shaped beads.And remember, they are handmade so you don’t want a factory produced look anyway.
When you have about an inch of paper left, gently squeeze some white tacky glue onto it and wipe any excess off with your finger. I try to keep a wet cloth handy for wiping gluey fingers across but I mainly use my jeans!!! I sometimes use Pritt Stick to glue the ends instead of white glue. Then finish rolling and firmly smooth down the end.
Step 5: Seal Your Beads
Next, you need to give your beads three coats of sealer. To make this easier, as each bead is finished rolling, I put it straight onto a toothpick and stand it up by pushing the end of the toothpick into white foam packing material. We used to call it Styrofoam not sure if it is still called that.
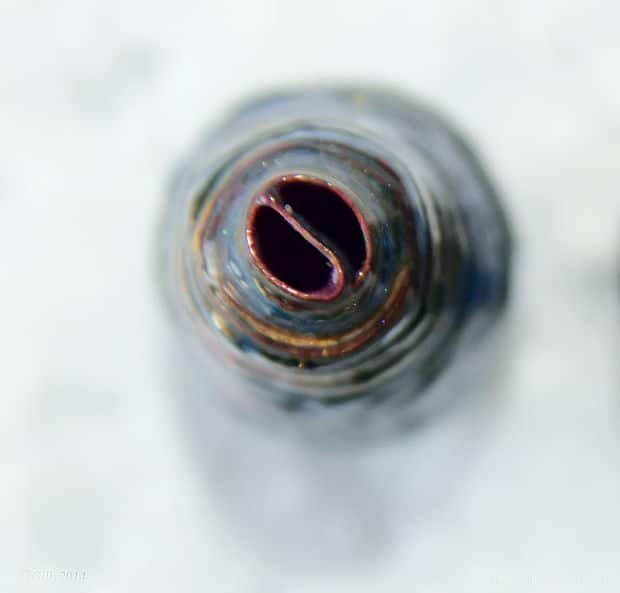
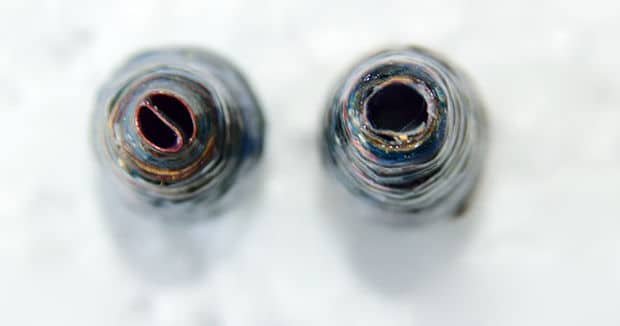
Tip: When your bead comes off the roller, the end where you started by pushing it into the bead roller slit will still be across the opening of the bead holes. (See pic above). Although you ultimately will want to straighten this out – don’t do it just yet. I find that if I stick the toothpick up the narrowest part of the bead hole, the bead sits snuggly on the toothpick while I am painting the sealer on and I can twirl it against the paint brush. If you straighten this out before you are ready, the beads will just slide up and down the toothpick and become a nightmare to paint.
Let each coat of sealer (glossy decoupage glue) dry for an hour before putting the next coat on. I let the last coat dry overnight. I also put a coat of Diamond Glaze on these beads because I thought the extra glossiness would suit the bead. Then let the glaze, if you use one, dry overnight too.
Tip: To keep track of which beads have been glazed and how many times, I have a large square of Styrofoam with the numbers 1 to 3 marked at three corners. As my beads come off the roller, I stick them in the corner with no number until they are all done. Then as I put each coat of sealer on, I move them around to 1, 2, and 3. When I am doing huge numbers of beads at once, this system works really well.
Step 6: Prepare Your Beads for Stringing
Once your beads are sealed. glazed and absolutely dry, take a bamboo skewer and push into the bead holes to get rid of the flap created by rolling. Make sure you have a clear hole straight through and snip off any extra bits of sealer or glaze that may have built up around the edges of the holes.
Step 7: Stringing Method
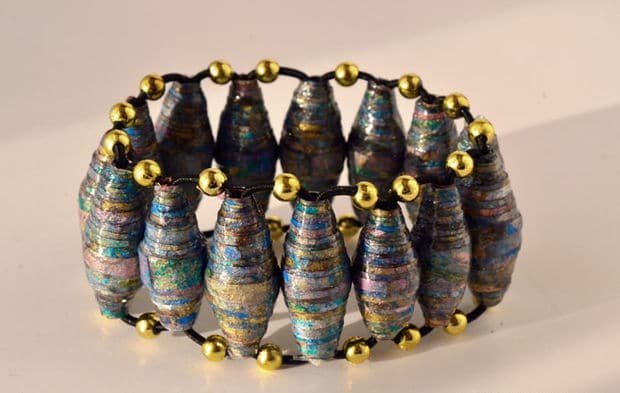
As these beads are quite chunky, they don’t sit well around a wrist when strung end to end. So I decided to use the ladder stringing method to show them off to their very best advantage and make them feel comfortable to wear.
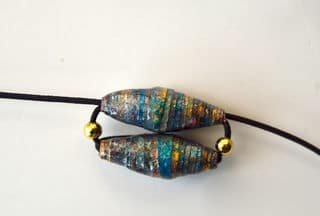
To add some contrasting color, I decided to add in some tiny gold colored beads I already had in my bead collection. As there is gold in the brown paper fabric, the little gold beads helped pick this out in the finished bracelet. You can adjust yours to use whatever color beads would match your art.
Step 8: How to Ladder String the Beads
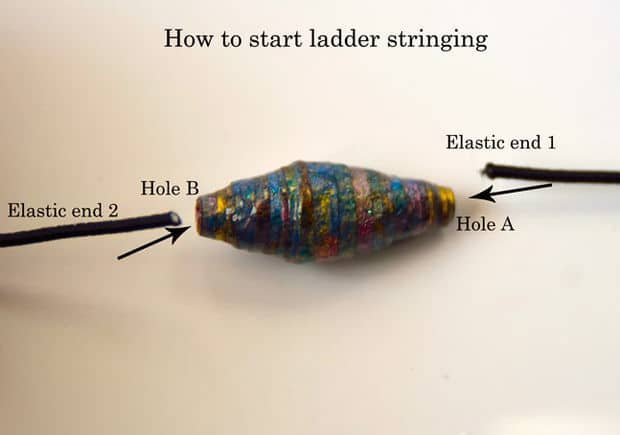
Take 4.5 feet of 1mm black elastic and lay it on the table with the end 1 facing bead hole A and end 2 facing bead hole B as per picture.
Push the ends into the holes so they pass each other inside the bead and come out opposite ends.
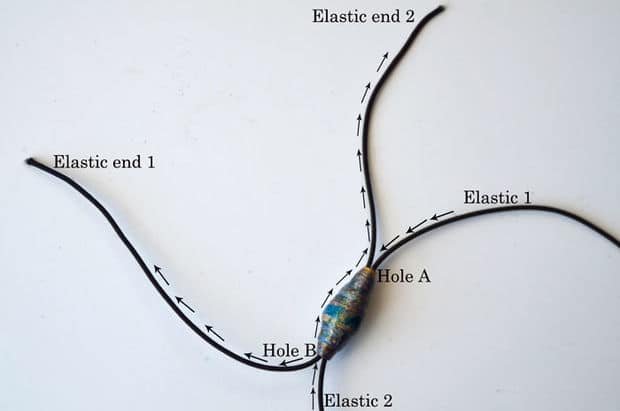
Step 9: Repeat the Last Step Until All the Beads Are Used
Pull the ends taut and string a small gold bead on either side. Take the next bead and repeat the process of pushing elastic ends 1 and 2 into bead holes A and B and pulling taut. Continue to put gold beads on either side. repeat until all the beads have been used. I used 15 beads in this bracelet and it will fit a small wrist. Add more beads as appropriate to your size.
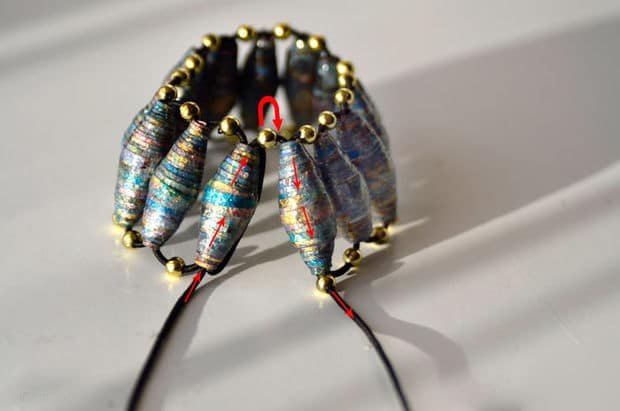
Step 10: Complete the Bracelet
Finally, when you have reached your last bead, take one of the ends coming out of the last bead and push it through the first bead from the top as per the picture. You will now have two ends coming out of the bottoms of the first and last beads. Tie these tightly together to form the bracelet.
That’s it! You can now wear your beautiful art, sell it or give it away as a present.