
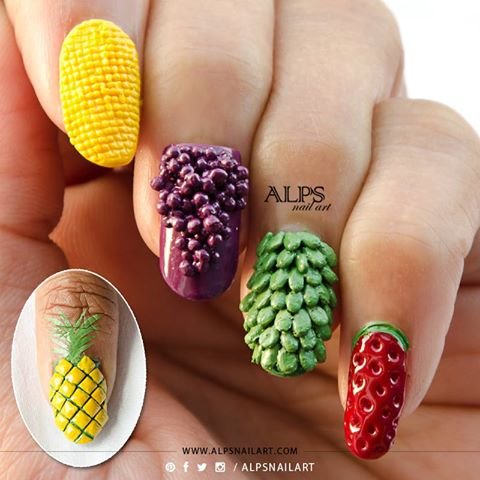
Creative fruit nails
Courtesy: Alps P Ladwani
Creative fruit nails…Can you guess how these were made?
Hint: Used some household stuff along with nail Polish and acrylic paints
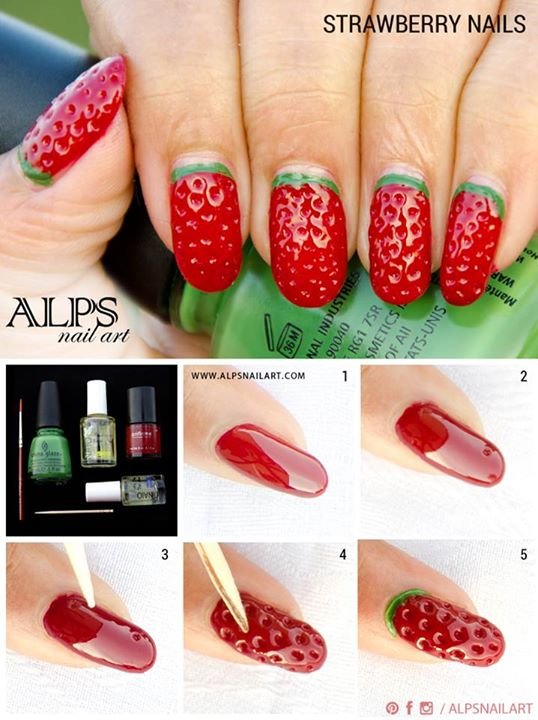
Yummylicious Strawberry Nails Tutorial is here..
Products Used:
Red nail polish, Green Nail Polish – Or Use Green Acrylic Paint
Base Coat and Top Coat, Toothpick, Thin Brush
1. Apply red nail polish over a base coat.
2. Paint multiple coats of red polish to build up the required thickness. Apply a layer of top coat in between each coat to prevent red getting too dark.
3. Check the depth using a toothpick. If required apply additional coats. More the coats, better would be the texture.
4. When the polish is 90% dry, use the toothpick to create the texture.
5. With the help of a thin nail art brush, draw a green curve on the cuticles, using FEVICRYL green acrylic paint.
Custard Apple Nail art tutorial by Alpsnailart
Looking at this nail art, could you guess how these custard apple nails were created? Find out below if you guessed it right wink emoticon
Products Used:
Base Coat, Green Nail Polish, Sesame Seeds
Acrylic paints: Green and White
Toothpick and Thin Nail art Brush
Steps:
1. Mix green and white acrylic colors and paint the sesame seeds.
2. Apply 2 coats of green polish over a base coat.
3. When the polish is still wet, start placing sesame seeds using toothpick. To get the bonding, make sure the painted sesame seeds are wet.
4. Continue adding sesame seeds (slightly overlapped).
5. For finishing, dab little fresh green polish over sesame seeds with a thin nail art brush.

Creative Grapes / Berry fruit nails tutorial using some day to day household items.
Products Used:
Base Coat, Purple Nail Polish, Mustard Seeds, Tooth Pick, Thin Nail art Brush
Steps:
1. Pour out a bit of purple polish onto a piece of tin foil, and then roll the mustard seeds with a toothpick.
2. Apply 2 coats of purple polish over a base coat.
3. When the polish is still wet, start placing mustard seeds using toothpick. To get the bonding, make sure the mustard seeds are semi wet.
4. Make a small bunch of seeds with toothpick and place it randomly on nails.
5. For finishing, dab little fresh purple polish over mustard seeds with a thin nail art brush.

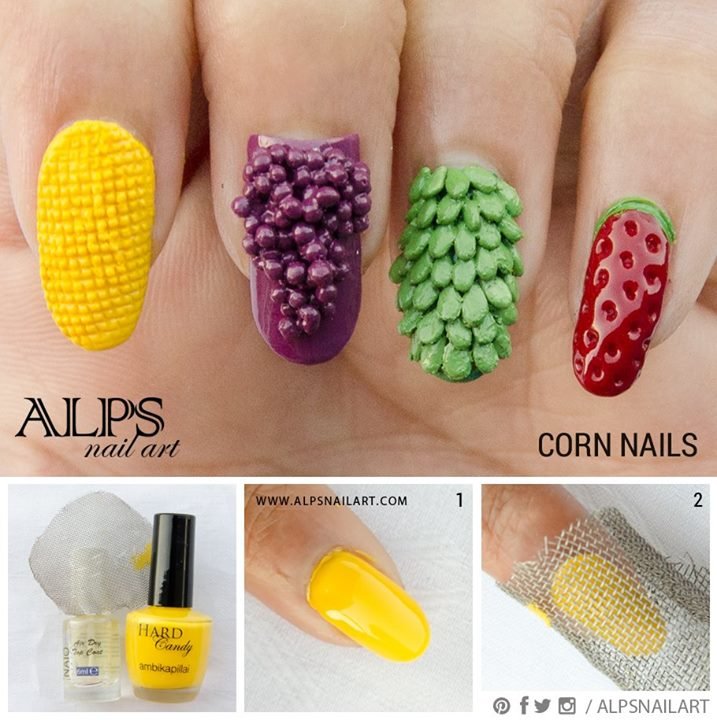
Next in the Fruit nail art tutorial series is Sweet Corn Nailart.
Products Used:
Yellow Nail Polish, Top Coat, and Metal Net or Tea strainer
Steps:
1. Paint multiple coats of yellow polish over a base coat to build up the required thickness. Apply a layer of top coat in between each coat to prevent yellow getting too dark.
2. When the polish is almost dry, press the metal net lightly over nails to imprint the grid and pick up immediately. Do not apply the top coat.
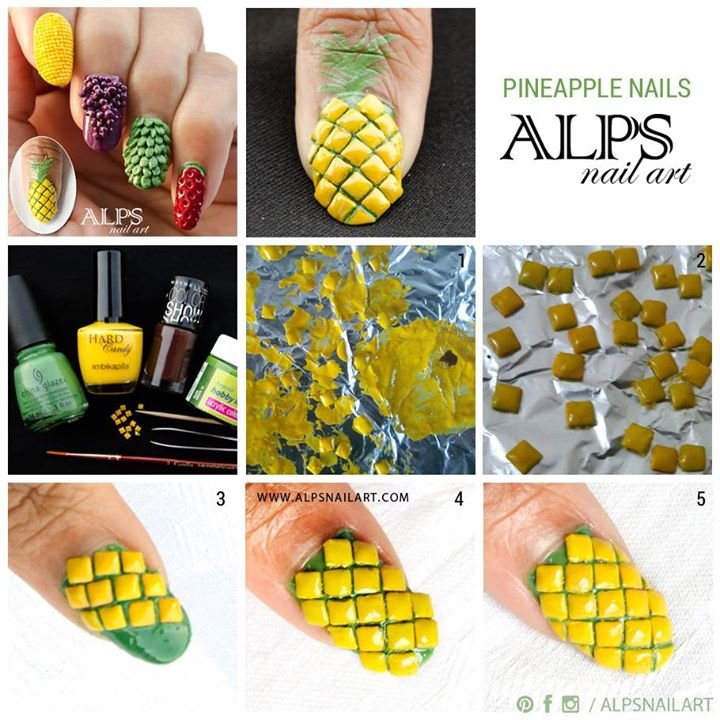
Pineapple nails tutorial
Products Used:
Yellow Polish, Green Polish, Brown Polish
Or Use Yellow, Green and brown acrylic paints.
Green Acrylic Paint for leaves
2mm Square Studs, Toothpick, Thin Nail art Brush, Tweezer
Steps:
1. If you don’t have the exact shade for the studs, mix yellow with little brown polish and paint the studs with brush.
2. Leave it to dry for some time.
3. Apply a coat of green nail polish over a base coat. When the polish is still wet, start placing studs using a tweezer.
4. You need to play around with the placements of the studs to cover the nail, depending on your nail size and shape.
5. If you don’t have triangular studs, cut the square studs half to get triangles for the sides and bottom.
6. Lastly, paint the leaves with green acrylic color using a thin nail art brush on cuticles and skin.
Courtesy: Alps P Ladwani