How to make black and white chevron skirt
This skirt is made of basically 16 panels of stripes, which I made in groups of two. For one inch finished stripes, cut your fabrics to 1.5″ by 10.”
My skirt required 5 of these pieces in black and five in white on one panel, but yours may require more or less, depending on skirt size. In total, my skirt (about a size 3) required 1.75 yards of each color.
(Sorry for the funky colors here, but I didn’t take a picture of this step originally.)
Use your cutting mat to lay out your stripes so that they extend 1″ to the right past the one beneath them. Sew all ten together, keeping them staggered this way when you pin. Repeat this step with ten more stripes, but these will extend 1″ to the left side as they go up, so you are left with two mirror images. Make sure you always start with the same color on the bottom.
Turn one of your panels so that the stripes point up and cut off the staggered edge. In this step, you are deciding on the angle of the chevrons throughout the skirt. Cut 6″ to the left on that panel so that the other side where the stripes point down is also evened up. (Again, if you are making a larger skirt, you might need to cut wider here, so use your pattern piece to get a feel for how big you need to cut things.)
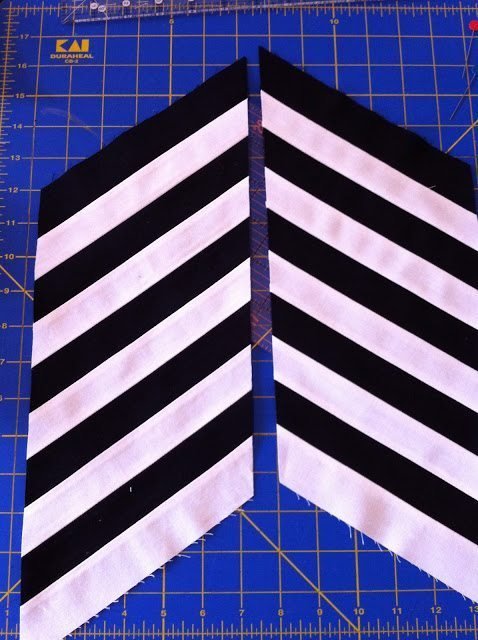
Now you are going to use that panel to cut the opposite one at the same angle. Flip the cut one onto the one that is still staggered so they are right sides together. Place them so the stripes and seams match up exactly on top of each other and cut to the same 6″ width with your ruler. Take the panels apart again and they should look just like the picture above.
Now match the centers right sides together again and sew. It helps to pin in every pressed open stripe seam so that all your points match. Take your time pinning.
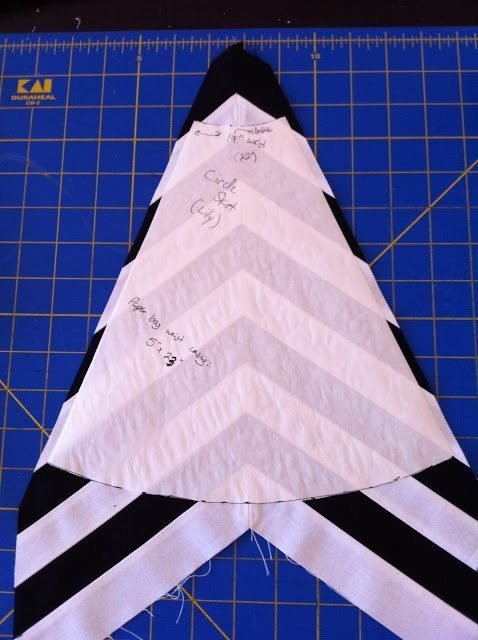
Now you have two stripe panels sewn together to make one chevron that points up. Take your circle skirt pattern piece and cut it exactly in half. The original is one fourth of the circle, but we need one eighth of the circle. Place it on your panel with the point of the chevron in the middle. You can see in the next picture that I tried to keep things even by placing the two lower corners right on corresponding seams. Now cut 1/4″ on either side of the pattern piece for seam allowance.
Now it looks like this. It’s important to cut the quarter inch on either side very accurately so that seam allowance is consistent. Do not cut along the top and bottom of the pattern piece, in fact you can put that aside now.
Hold on to this original chevron panel because now you will use this to cut 7 more. As you are making those 7, keep the angle consistent by folding this one right sides together again and cutting at the same angle as the stripes in the middle seam allowance.
The secret is to keep very consistent seam allowance as you piece stripes, and very consistent angles as you cut panels.
Now there are 8 panels ready to be sewn into the circle skirt. You can see that there appears to be a gap, but don’t worry. That will disappear in the seam allowance as you sew each panel together. Pin carefully again to match points and seams.
(Warning: This method produces lots of scraps!)
Next make a lining to hide all those seams out of your original pattern. (Tape it back together so that it’s one fourth of a circle again.) Center it over your chevron piece and use it as a pattern to cut off the excess in the middle and on the outside.
Now let’s put on the waistband. (Hopefully these pictures aren’t confusing since solid white fabric doesn’t have a wrong side and right side. I’ll try to explain clearly.)
First, figure out how big to cut your waistband piece. Measure the distance around the opening of your circle skirt (NOT the waist of your child) and add 1″ to that. Cut your piece to that length and 6″ width. My skirt opening was 22,” so I cut my piece 23″x 6.”
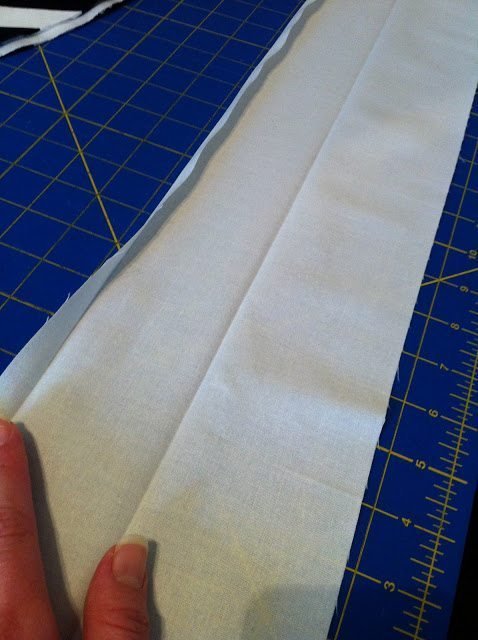
Fold one long edge to the WRONG side by 1/2″ and press to give it a good crease. Open that fold back up. Now sew the short ends RIGHT sides together with a 1/2″ seam allowance and press the seam open.
At this point I have basted the outside of the skirt to the lining at the waist opening with about a 1/4″ seam. Take your waistband piece and pin the RIGHT side to the WRONG side of the skirt, on the raw edge that you did not press the fold into. In my picture, you can see the short seam in the back there so you know that’s the wrong side of the waistband facing. Pin evenly all the way around and sew with a 1/2″ seam.
Turn the skirt inside out and press the waistband facing up. Even though this is the wrong side of the skirt body, you should be looking at the right side of the facing here, and that fold you originally made is on top.
Flip the skirt right side out again, and re-fold that first crease. Then bring that folded edge down on the outside of the skirt, just covering over your other line of stitching. Pin and edge stitch in place, leaving about 2″ open at the back where the short seam is.
Here is what the right side of the skirt looks like, with the opening.
Measure about 1.25″ up from the line you just stitched and sew another line all the way around. This forms the actual casing for 1″ wide elastic. But before you thread your elastic through the opening, topstitch one more time around the very top edge for a nice finish on that ruffle or “paper bag” waist. Insert the elastic that is the size of your child’s waist, plus 1.” Overlap the ends an inch and sew together, then close the opening.


