
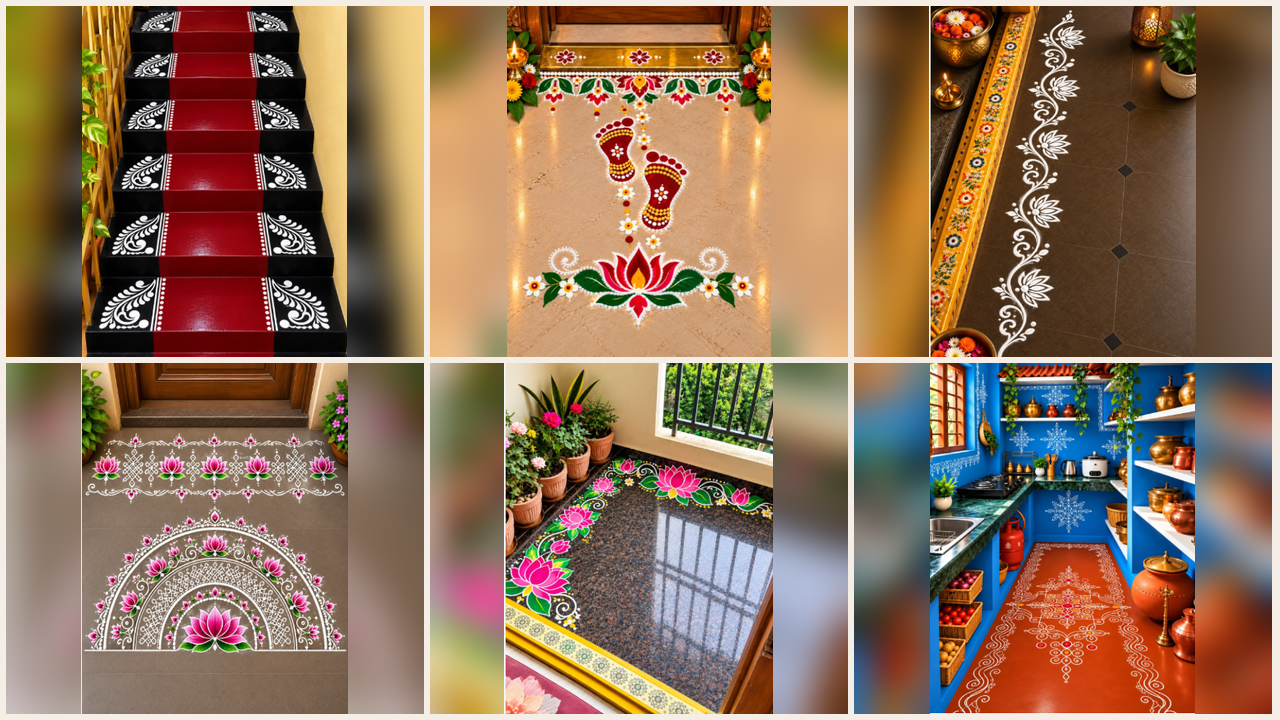
A beautiful rangoli design can make even a small doorway look festive. A row of pink lotus flowers, a few white curves on dark tiles or a colorful pattern near the entrance can change the entire feel of a space.
And you don’t always need a large floor. Some of the prettiest designs fit along a narrow threshold, beside a wall or around the corner of a balcony.
The 10 images here show different ways to use rangoli at home. You’ll find staircase patterns, traditional white motifs, colorful floral arrangements and detailed entrance decorations. Each design has something worth borrowing, whether it’s the color combination, spacing or shape.
I’ve kept the ideas practical so you can choose a pattern that suits your available space and the amount of detail you’re comfortable drawing.
1. Beautiful rangoli design for staircase decoration
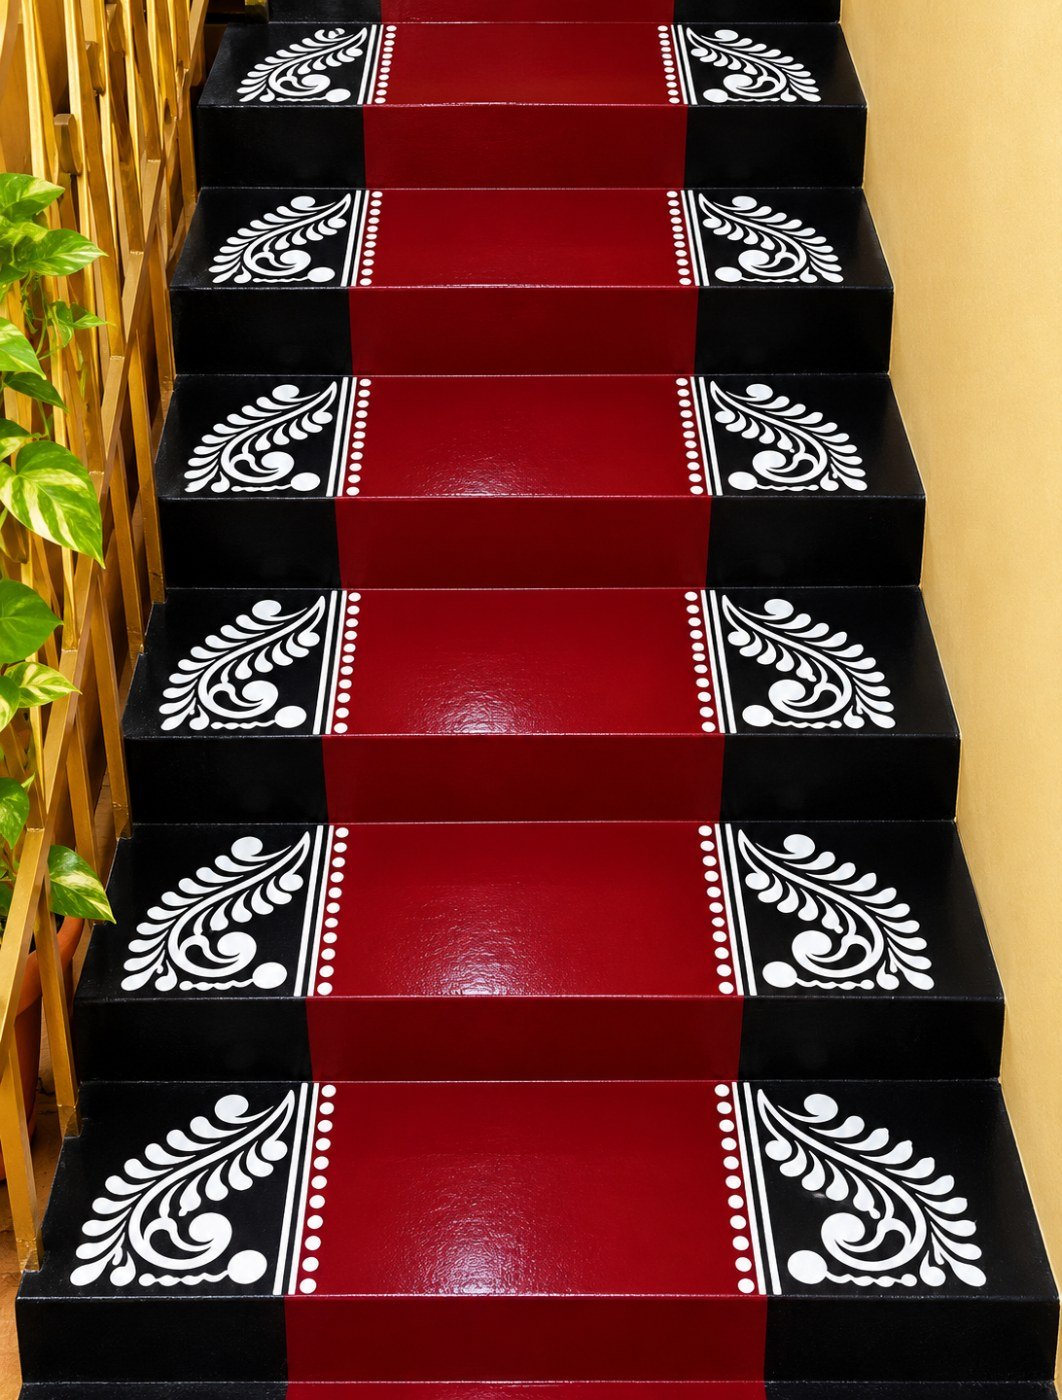
This staircase looks striking because of its bold color combination. A deep red strip runs through the middle of each step, with black sections on both sides. White decorative patterns fill the outer corners.
The white motifs resemble curved leaves or paisley shapes. Small dots and ornamental lines frame the red central section, giving the steps a tidy, repeated appearance.
What I like here is the consistency. Every step follows almost the same layout, so the entire staircase looks connected. The white designs also stand out sharply against the black background.
If you want a similar look, choose one corner motif and repeat it across the stairs. Keep its size consistent and reverse the design for the opposite corner. A simple guide or reusable stencil could help with spacing.
The exact decorating material isn’t clear from the photograph. For real stairs, I’d choose a non-slip decorative method that stays secure underfoot. Loose rangoli powder on steps can create a slipping hazard.
This idea suits a staircase where the decoration can follow the edges without obstructing the walking area.
2. Traditional white rangoli design with decorative footprints
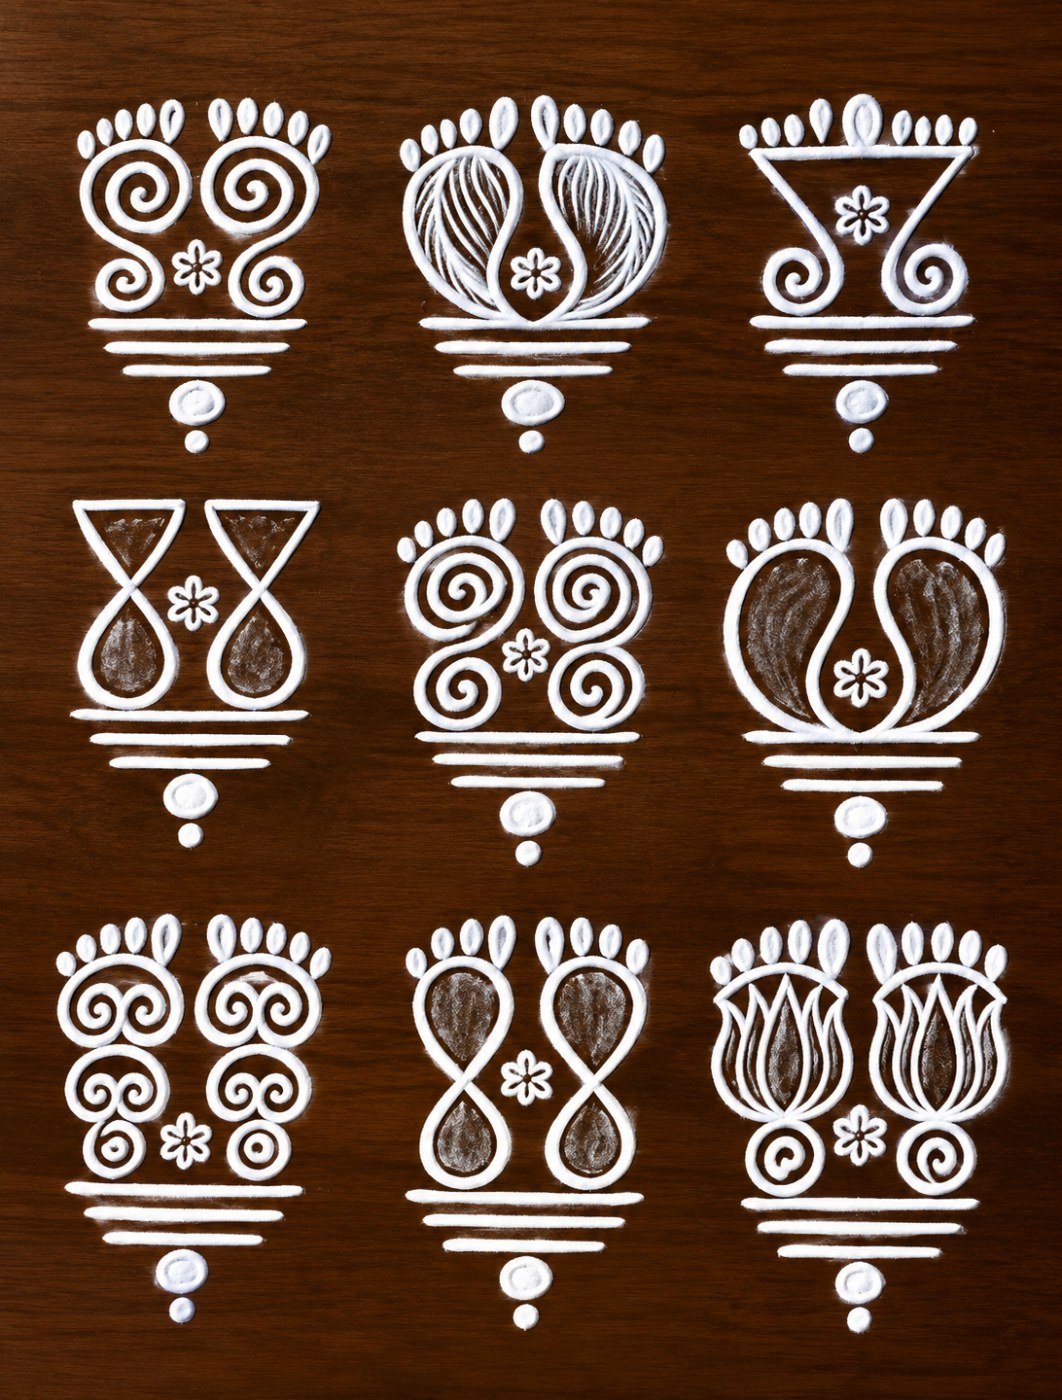
This image contains nine different white rangoli patterns arranged in a neat grid. Each design uses curved lines, tiny dots and paired shapes that resemble decorative footprints.
Several patterns have mirrored halves. The top-left motif includes spiral curls around small foot-like forms, while the center-left design has an hourglass-shaped outline. Other examples combine rounded shapes with short horizontal lines.
The dark brown background makes every white detail easy to see. It’s a useful collection if you want to practice traditional-looking rangoli motifs before attempting a larger floor decoration.
Start with one of the simpler symmetrical designs. Draw its central shape first, then copy the curves on the opposite side. Finish with the small dots and horizontal strokes.
You could use these motifs individually near an entrance or arrange several along a flat floor border. Their compact shape makes them suitable for areas where a larger floral design would take up too much room.
3. Easy lotus rangoli border design for a front door
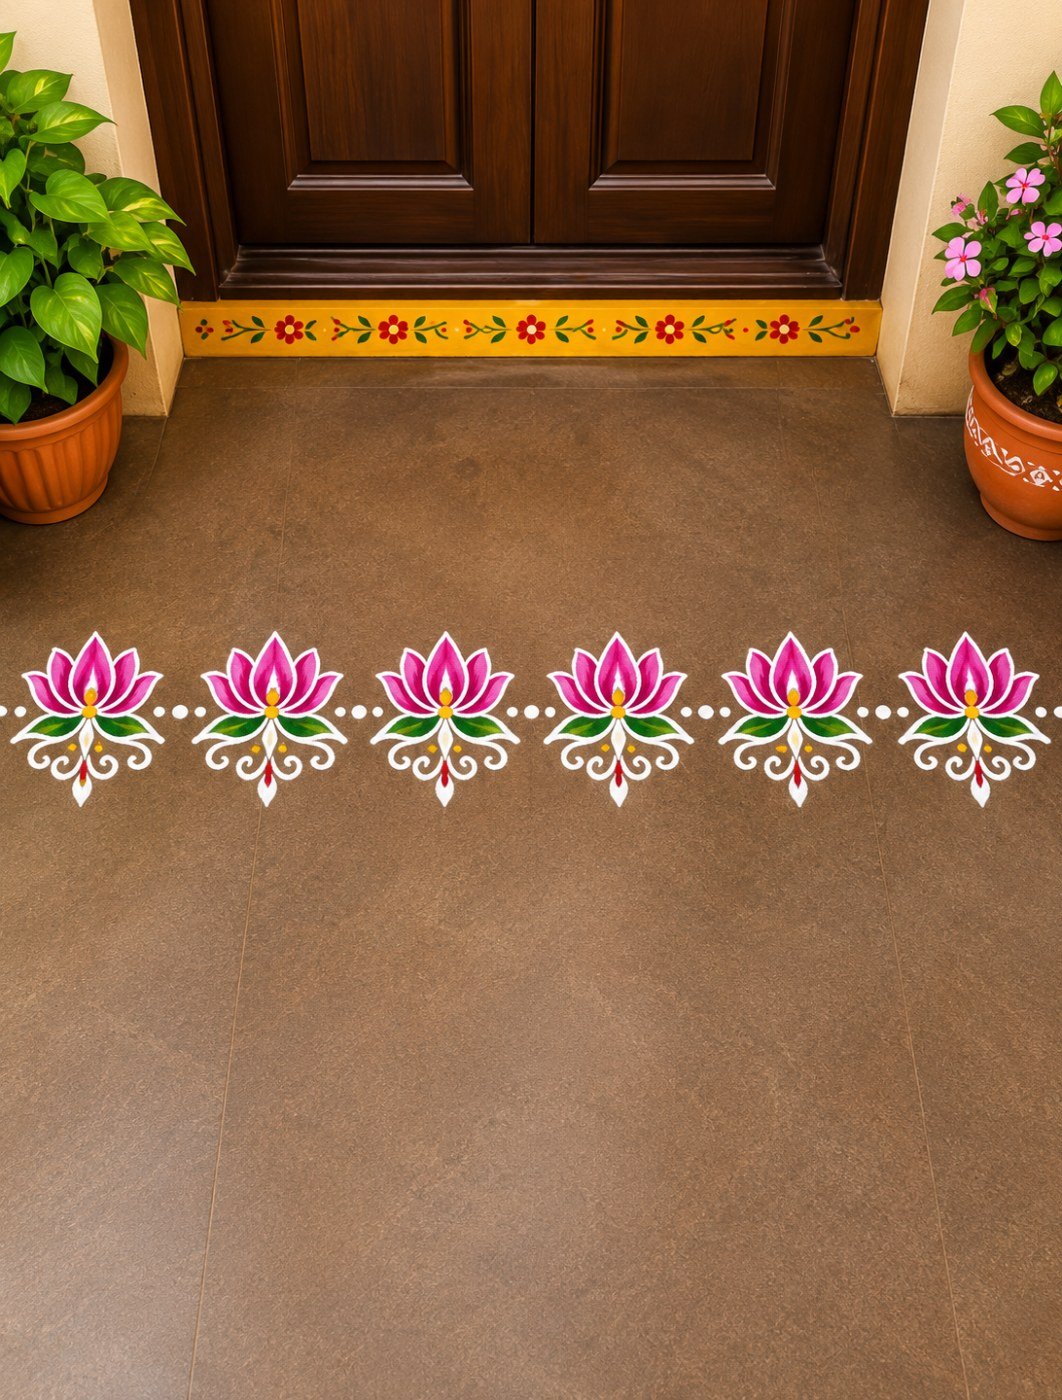
A straight row of six pink lotus flowers stretches across this doorway. Green leaves sit beneath the petals, while white curling lines connect the flowers into one continuous border.
The arrangement is narrow and balanced. There’s plenty of open floor in front of it, which makes this a useful reference for a small entrance.
Each lotus has pointed pink petals with a lighter center. The white outlines define the flowers, and small dots fill the spaces between the repeating shapes.
Above the rangoli is a decorative orange and yellow threshold strip. Potted plants stand beside the wooden door, adding more green to the setting.
To recreate the floral layout, mark six equally spaced points across your chosen area. Draw a lotus around each point, keeping the petals similar in size. Add the leaves, then connect the flowers with white scrollwork.
You can shorten the design by using four flowers or extend it for a wider doorway. The repeated pattern is easy to adjust once you’ve practiced one lotus.
I’d recommend this rangoli design for beginners who want a colorful entrance border with a clear, manageable shape.
4. Colorful rangoli design with lotus flowers and footprints
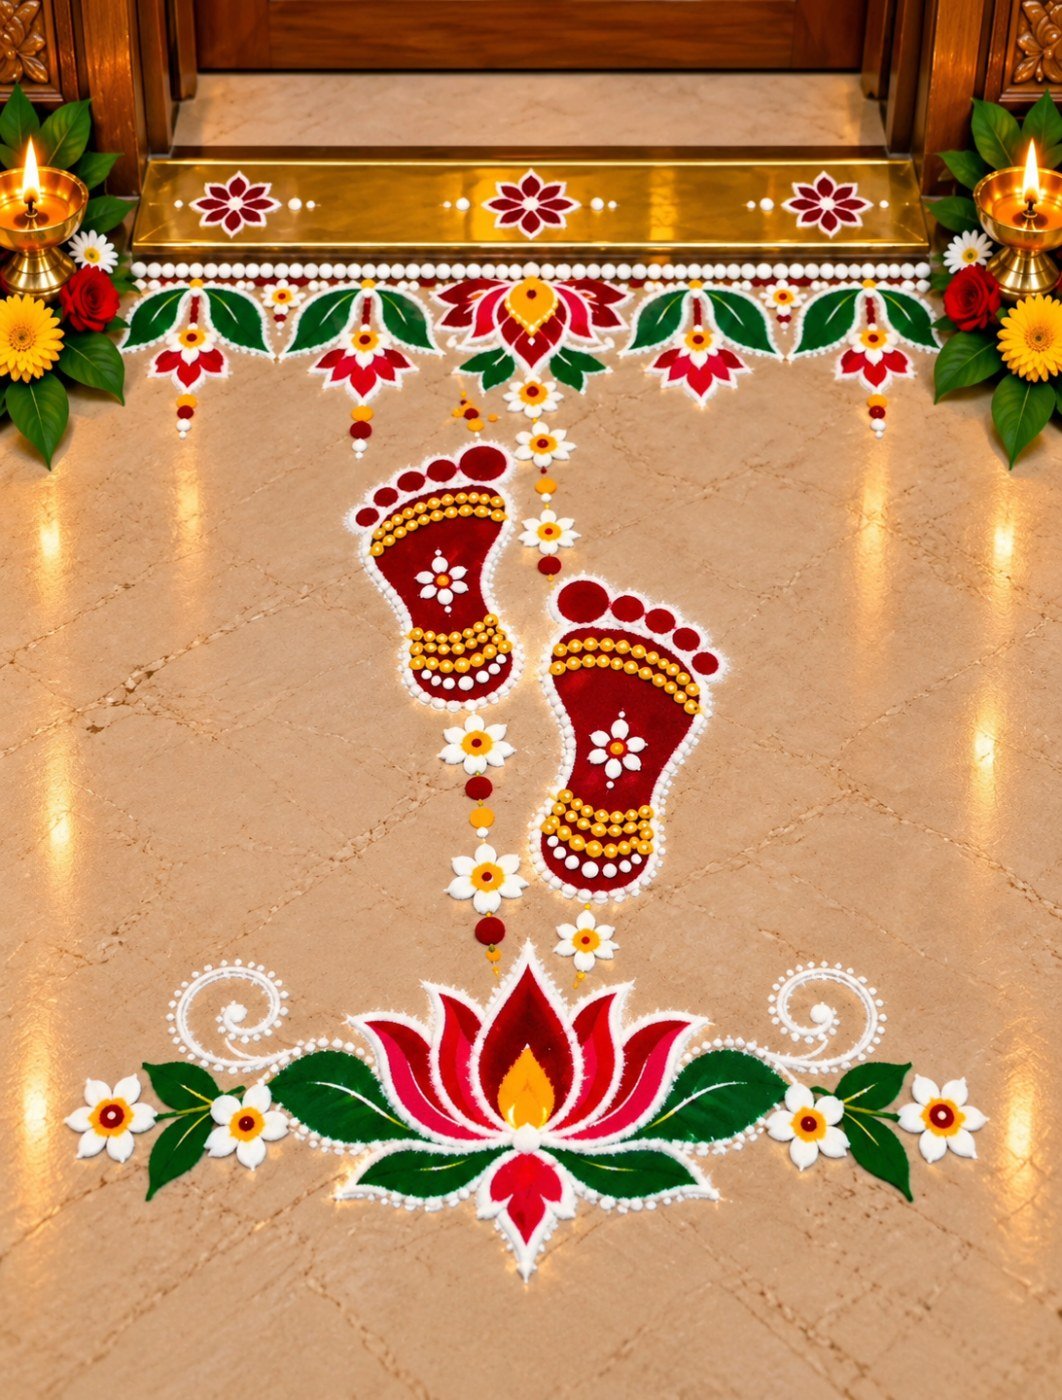
This entrance rangoli has a lovely sense of direction. A large red, yellow and green lotus sits near the bottom, while a pair of decorated red footprints leads toward the wooden door.
The footprints have tiny white details around their edges. A narrow chain of yellow, orange and white shapes runs between them, connecting the arrangement visually.
Near the threshold, a horizontal decorative border contains colorful floral and leaf-like motifs. Small red-and-white flowers decorate the raised step. Glowing lamps and potted flowers frame the doorway.
The layout is worth studying because each section has a distinct shape. The large lotus creates a strong starting point, the footprints occupy the middle, and the threshold border finishes the design.
For a similar arrangement, position the lotus first. Mark a central path toward the entrance and place the footprints along it. Draw the doorway border last so you can adjust its width to the available space.
Red is the dominant color, supported by yellow and green details. The white outlining makes the individual sections easy to distinguish.
This is a good choice for a festive entrance where you have enough room to create a longer floor composition. If you’re adding real oil lamps, place them securely away from walking paths and loose decorations.
5. Simple white lotus rangoli design for a long floor border
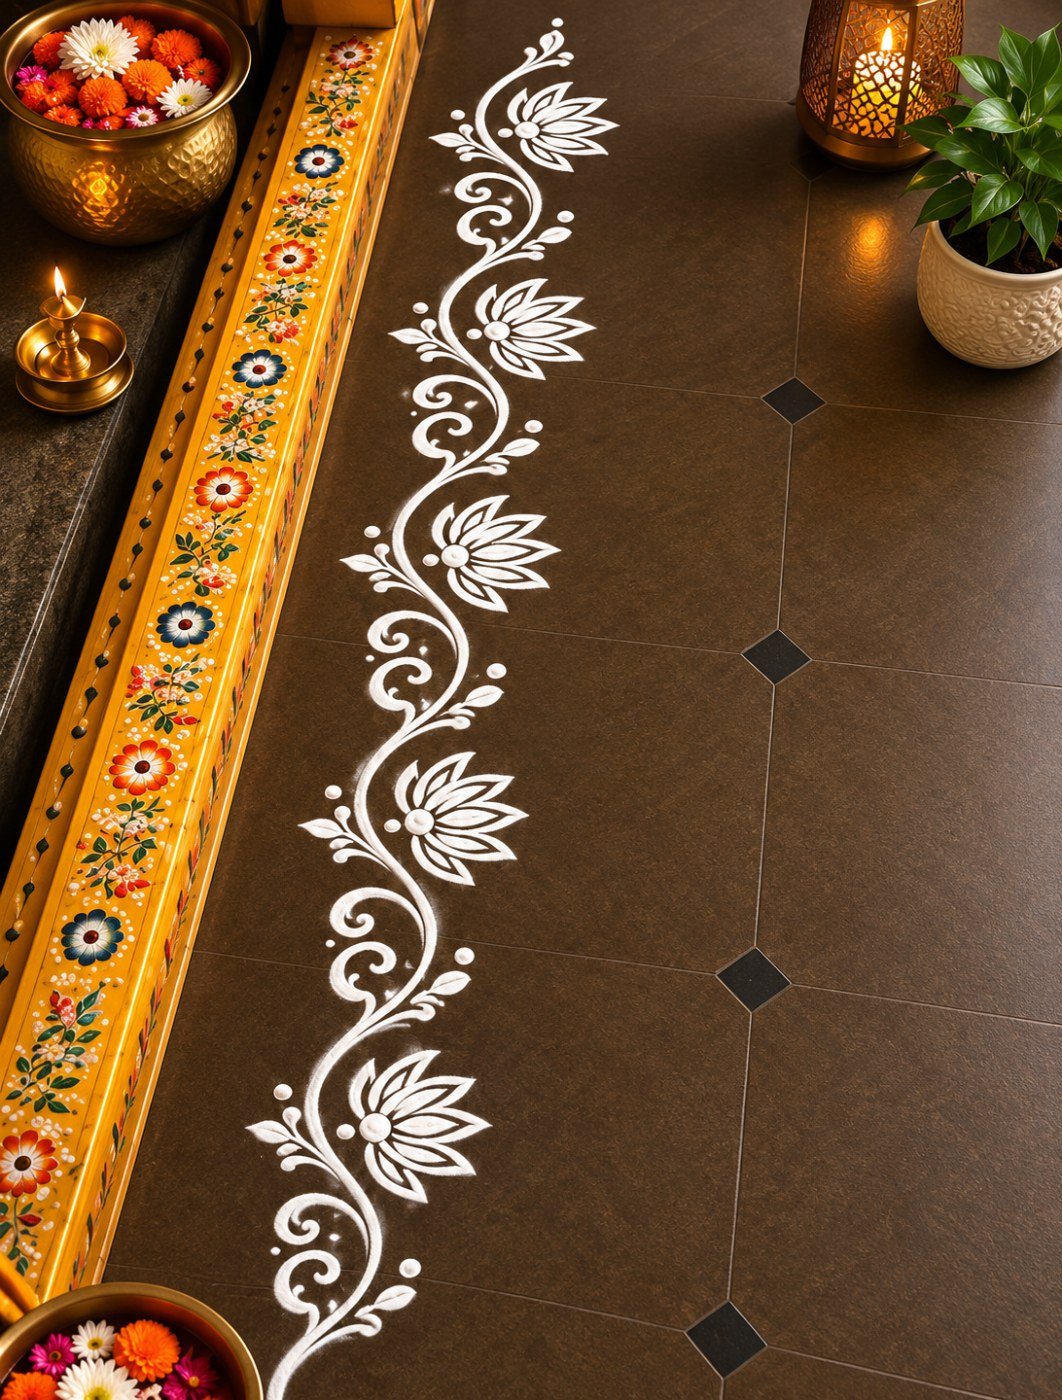
This design follows the length of a dark tiled floor. White lotus flowers appear at regular intervals, connected by flowing curls and leaf-like shapes.
Beside the white pattern is a narrow orange and yellow decorative strip with small colorful flowers. The two borders run parallel, creating a pleasant contrast between the detailed white line work and the bright floral band.
The repeated lotus motifs have pointed petals and swirling stems. Their spacing keeps the arrangement readable, even though the overall pattern is fairly detailed.
To create something similar, draw a long guide along the floor edge. Mark the places where each lotus will sit, then work from one end to the other. Once the flowers are complete, add the connecting curls.
You can keep the design entirely white for a cleaner look or add a separate colored strip like the one shown here.
This style is especially useful for a hallway, entrance passage or narrow area beside a wall. Its long shape follows the floor without covering the central walking space.
I like this idea for dark tiles because the white flowers remain clearly visible from a distance.
6. Grand semicircle rangoli design with pink lotus flowers
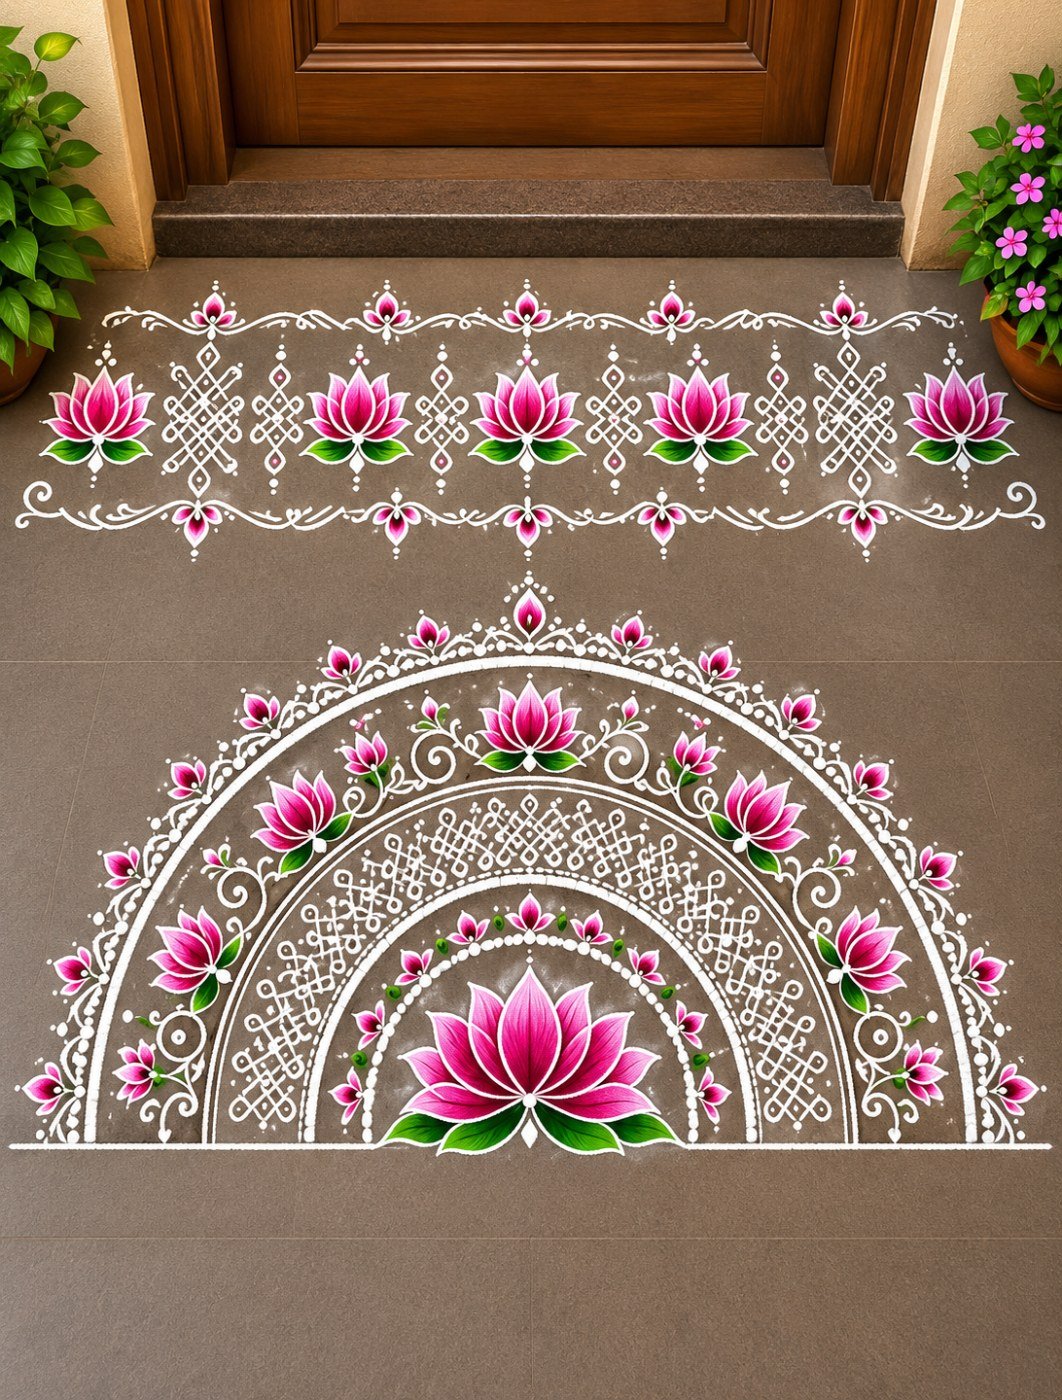
This is one of the most detailed rangoli designs in the collection. A large semicircular arrangement spreads outward from the entrance, filled with fine white patterns and pink lotus flowers.
A straight lotus border runs across the upper section. Below it, several curved bands form layered arches. Tiny white dots, loops and floral shapes fill the spaces between the curves.
Pink lotus flowers appear at different positions along the semicircle. The largest flower sits near the lower center, creating a strong focal point.
The semicircular shape works well at a wide doorway because its straight edge follows the entrance while the rounded section extends into the available floor area.
If you want to try this rangoli, begin with the outer semicircle. Add smaller curved guidelines inside it, leaving fairly even gaps between the bands. Position the lotus flowers before filling the remaining areas with fine white details.
Take extra care with the spacing. The small ornamental patterns can become crowded if the curved bands sit too close together.
This design would suit a special occasion when you have time to work on a larger arrangement. Choose a broad, level floor and keep enough room for people to enter comfortably.
7. Five easy rangoli border designs with colorful flowers
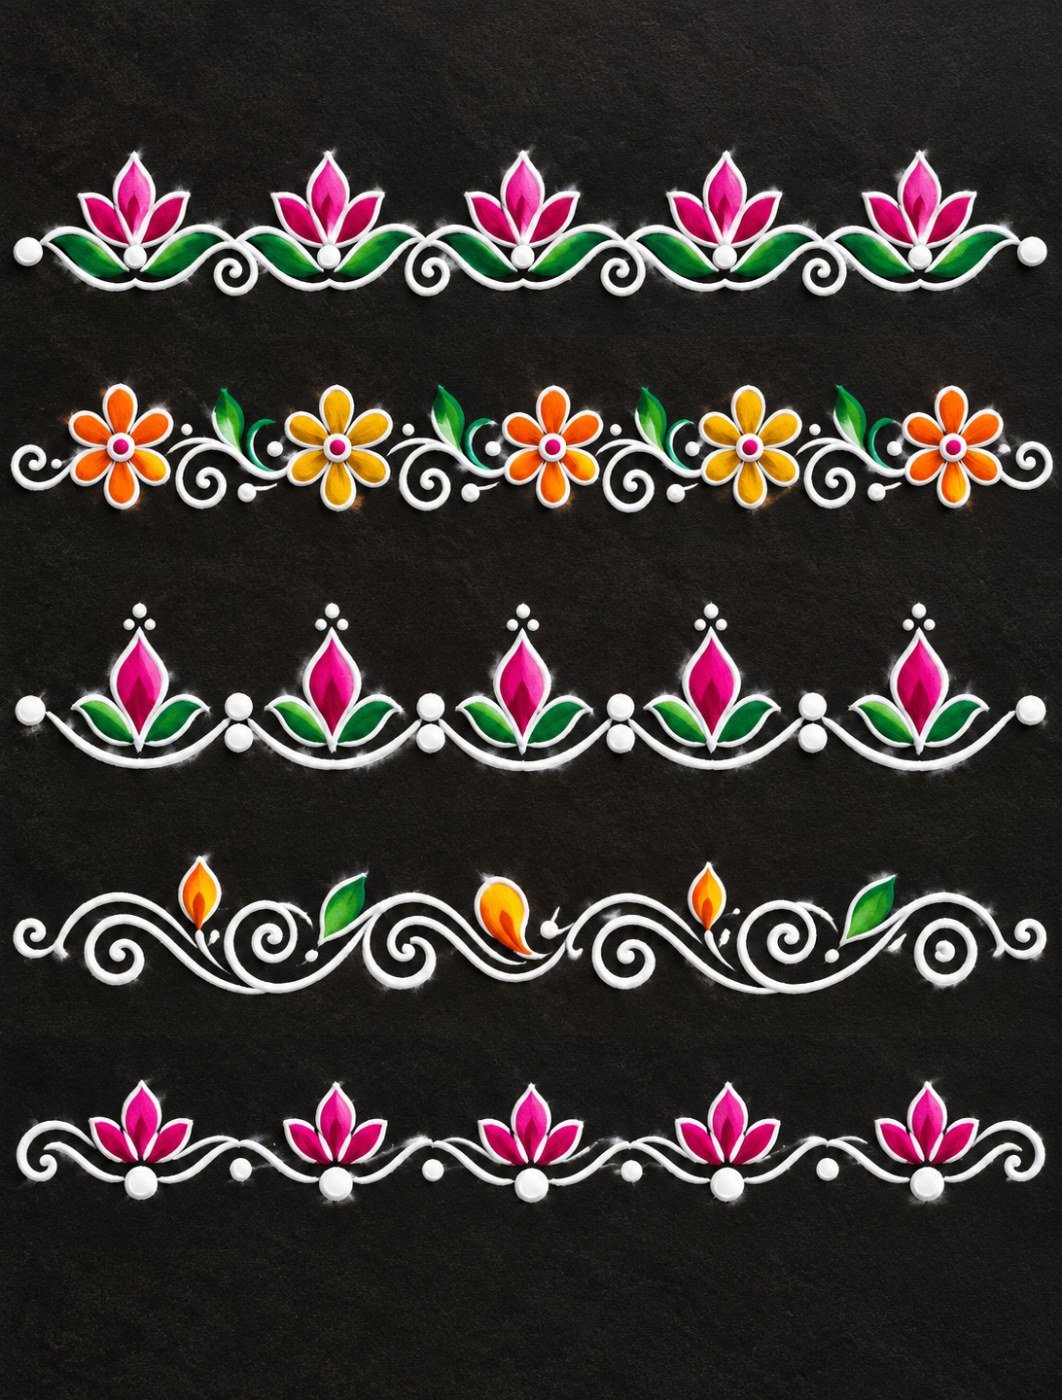
This image gives you five different horizontal border ideas in one place. Each row repeats a small floral motif, connected by white decorative lines.
The first row uses pink lotus buds with green leaves. The second has orange and yellow flowers linked by rounded white curls. The third contains smaller pink lotus motifs, with white dots between them.
The fourth border has flowing white vine-like shapes and small orange and yellow accents. The bottom row uses pink buds arranged closely along a continuous white curve.
These patterns are useful because you can adjust their length without changing the basic design. Draw the first motif, repeat it at regular intervals and connect the shapes.
For beginners, I’d choose the bottom row. Its flowers are compact, and the curved line gives you a clear guide for placing each bud.
The orange floral row is a nice option if you prefer warmer colors. The white vine pattern could suit a simpler decoration along dark tiles.
Use these designs across a doorstep, beside a wall or along the edge of a larger rangoli. Practice one repeating section before drawing the complete border.
8. Beautiful corner rangoli design for a balcony or veranda
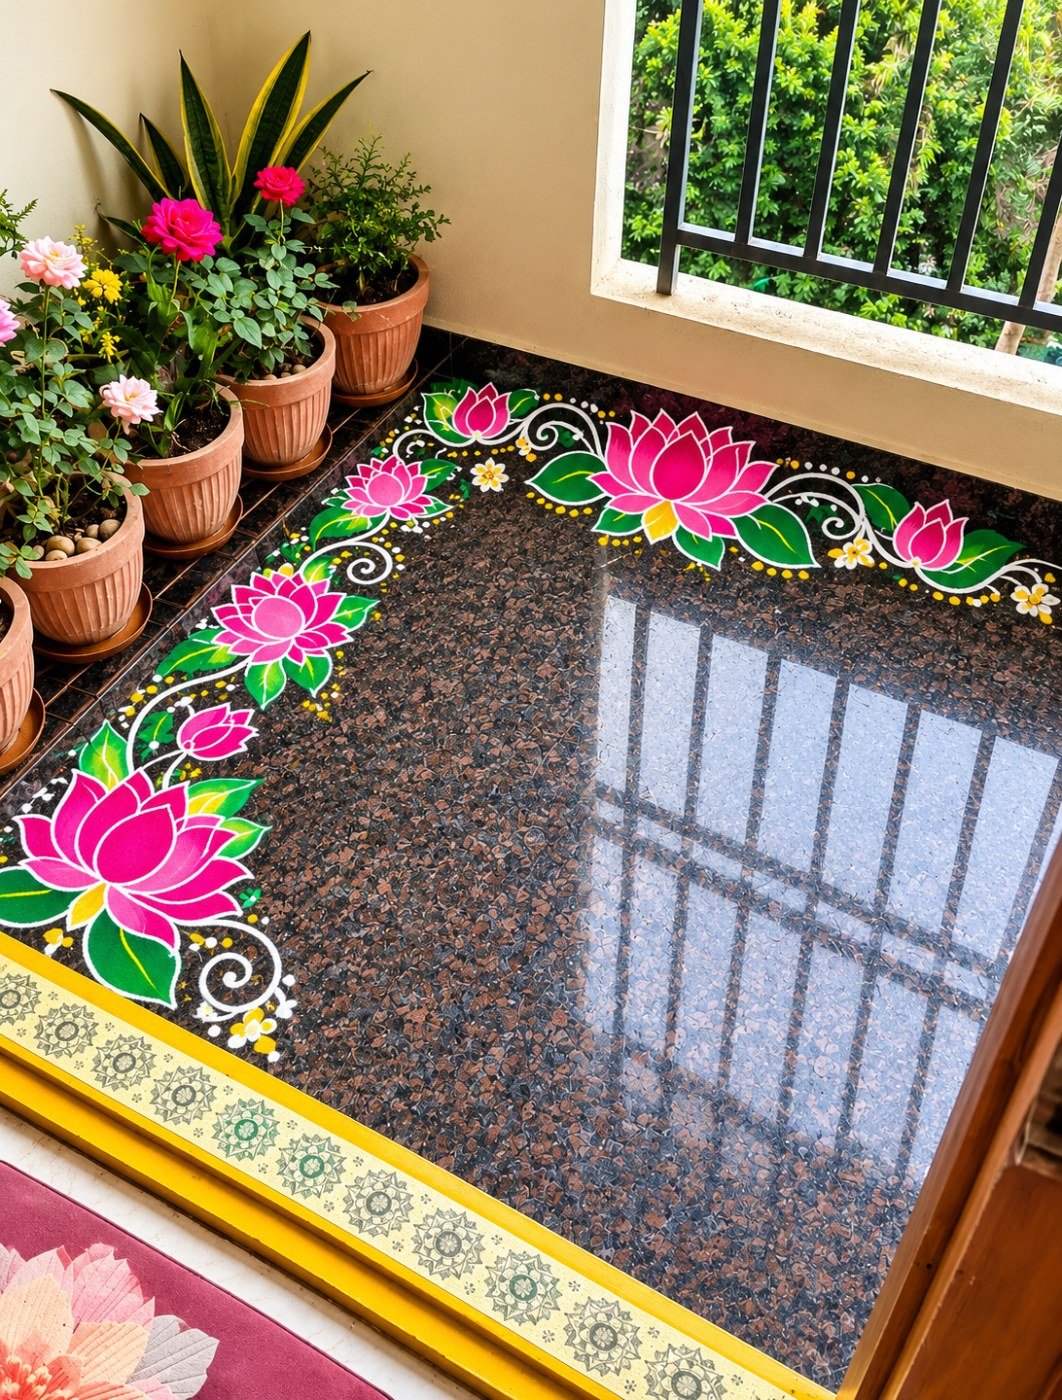
This floral rangoli follows the corner of a glossy dark floor. Pink lotus flowers and green leaves form an L-shaped border, with white curls filling the spaces between the flowers.
The arrangement fits the room beautifully. One section runs along the wall, then turns around the corner and continues beside the plants.
Several large lotus flowers anchor the pattern. Smaller pink buds fill the gaps, while thin white scrolls keep the floral sections connected.
The surrounding space has potted plants and a window with black vertical bars. Their reflections are visible on the polished floor, making the setting feel bright.
If you’re planning a corner rangoli design, begin by marking the two edges you want to follow. Place a large flower near the corner, then add smaller flowers along each side. Use white curls to connect the individual motifs.
Keep the border width reasonably consistent as it turns the corner. That small detail helps the finished arrangement look balanced.
I particularly like this layout for a balcony or covered veranda. It leaves the middle of the floor open and gives an otherwise plain corner a decorative finish.
On polished surfaces, make sure the decoration doesn’t leave the floor slippery, especially where rainwater might reach it.
9. Small vertical rangoli design ideas for narrow floor spaces
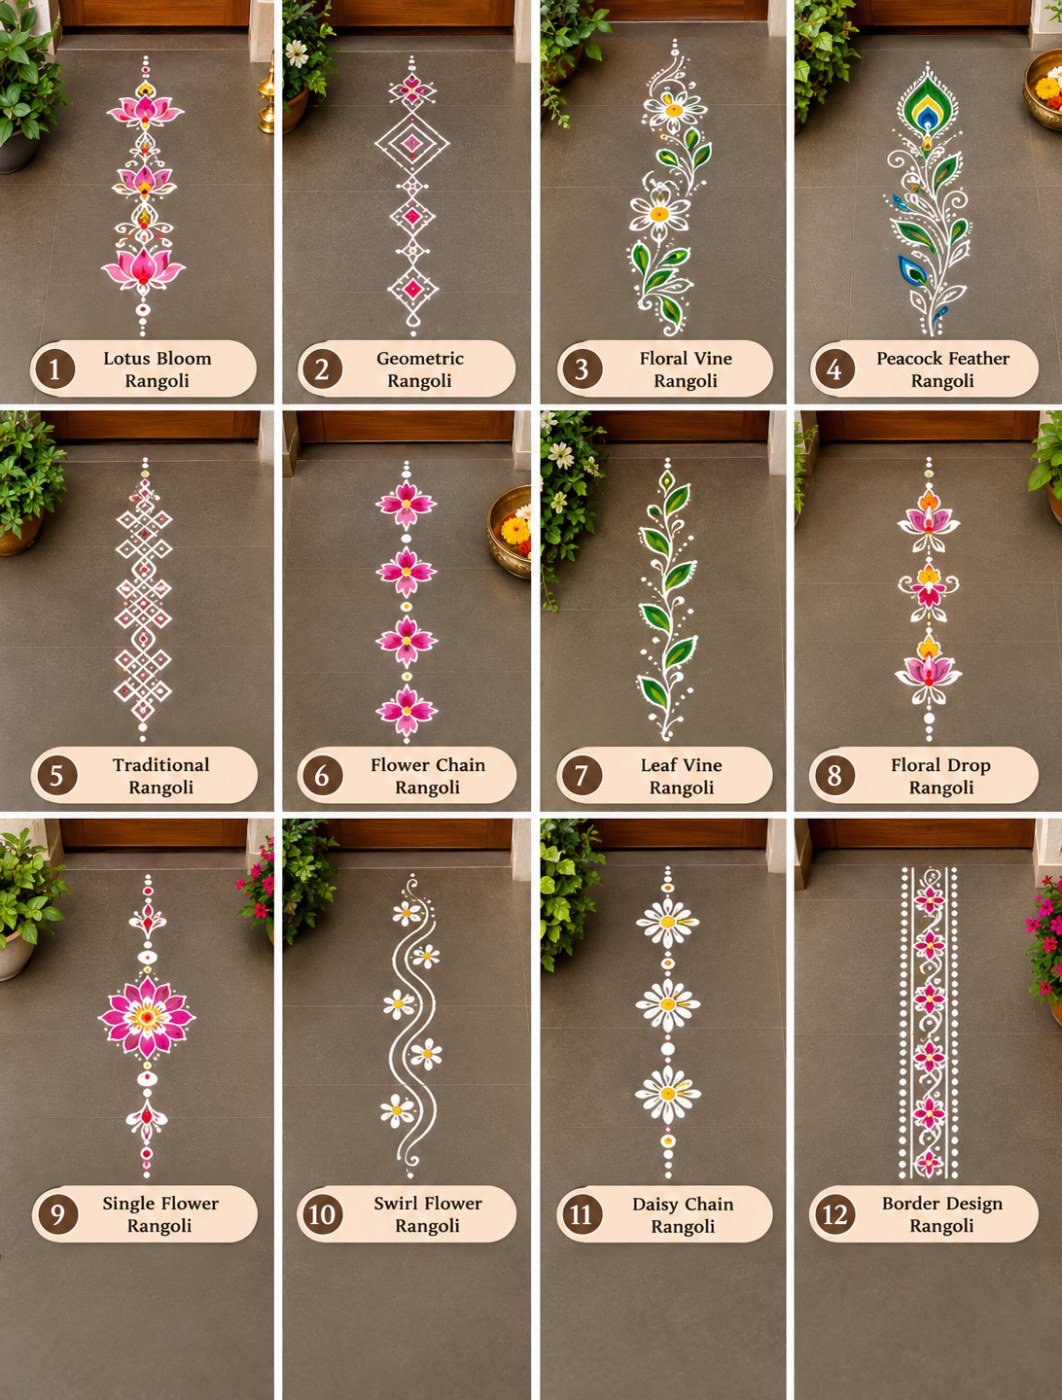
This image contains twelve vertical rangoli designs arranged in a three-row grid. Each example has a narrow shape built around a central line.
Some patterns use small flowers stacked one above another. Others combine diamonds, loops, pointed leaves and decorative dots. Several look like hanging floral ornaments because of their long, slender proportions.
The colors include pink, green, orange, yellow and white. Most examples rely on white outlines, with colored floral details placed at intervals.
The biggest advantage of these designs is their narrow shape. They’re useful references when you want a decorative pattern that extends along a floor rather than spreading outward.
For a geometric version, mark a central line and place the main diamond shapes along it. Connect them with fine curves, then add small dots and colored accents.
For a floral arrangement, draw the larger flowers first and connect them with smaller leaves and white strokes. Keep the shapes centered so the final pattern looks balanced.
The labels in this collage are too small to read confidently, but the decorative shapes are visible. You can choose a design based on its proportions and level of detail.
These ideas could work beside a doorway, along a narrow passage or as individual decorative strips.
10. Traditional white rangoli design for a colorful kitchen floor
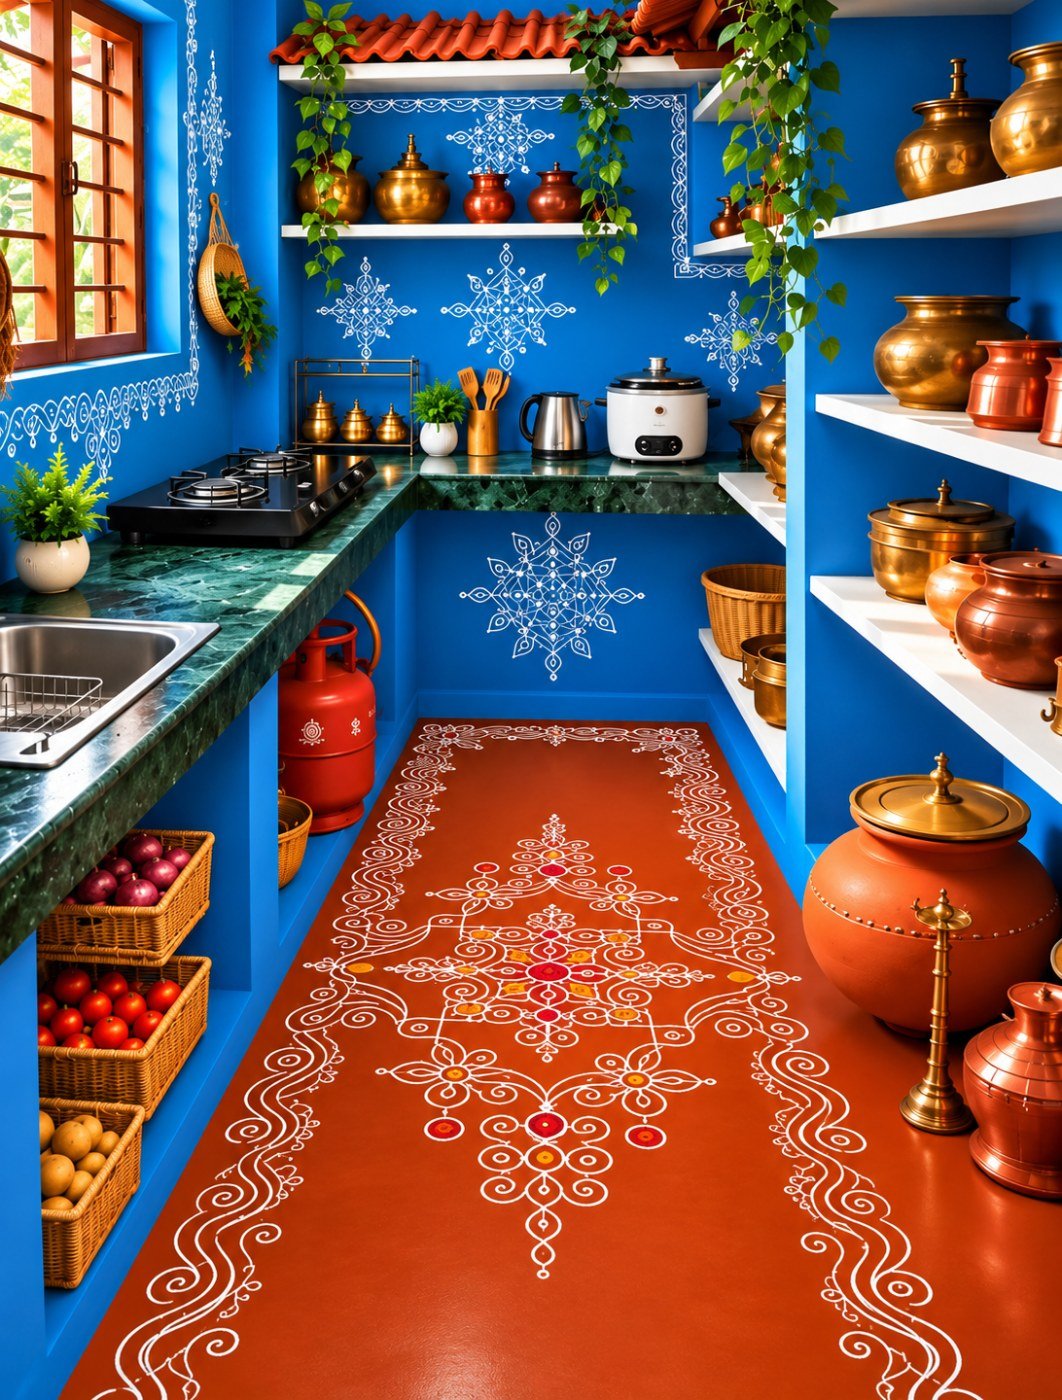
The final image shows a long white rangoli arrangement on a reddish-orange kitchen floor. Bright blue walls and cabinets surround the space, with green stone-looking countertops and shelves holding copper-colored vessels.
The rangoli runs along the central passage. White ornamental lines form a decorative border near one side, while the middle contains a sequence of symmetrical floral and geometric motifs.
Small circles, loops, pointed petals and curved lines give the central pattern its traditional appearance. The white decoration stands out clearly against the warm floor color.
The narrow layout follows the shape of the kitchen. It also connects visually with smaller white ornamental decorations visible on the blue surfaces.
To create a similar arrangement, mark a central guideline along the floor. Draw the largest symmetrical motifs first, leaving space for smaller loops and decorative dots between them.
A separate side border can complete the composition. Keep its repeated curves similar in size so the line looks continuous.
For an actual kitchen, I’d keep this type of decoration away from wet areas and the main cooking route. A secure, non-slip decorative method is the safer choice for a frequently used floor.
The photo is a lovely example of how a long rangoli pattern can fit the proportions of a room, especially when the floor already has a strong contrasting color.
Conclusion
The best rangoli design for your home depends on the space you have. A simple lotus border fits a narrow doorway, a semicircular design suits a wider entrance, and a corner arrangement works beautifully beside plants or a balcony wall.
If you’re just starting, try the lotus border in image 3 or one of the floral rows in image 7. Practice a single motif, repeat it with even spacing and build the pattern gradually. A clean surface and careful placement will help your finished rangoli look neat while keeping the walking area safe.







Leave a comment