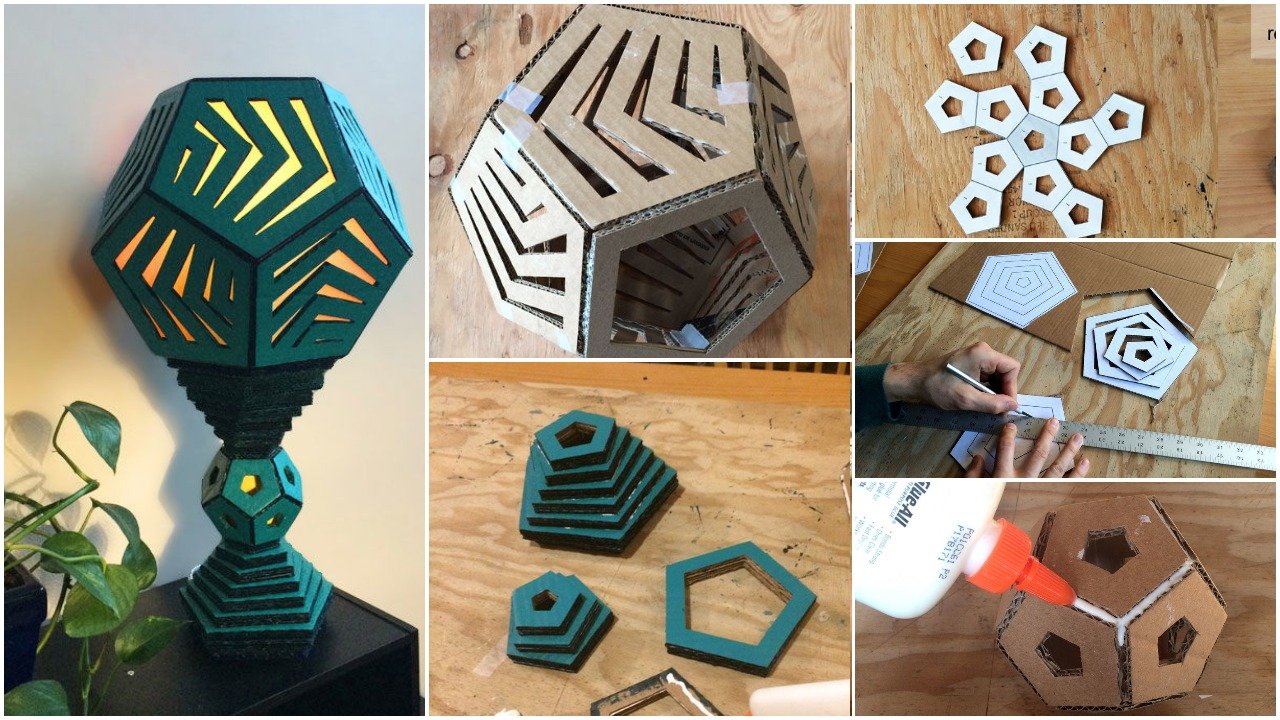
Use some scrap cardboard and a few easy to find supplies to create a decorative, geometric table lamp made of pentagons and dodecahedrons. Add a color changing the LED bulb for a relaxing mood or nightlight.

Step 1: Gather Your Tools and Supplies
SUPPLIES
1 Paperboard Box (canned soda or beer box)
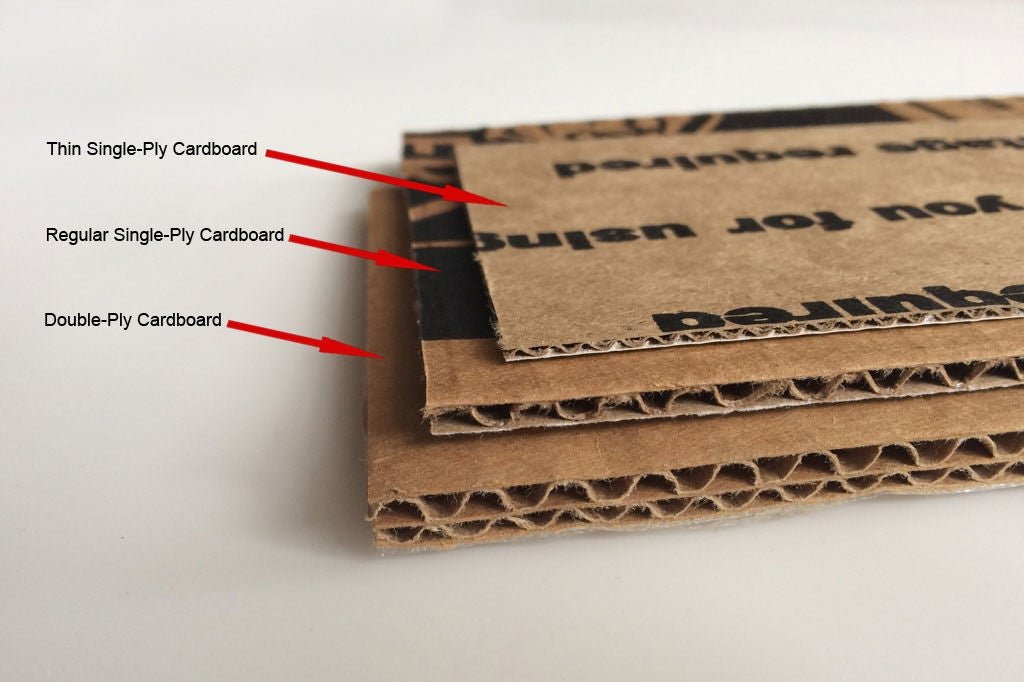
1 Thin Single-Ply Corrugated Cardboard Box (small shipping boxes, Amazon and USPS, for example)
1-2 Double-Ply Corrugated Cardboard Boxes (heavy moving boxes or appliance boxes)
2-4 Regular Single Ply Boxes (medium size shipping boxes)
10 Sheets Tracing Paper or Vellum (or any convenient translucent material)
4 Bottles Clear Drying Craft Glue
2 Glue sticks
Acrylic Paint
1 Extension or Lamp Cord (18 gauge)
1, 6-Inch-Long, 3/8” Threaded Lamp Pipe (sold in lighting departments of hardware stores)
2, 3/8” Nuts (sold alongside the threaded pipe)
1 Inline, 18 Gauge, On/Off Switch (also found in the lighting department)
2, 3/8” Fender Washers
1 Light Socket with a 3/8” Screw Mount on the Bottom (I used a switchless brass socket, but a plastic socket with a switch will work as well)
Scrap Printer Paper (it should have one clean side)
Masking Tape (I used scotch tape, but masking tape would be easier to remove)
Small plastic bag
1-2 lbs Gravel, Sand, or Dried Beans
15 Bamboo Skewers
TOOLS
Cutting Mat or Board (I used a scrap of plywood)
Metal Ruler
X-ACTO Knife
2-3 Extra X-ACTO Knife Blades
Scissors
Popsicle Stick (for spreading glue)
Drill
3/8” Drill Bit
Phillips Head Screwdriver
Wire Strippers
Wire Cutter
2 Adjustable or 9/16” Wrenches
Small Acrylic Paint Brush, Cup of Water, and Pallet
4-5 Heavy Books (to use as weights)
Computer and Printer
Fine Point Marker  Template Print List
8 copies -Base_1.jpg
13 copies –Base_2.jpg
2 copies –Base_3.jpg
4 copies –Base_4.jpg
1 copy -Dodecahedron_1.jpg
1 copy -Dodecahedron_1.jpg
1 copy –Electric_1.jpg
11 copies –Shade_1.jpg
1 copy –Shade_2.jpg
10 copies –Shade_3.jpg (print this template on tracing paper)
Tip: Use scrap paper. It only needs to be clean on one side.
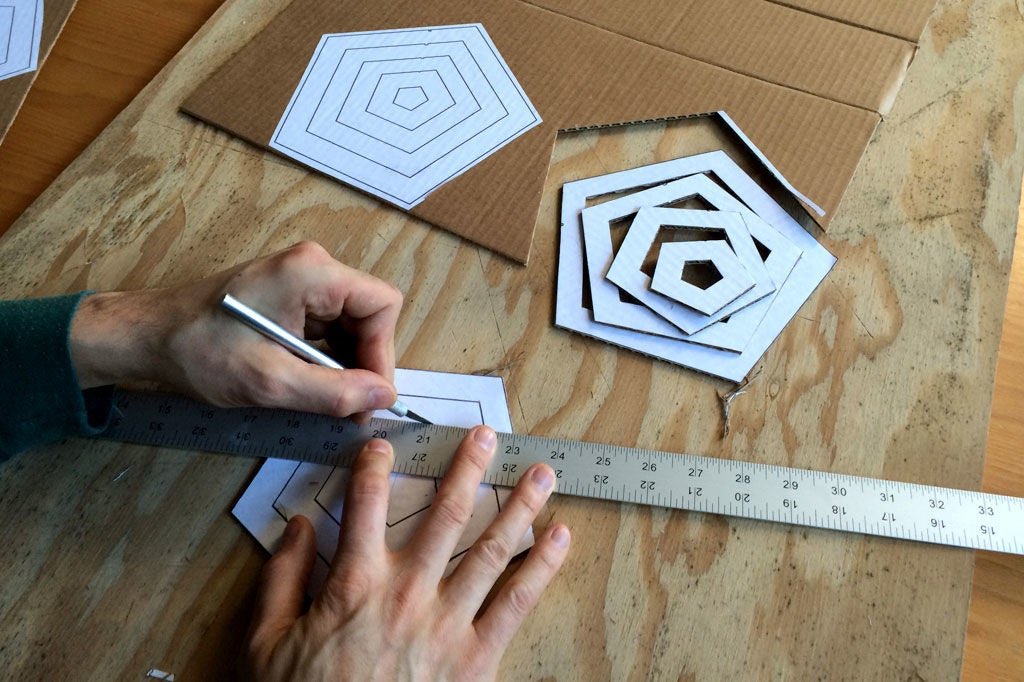
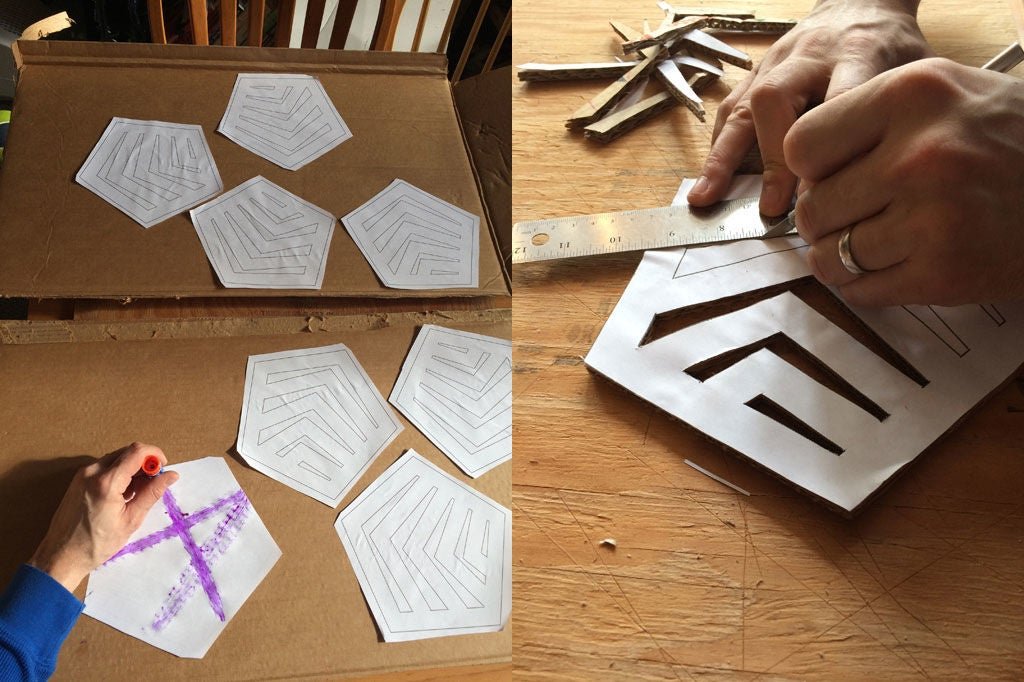
Step 3: Lamp Base – Stage 1
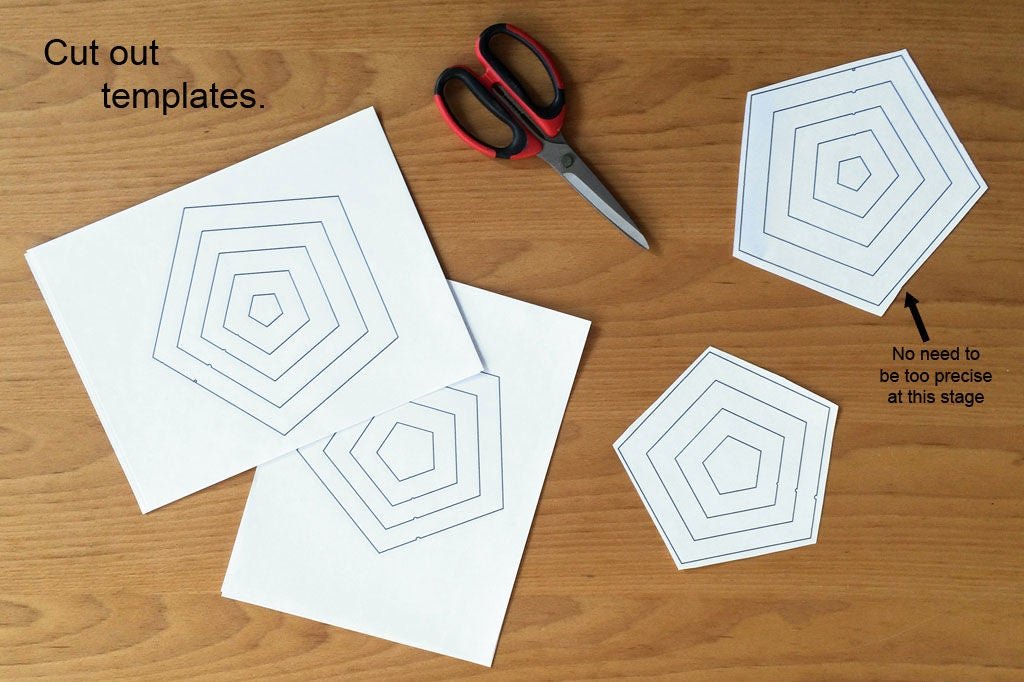
Trim out the largest pentagons from all copies of templates Base 1, Base 2, Base 3, and Base 4. You can cut stacks of 3-4 sheets at once.
Step 4: Lamp Base – Stage 2
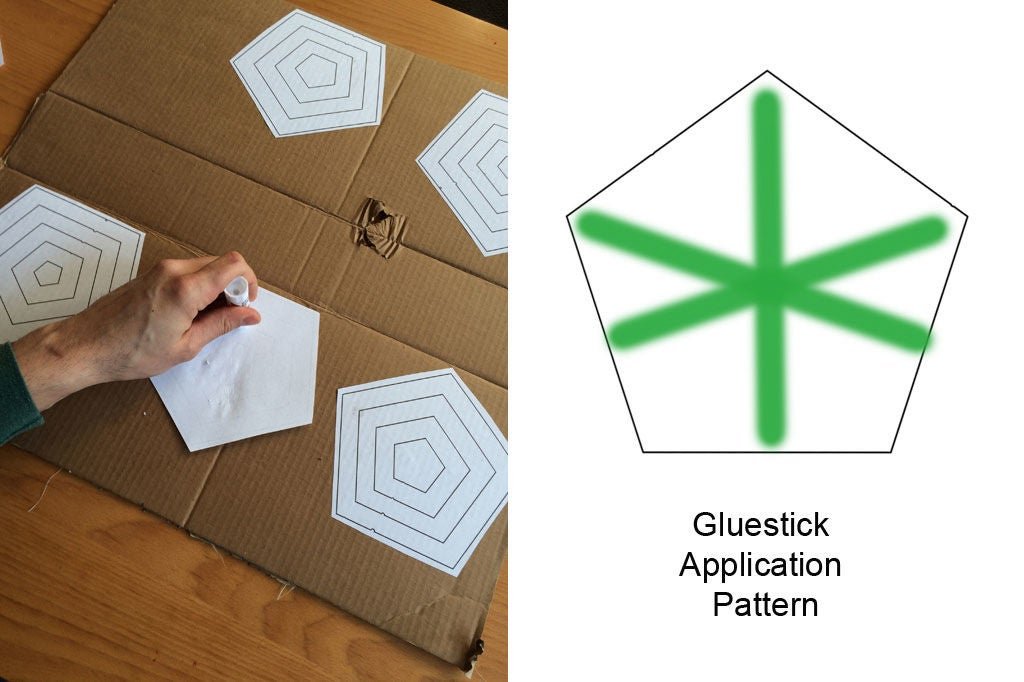
Tack the pentagons to regular single-ply cardboard. Follow the pictured glue application pattern. Do not cover the backs of the templates in glue because they will need to be removed later. Avoid dirty, crushed, or creased areas of the cardboard.
Step 5: Lamp Base – Stage 3
Use an X-ACTO knife and metal edged ruler to cutout all the concentric pentagons except for one of the Base 2 templates. Cut off the outer edges of this final template, but none of its inner pentagons. This piece will be the solid bottom of the lamp.
Step 6: Lamp Base – Stage 4
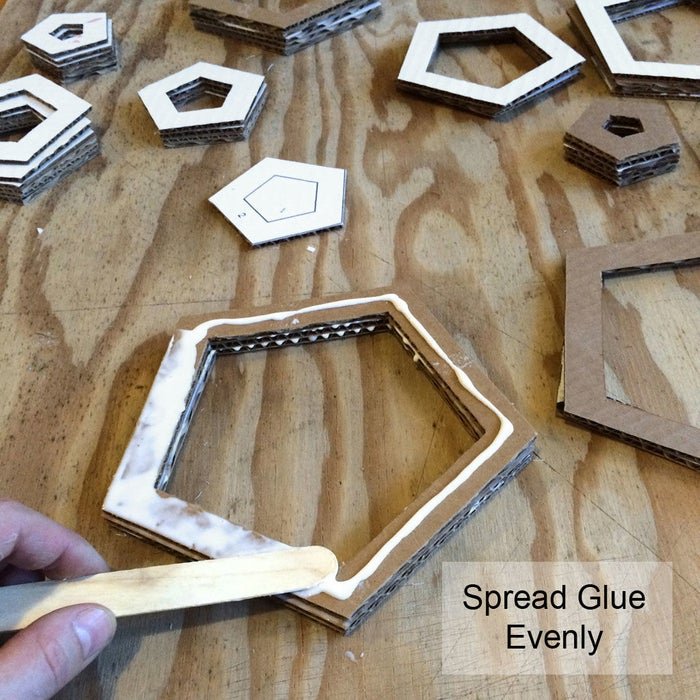
Remove the template paper from the pentagons and sort them into like sizes. Glue the pentagons into stacks of 4. Use a Popsicle stick to spread the glue evenly over the entire surface of each pentagon. Carefully align each stack before the glue dries and arrange them under 2-3 heavy books to insure good contact between the layers.
You will need:
2 stacks of sizes #7,#6, #5, #3, #2,and #1
3 stacks of sizes #4
1 stack of Base 3 templates
1 stack of Base 4 templates
Step 7: Lamp Base – Stage 5

Cut away the light grey area of the Dodecahedron 1 template. Arrange the Dodecahedron 1 and Dodecahedron 2 templates in a pinwheel pattern as shown in the diagram on the Dodecahedron 1 template. Use a glue stick to glue the two grey pentagons together.
Step 8: Lamp Base – Stage 6
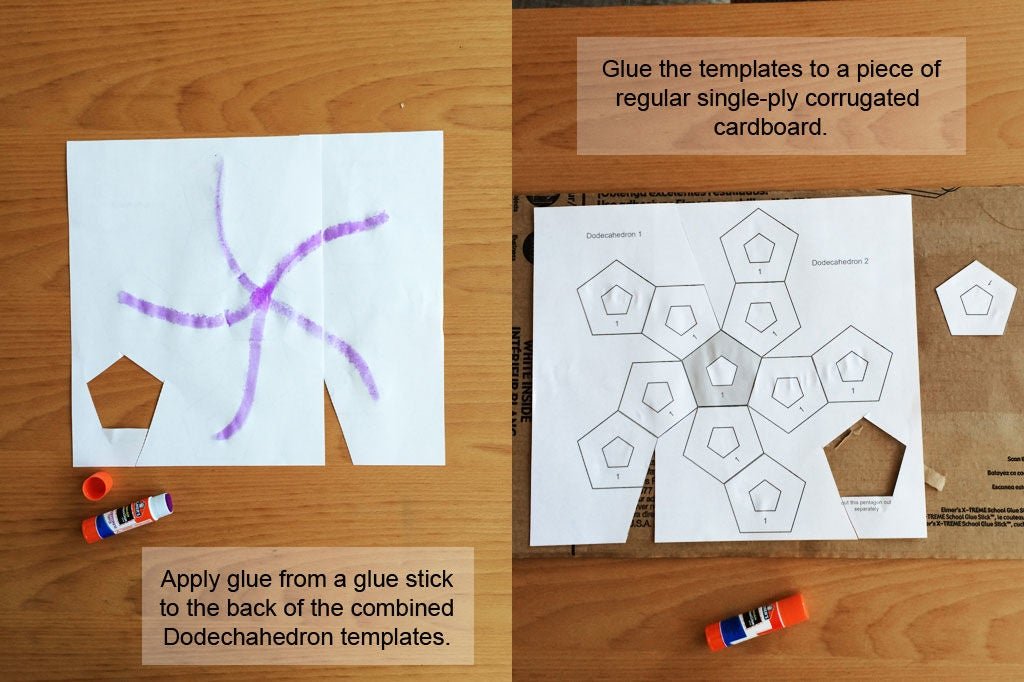
Apply glue stick to the back of the combined dodecahedron templates and tack them to a clean, undamaged piece of regular single-ply corrugated cardboard. Also glue down the single pentagon on the Dodecahedron 2 template. The templates will need to be removed, so only run a single line of glue down each arm of the pinwheel.
Step 9: Lamp Base – Stage 7
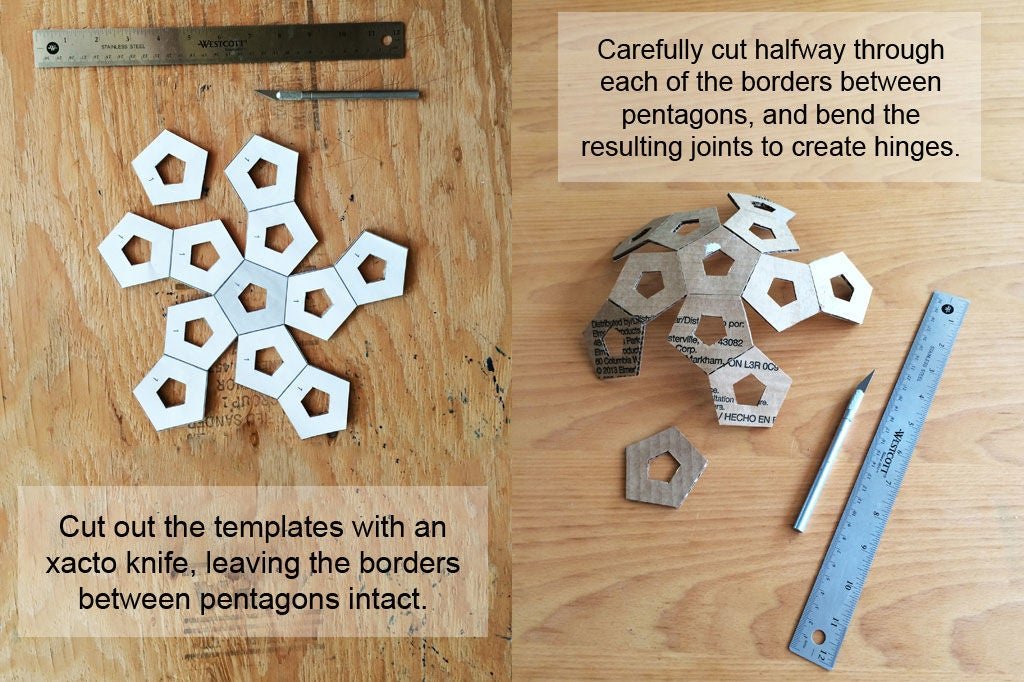
Use an X-ACTO knife and metal edged ruler to cut out the pinwheel shape, leaving the lines between the pentagons intact. Cut out the small interior pentagons. Finally, cut along the lines that separate the pentagons, but apply only enough gentle pressure to slice half way through the cardboard. These partial cuts will act as hinges. Remove the paper template from the cardboard.
Step 10: Lamp Base – Stage 8
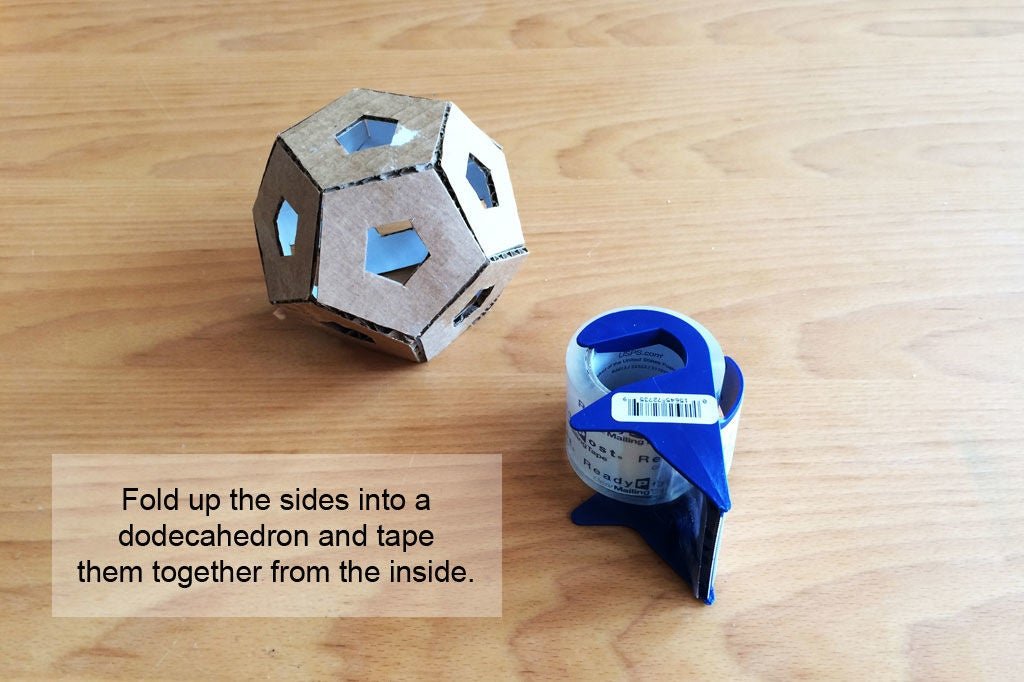
Fold each of the partial cuts to create a series of hinged flaps. Fold the flaps together and secure them from the inside with tape.
Step 11: Lamp Base – Stage 9
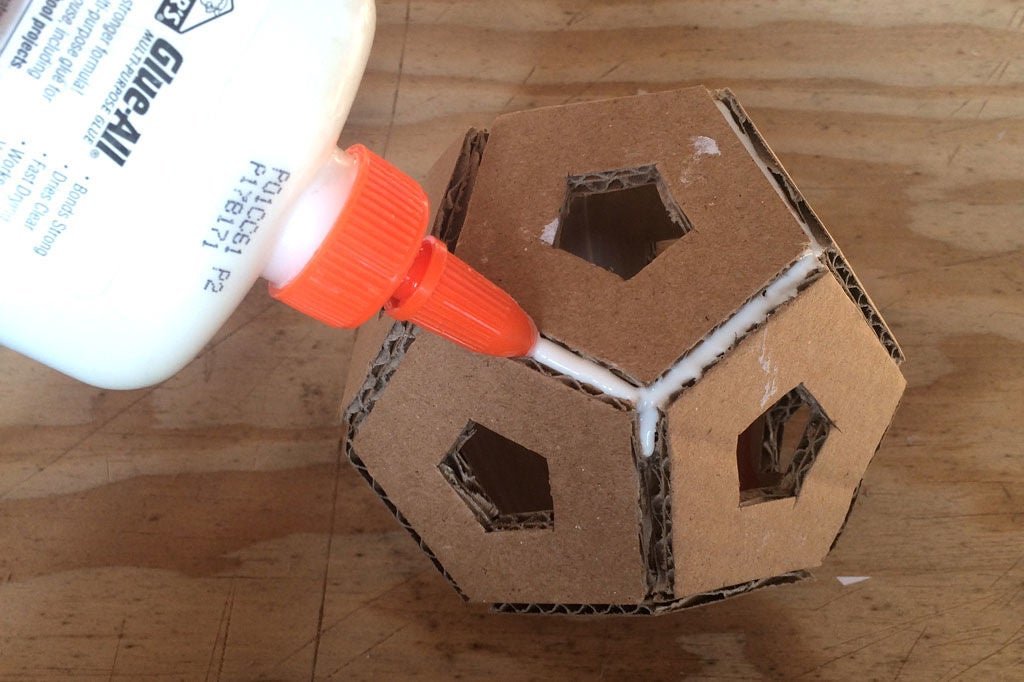
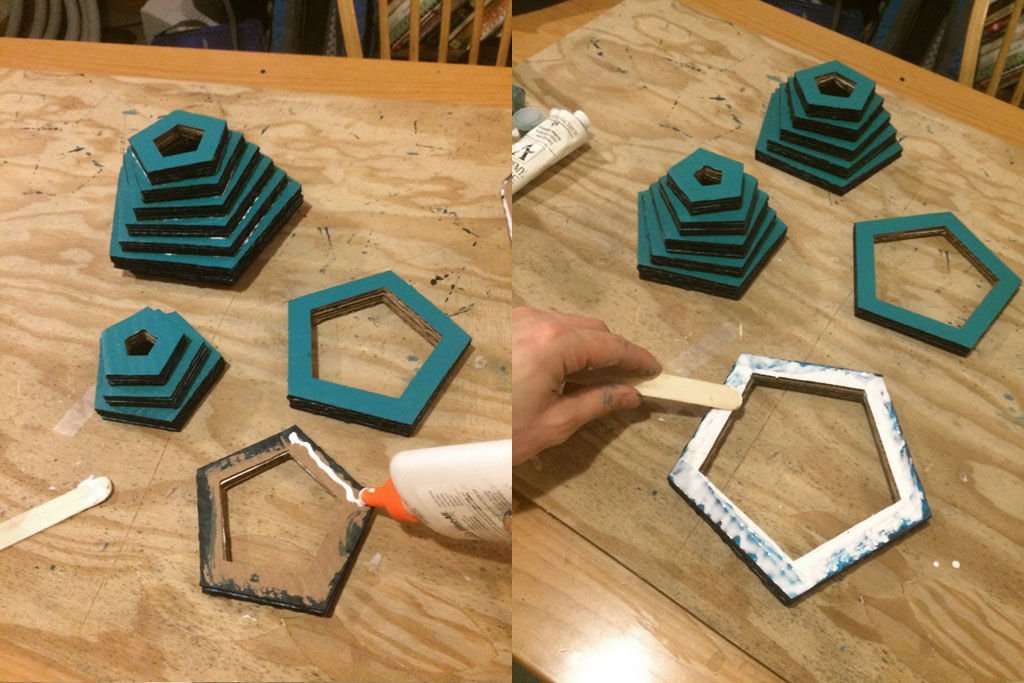
Use craft glue on all of the joints on the outside of the dodecahedron. Allow it to dry and add one or two more coats of glue. Add more coats if you are using all-purpose white glue (as I foolishly am in the picture). Craft glue is thicker and won’t run.
Step 12: Lamp Base – Stage 10
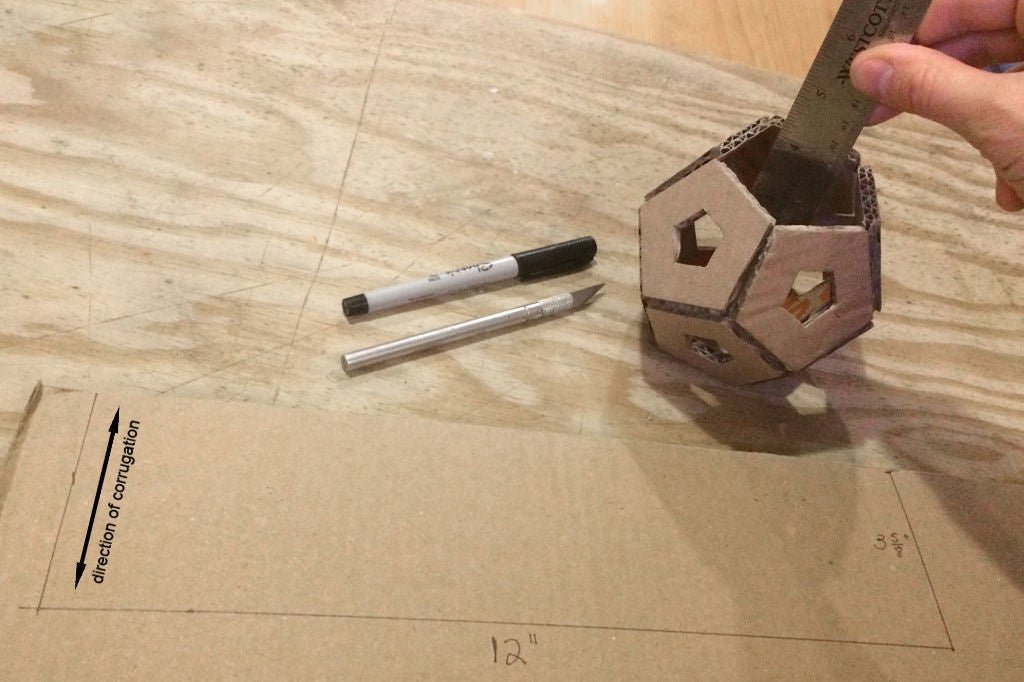
Measure the depth of the dodecahedron. Mark and cutout a rectangle that is 12-in long and as wide the depth you just measured. My rectangle was 12-in x 3 5/8-in, but you should measure your own. Layout the rectangle on the cardboard so that the corrugation parallels the shorter edge.
Step 13: Lamp Base – Stage 11
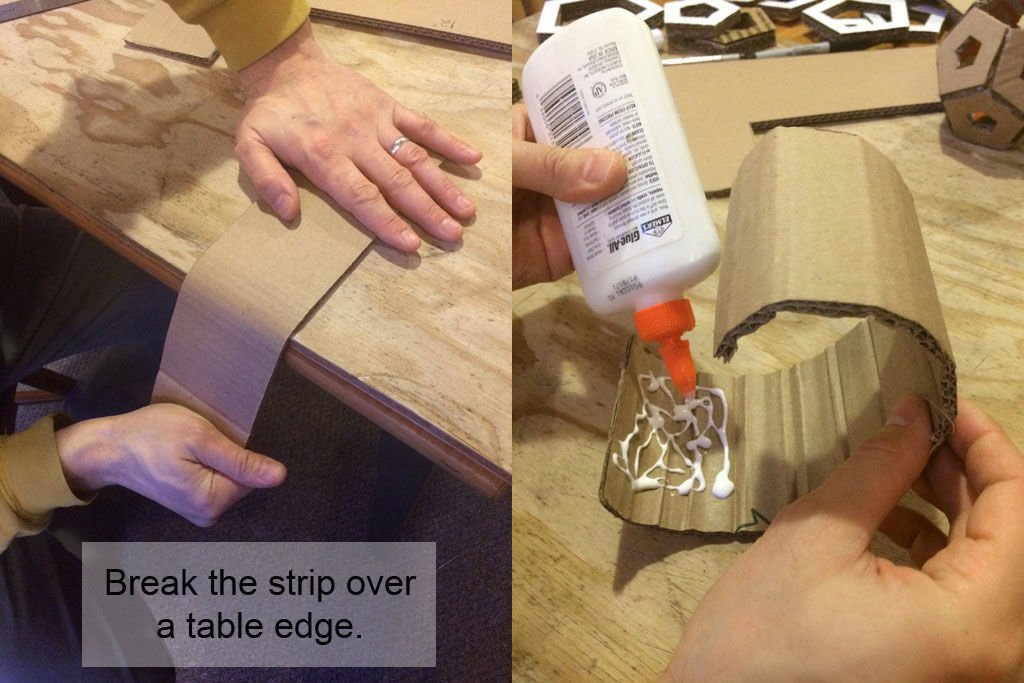
Break the rectangular strip over the edge of a table to put a curl in it. Apply a liberal amount of glue to 3-4 inches at one end of the strip on the side that curls inwards.Roll it up and temporarily tape it closed. Confirm that the roll is narrow enough to fit inside of the dodecahedron and that it sits level with the open edge. Make any necessary adjustments before the glue dries. This roll bears the weight of the lamp, so it is important that it not sit lower than the top of the dodecahedron.
Step 14: Lamp Base – Stage 12Step 14: Lamp Base – Stage 12

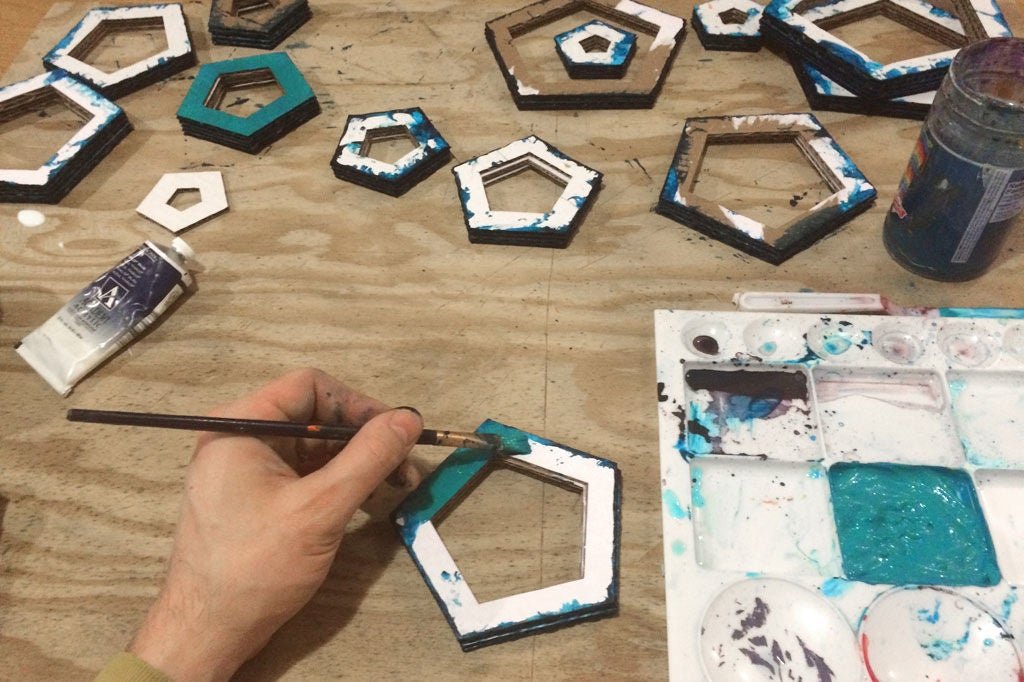
Once the glue has dried, remove the tape and paint the roll. Paint all the outside edges of the glued pentagon stacks. If you would like to minimize the visibility of the corrugation, pick a darker color that will camouflage the shadows. It can take a bit of paint and effort to work cover the corrugated sides. Water down the paint for the sides a bit. You will use less, and it will be easier to get full coverage. Allow the paint to dry. Paint the tops of all the pentagon stacks. Make sure the template paper has been removed. Glue sticks do not provide enough strength to hold the lamp together. I used some white sided cardboard. I was not painting on template paper in the picture.
Step 15: Lamp Base – Stage 13
Glue the cardboard roll into the dodecahedron. Spread glue onto the small pentagon from the Dodecahedron 2 template, add more glue to the top of the roll, and glue them together, closing the dodecahedron.
Step 16: Lamp Base – Stage 14

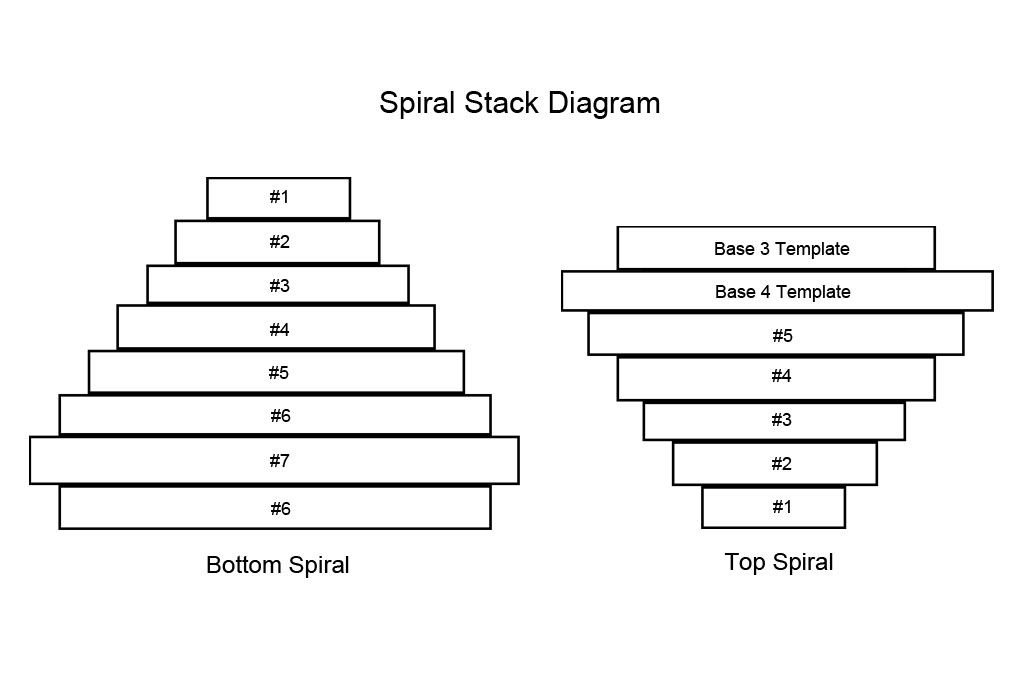
Glue together two spiraling stacks of concentric pentagons. Center each pentagon in the stack and rotate them incrementally. Follow the configuration as shown in the Spiral Stack Diagram. Note that there will be an extra size #7 pentagon stack left over. This will be used in the lamp shade.
Step 17: Lamp Base – Stage 15
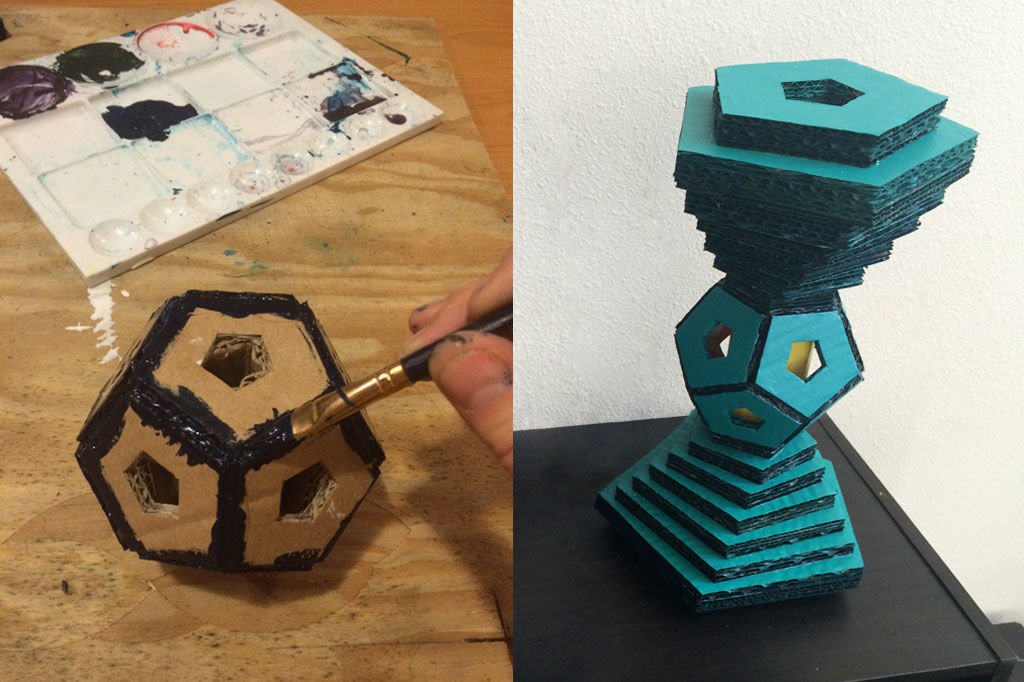
Paint the dodecahedron. Glue the dodecahedron to the small ends of the bottom and top spiral. Position the cardboard roll vertically, so it acts as a post and bears the weight of the lamp above it.
Step 18: Lamp Shade – Stage 1
Cut out the 11 copies of Shade 1 template, and the single copy of Shade 2 template. Tack them to pieces of double-ply corrugated cardboard with a glue stick. It is important use heavier cardboard on the shade to maintain its structural integrity. Use an X-ACTO knife and metal edged ruler to cut out the shade panels and the designs within them.
Step 19: Lamp Shade – Stage 2
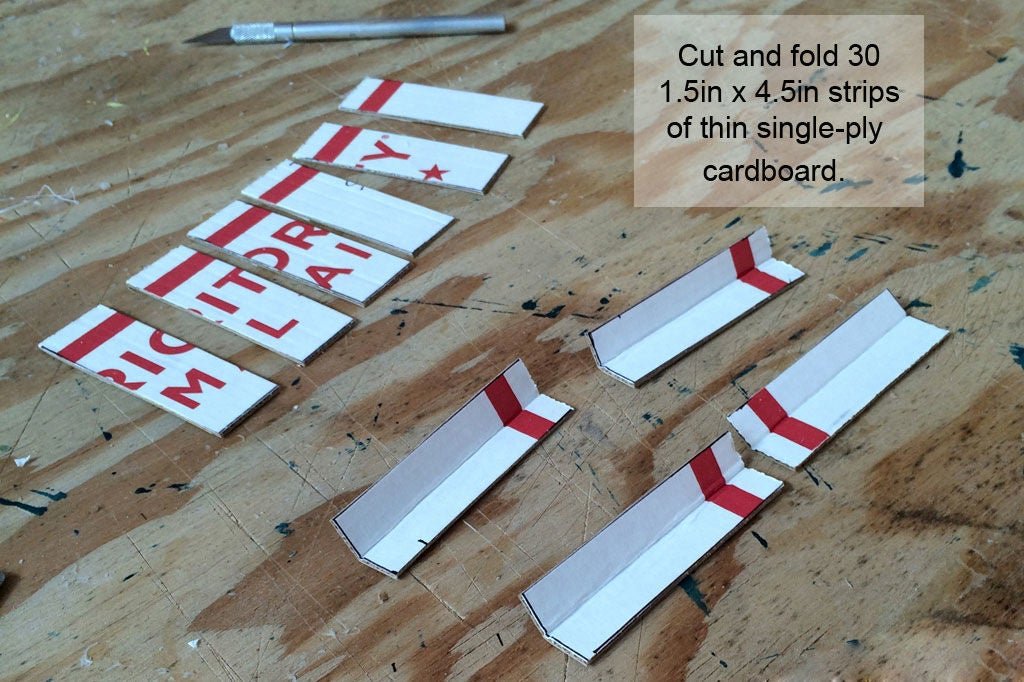
Cut a couple 4.5-inch-wide strips of thin single-ply cardboard so that the corrugation runs parallel to the 4.5-inch edge. Cut 30, 1.5 inch pieces off of these strips. Bend 20 of those pieces in half length-wise. Set aside.
Step 20: Lamp Shade – Stage 3
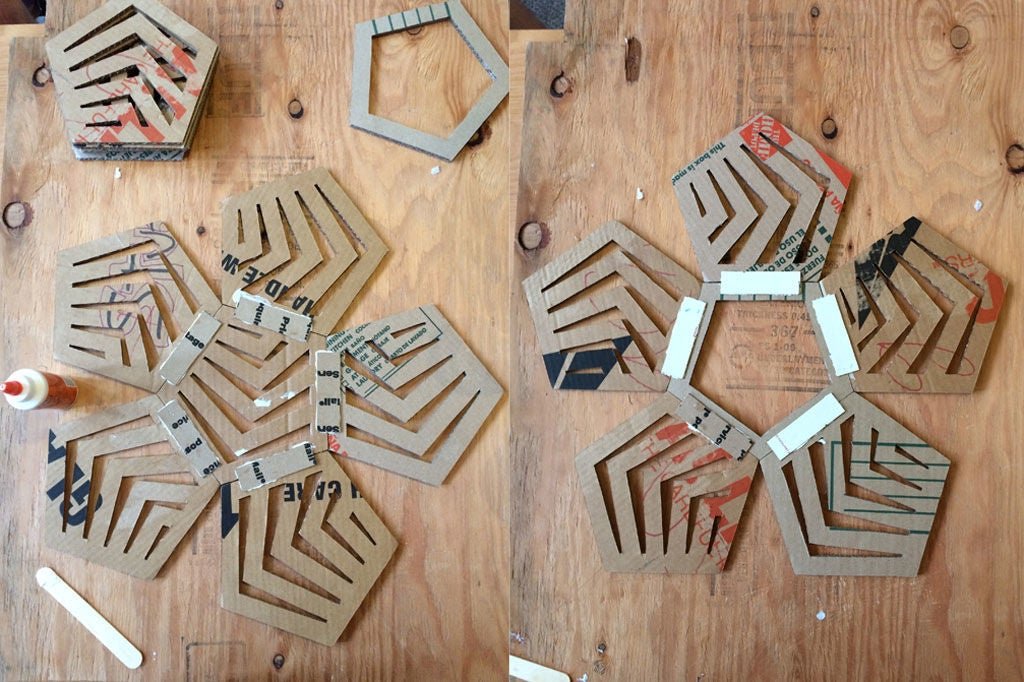
Lay out the shade panels in two flower-like arrangements, as depicted in the accompanying images. Glue the unbent 1.5 inch x 4.5 inch thin single-ply cardboard strips across all five joints on each “flower.” Weigh them down with a couple books while the glue sets to insure a strong bond.
Step 21: Lamp Shade – Stage 4
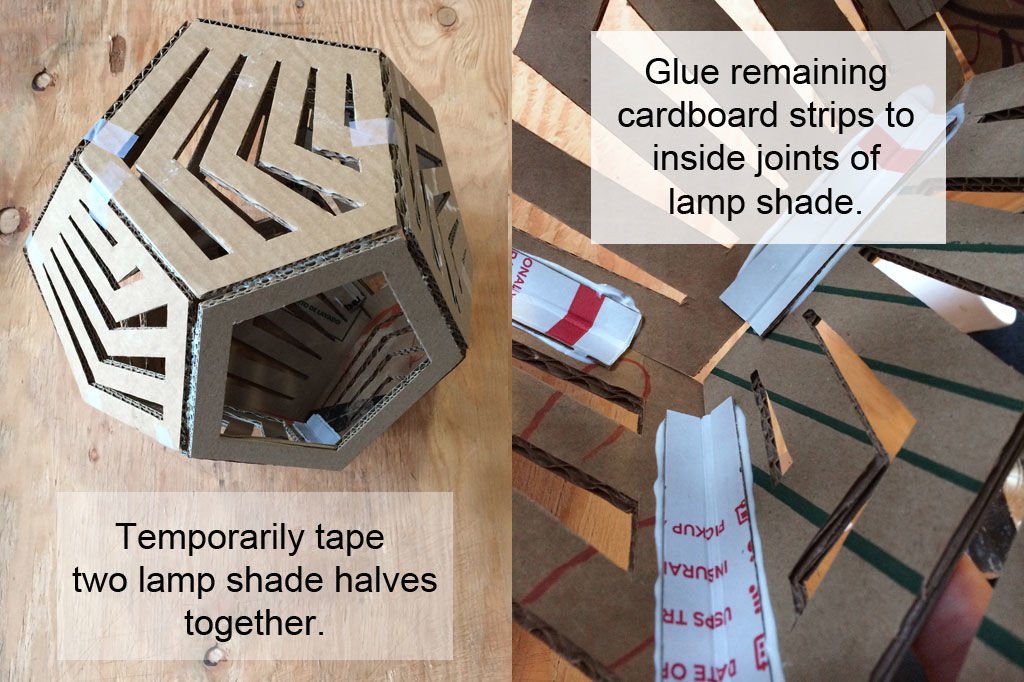
Carefully bend each of the “petals” up, creating hinges out of the previously glued thin cardboard strips. Each “flower” will fold into half of the dodecahedron lamp shade. Fold the side panels up, joining them, and temporarily hold them in place with masking tape. Glue the bent 1.5-inch x 4.5-inch strips into the inside joints of each half of the dodecahedron. Allow them to dry.
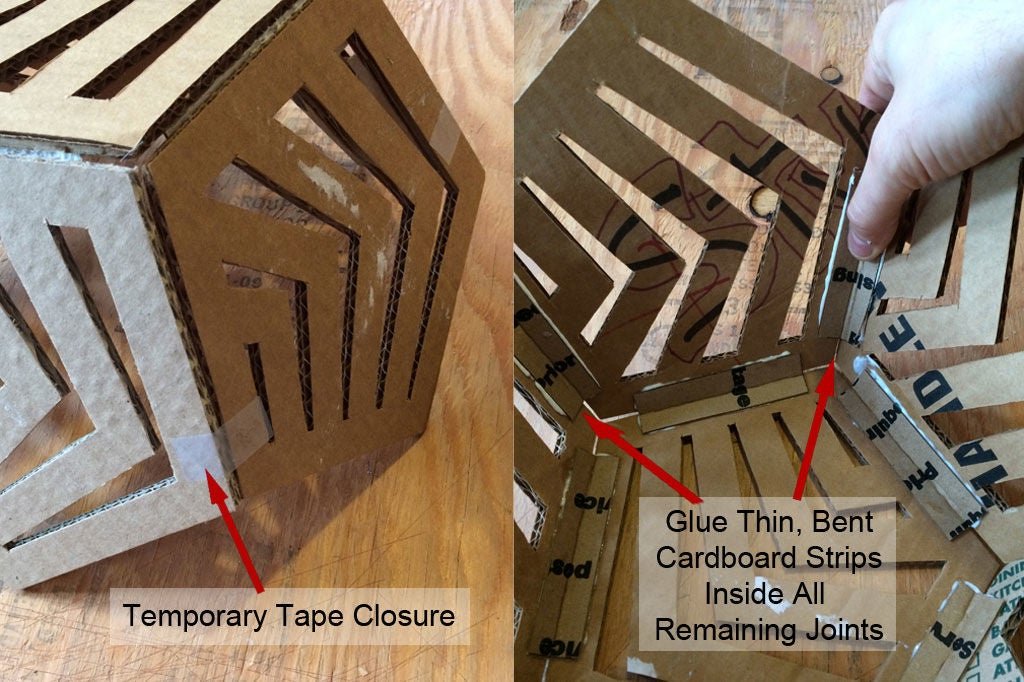
Step 22: Lamp Shade – Stage 5
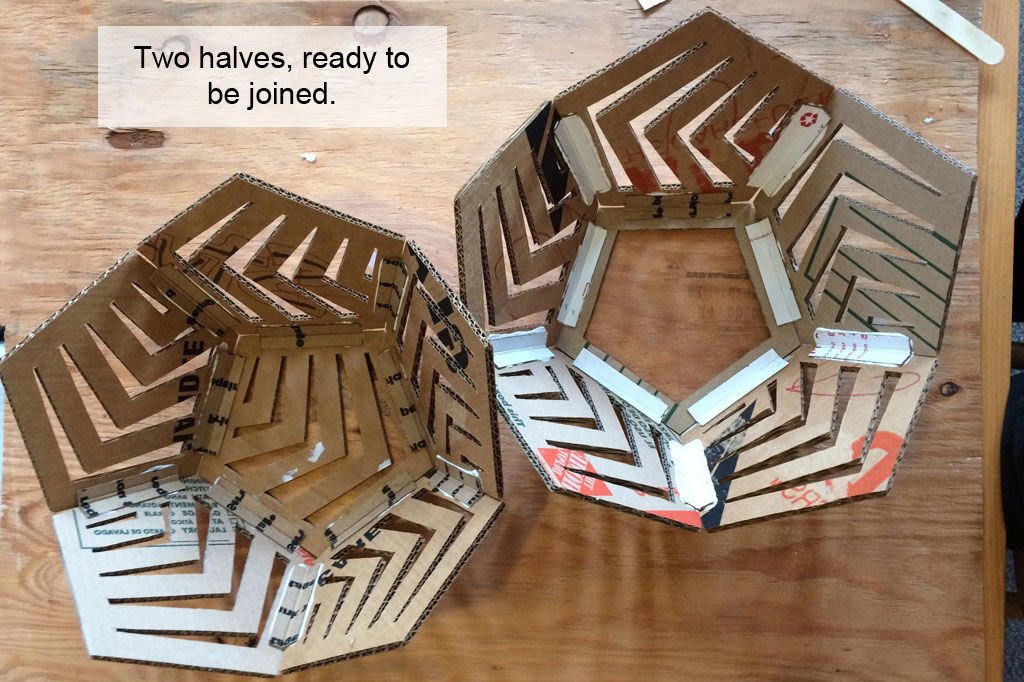
Tape the two halves of the dodecahedron together. Glue the last ten thin cardboard strips into the final interior joints. Allow them to dry.
Step 23: Lamp Shade – Stage 6
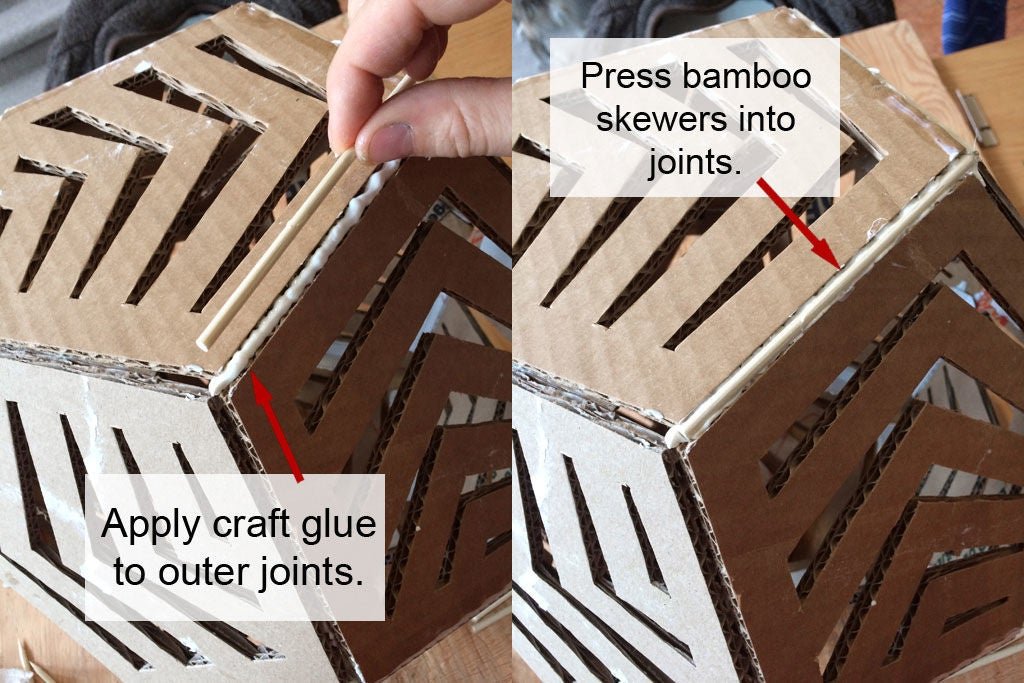
Mark 2, 4 7/8 inch sections on 15 bamboo skewers. Lay the skewers out side-by side and mark them all at once. Use a pair of scissors to score the skewers. Twist the skewers while applying pressure to the scissor blades to score all the way around them at each mark. Snap the scored skewers into 30, 4 7/8 inch lengths.
Step 24: Lamp Shade – Stage 7

Remove the masking tape from the outside of the lamp shade. Glue the skewers into each outside joint around the entire dodecahedron. Allow them to dry.
Step 25: Lamp Shade – Stage 8
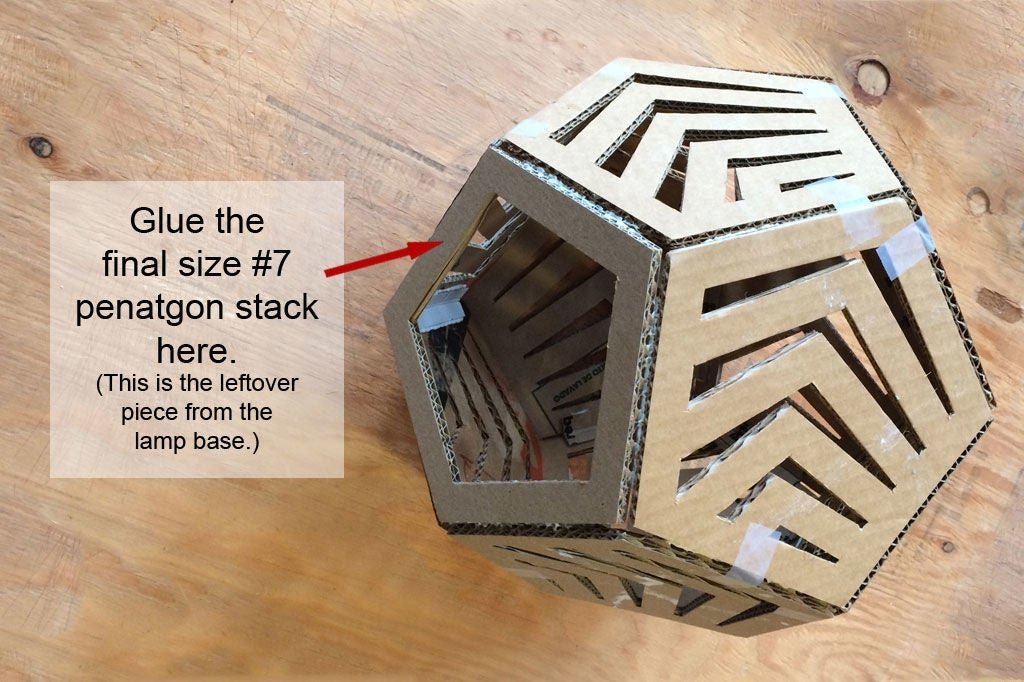
Glue the size #7 pentagon stack (leftover from the making the lamp base) to the bottom of the dodecahedron.
Step 26: Lamp Shade – Stage 9
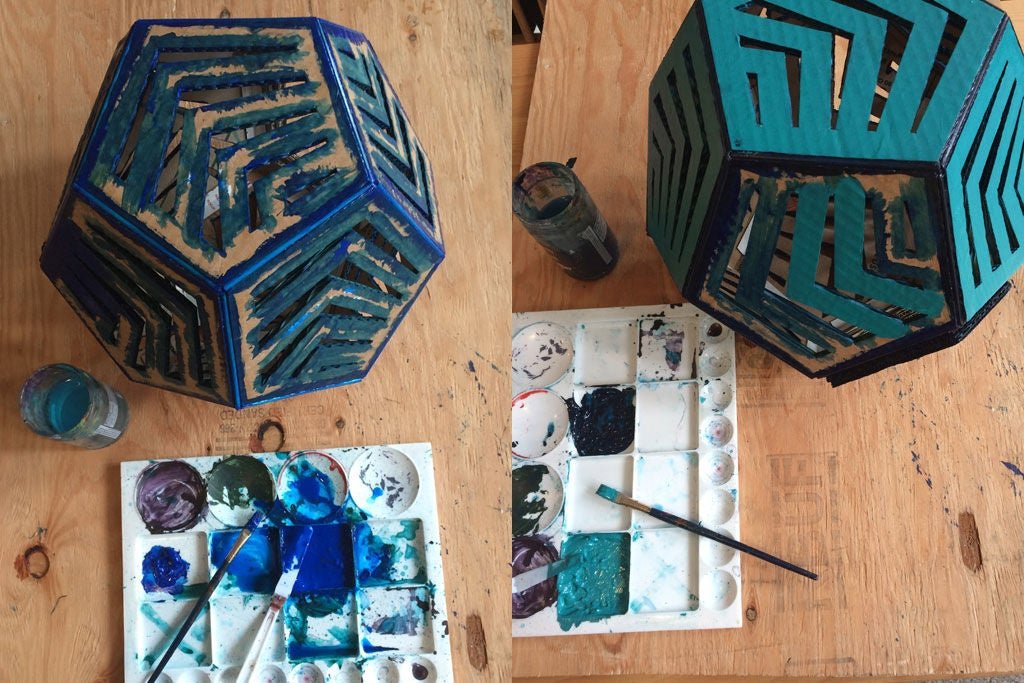
Paint the interior edges of the cutout designs and the bamboo skewer filled joints. Paint the exterior surfaces of the dodecahedron.
Step 27: Lamp Shade – Stage 10
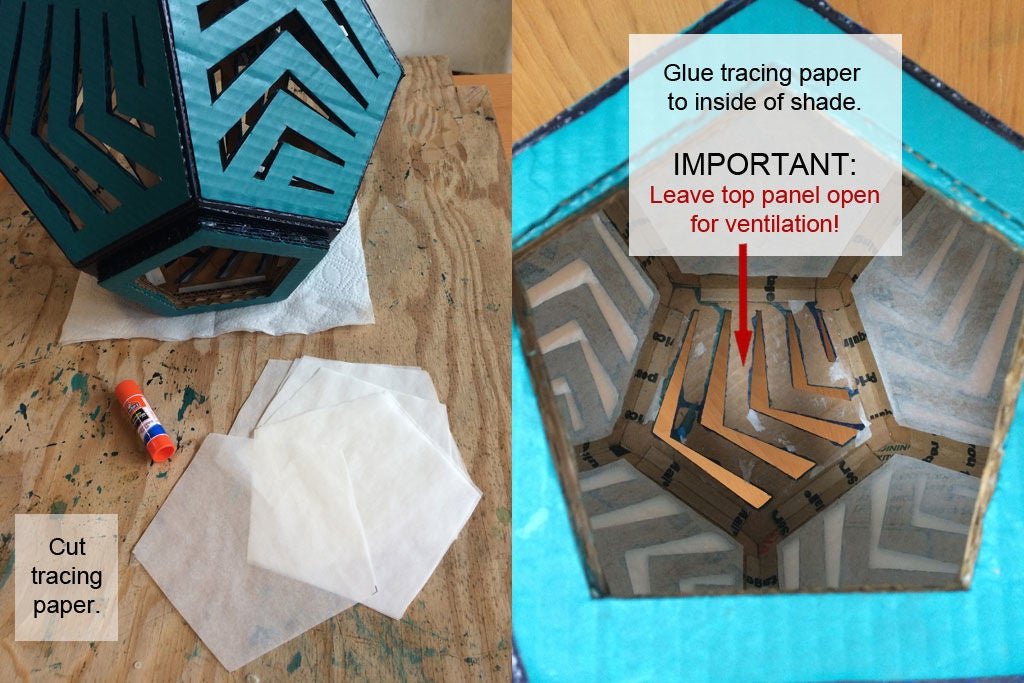
Cut out the 10 tracing paper or vellum prints of the Shade 3 template. Glue tracing paper to the inside of each lampshade panel except the top. Glue them in place with a glue stick. Apply glue to all interior surfaces and press the tracing paper into place. Leave the top open to allow heat to escape. You should only use low wattage LED light bulbs in this lamp, but even some of those can get quite warm. Be sure to leave ventilation.
Step 28: Electrical – Stage 1
Use the Electric 1 template to cut 10 pentagons out of paperboard. Glue them together in a stack and let them dry. Leave the template glued to the surface of the top pentagon in the stack.
Step 29: Electrical – Stage 2

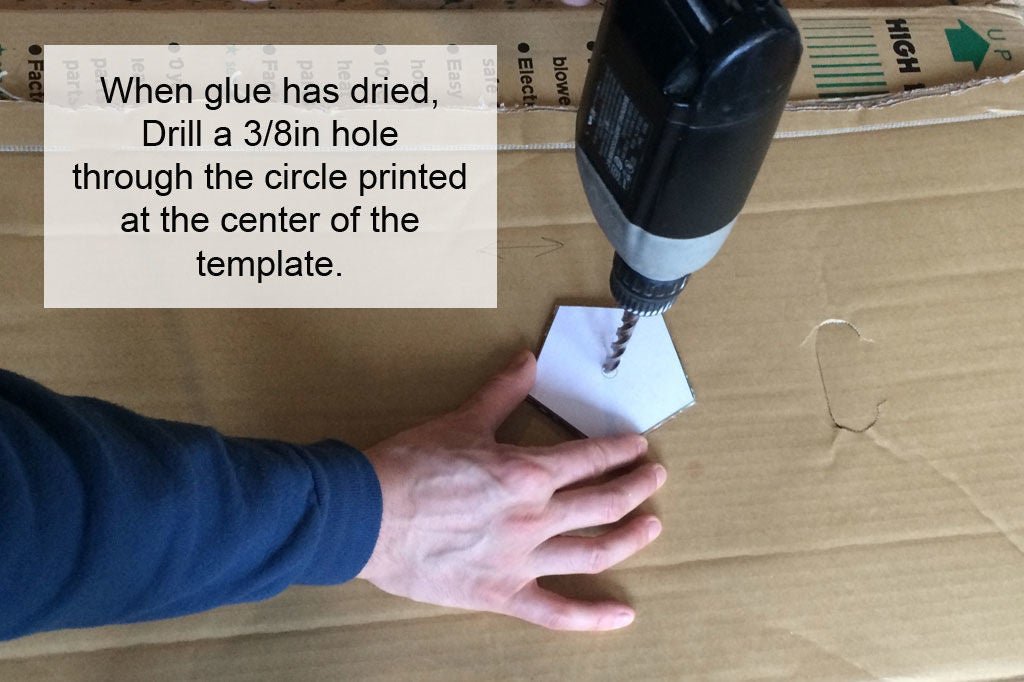
Drill a 3/8-inch hole through the circle printed in the center of the pentagon.
Step 30: Electrical – Stage 3

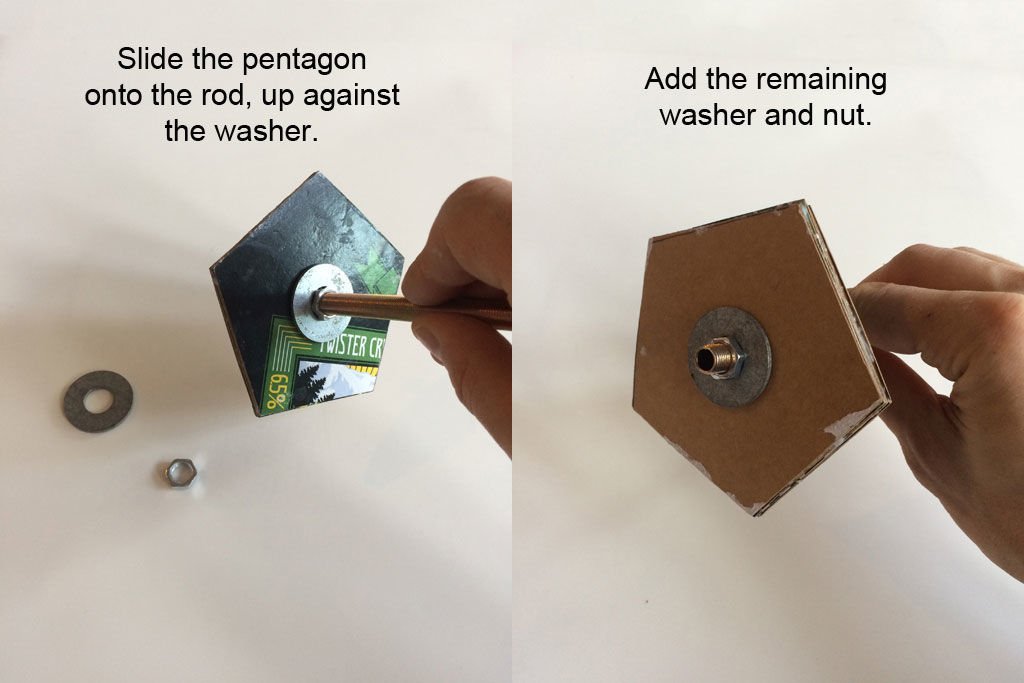
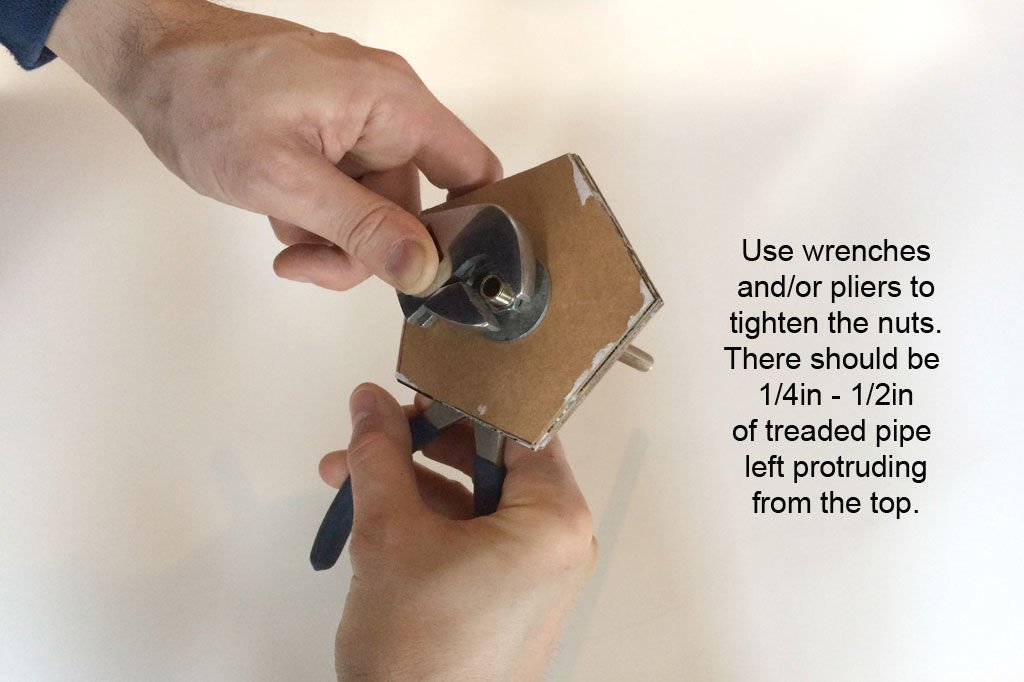
Screw a 3/8-inch nut 1 inch down the threaded rod. Slide a washer down the 1 inch long side of the rod so it rests on the nut. Push the 1 inch long side of the rod through the hole drilled in the cardboard. Slide the second washer on and follow that with the second nut. Use wrenches or pliers to tighten the nuts. Be sure to leave ¼ –½ inch of threaded rod protruding from the top of the pentagon.
Step 31: Electrical – Stage 4
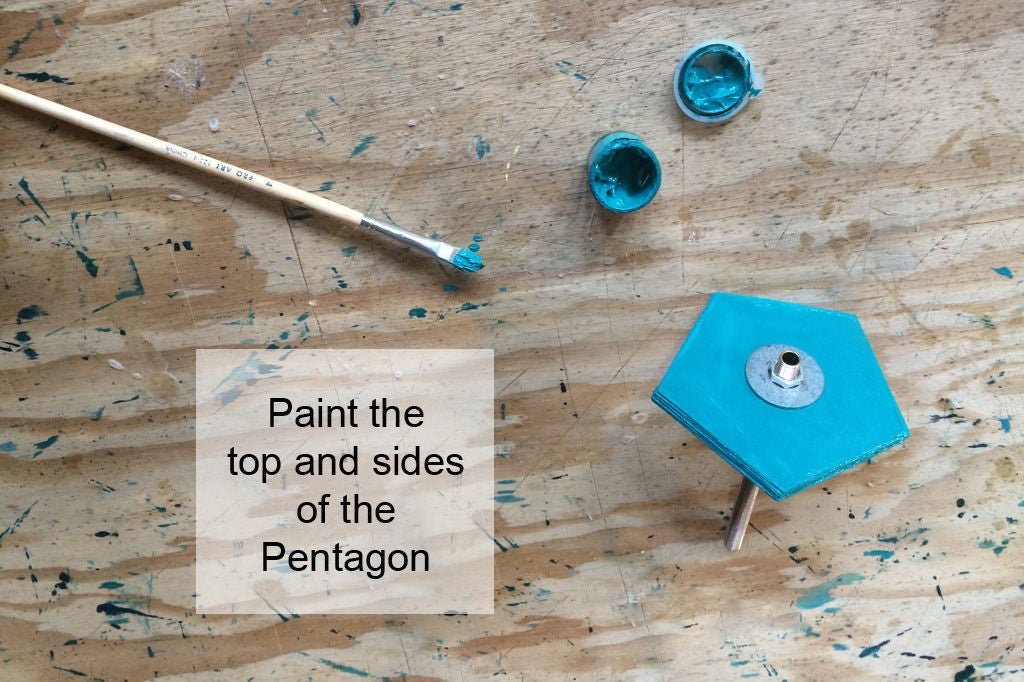
Paint the top and sides of the pentagon.
Step 32: Electrical – Stage 5
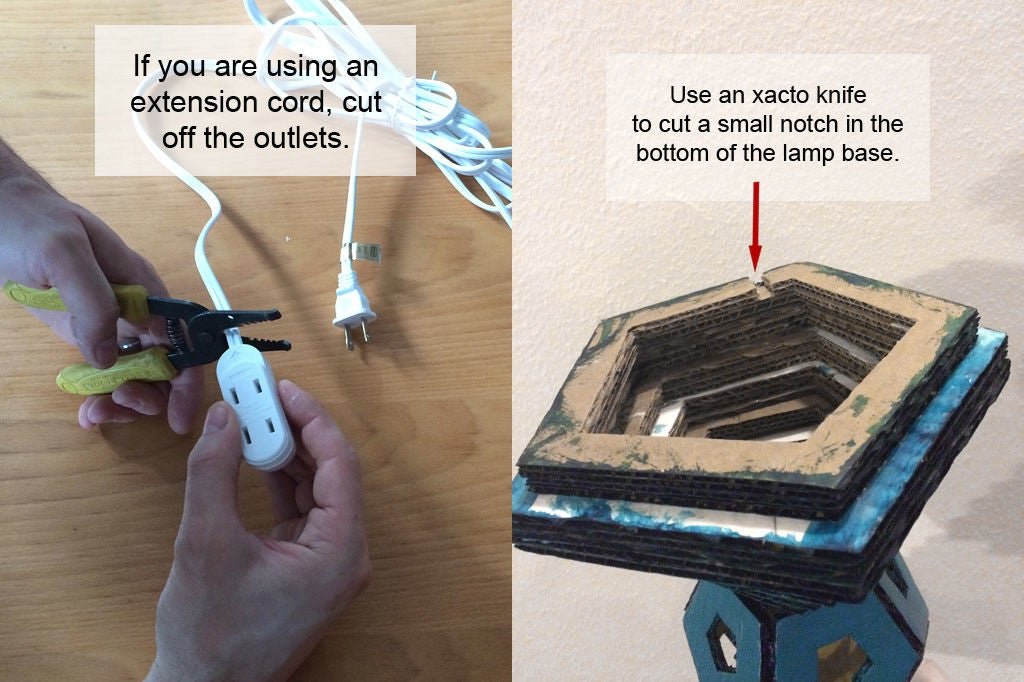
If you are using an extension cord, cut the outlets off with wire clippers. Cut a small notch in the bottom of the lamp base. This is to provide a place for the cord to exit the bottom of the lamp, so position it on the side you would like to be the back of your lamp. Cut it to the width of your cord, so it fits snugly.
Step 33: Electrical – Stage 6
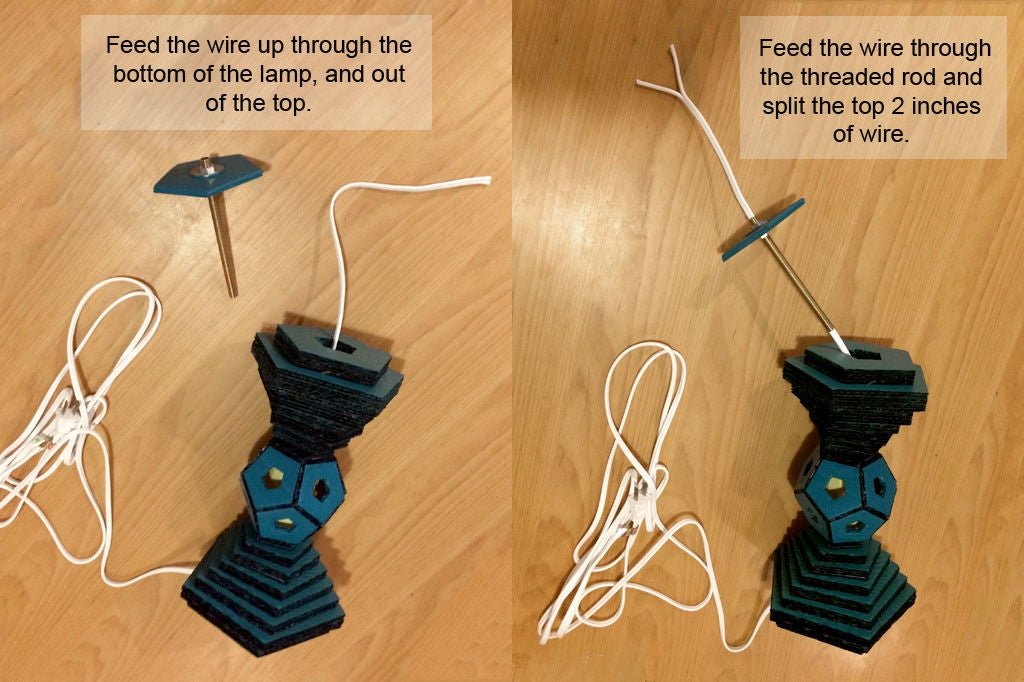
Feed the cut end of the wire into the bottom of the lamp base and out of the top. Feed the wire through the rod and out the end with the pentagon bolted to it. Split apart two inches of the wire.
Step 34: Electrical – Stage 7
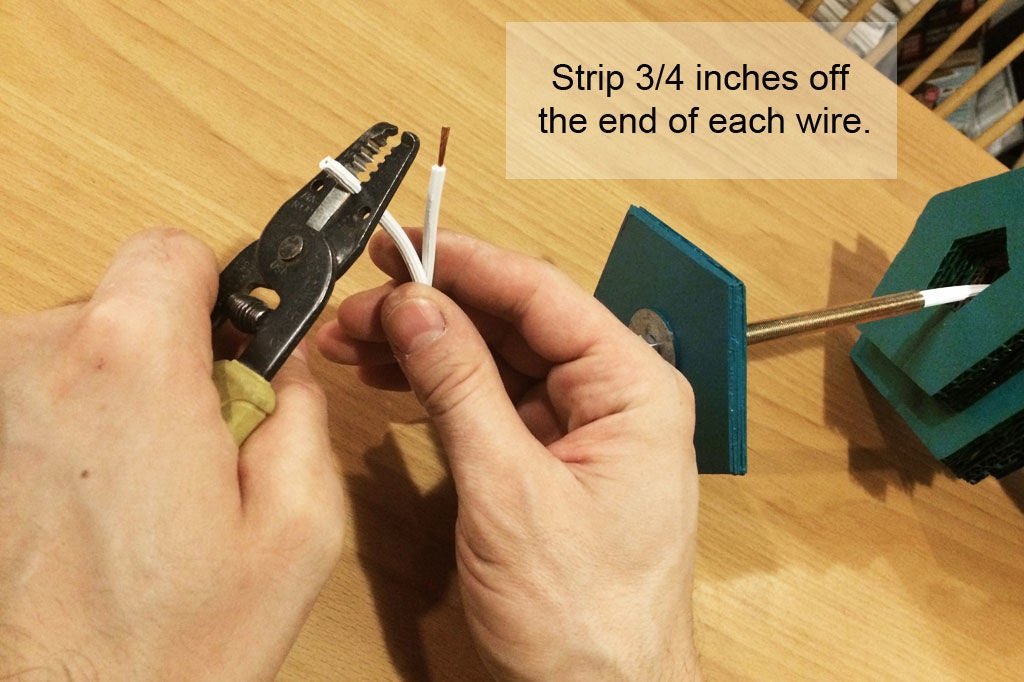
Strip ¾ inches off the end of each wire.
Step 35: Electrical – Stage 8
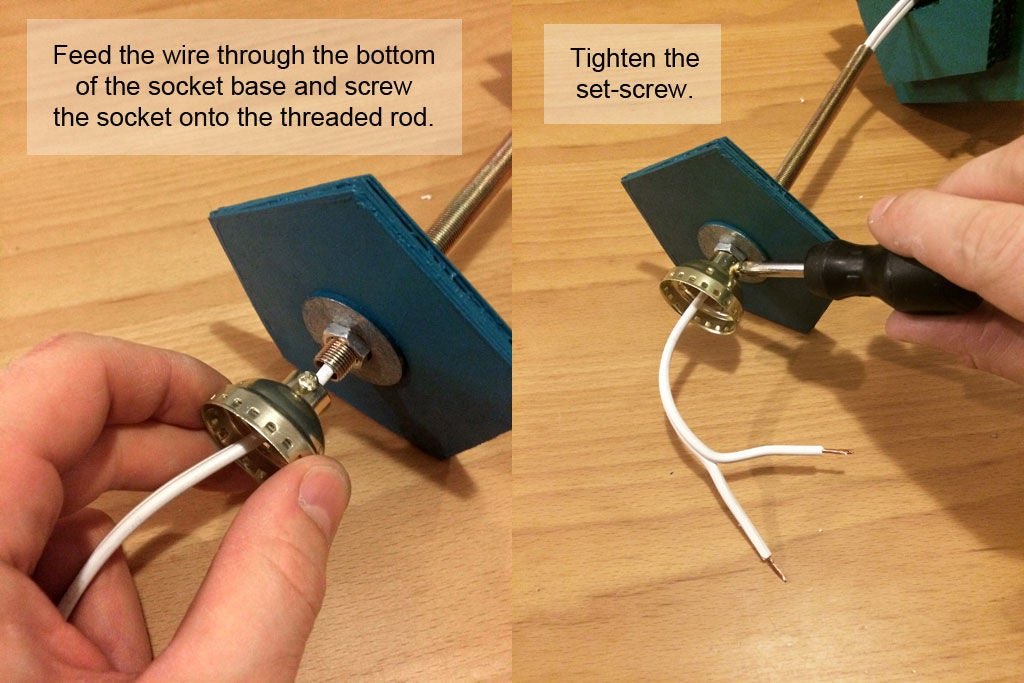
Slide the socket base over the wire and screw it onto the threaded rod. Tighten the set-screw on the socket base.
Step 36: Electrical – Stage 9
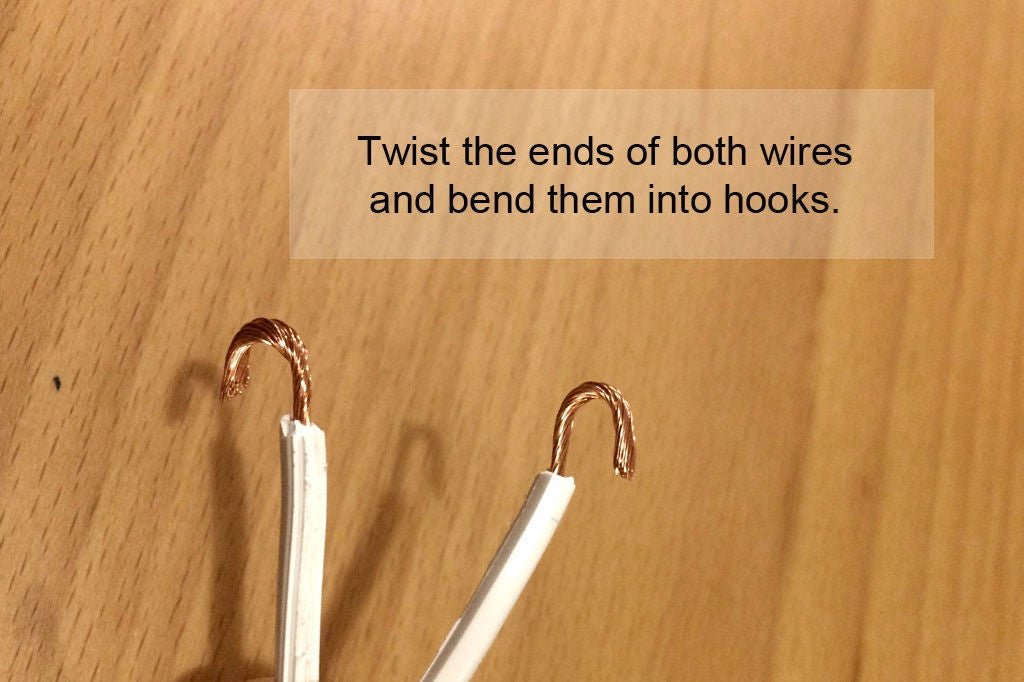
Twist the stripped ends of the wires and bend them into hooks.
Step 37: Electrical – Stage 10
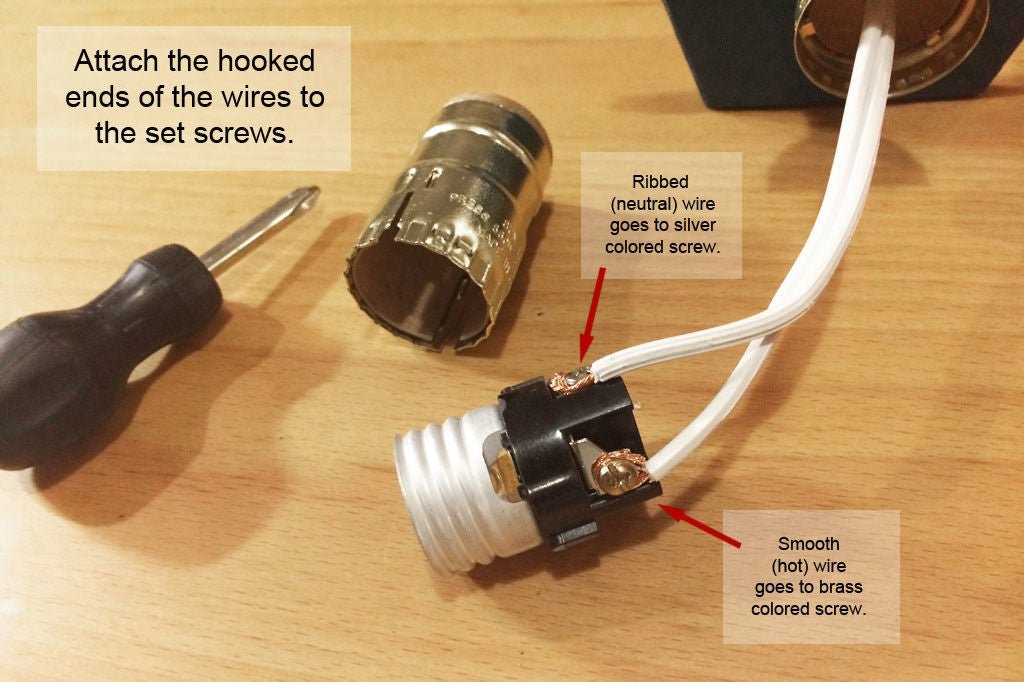
Loosen the screws on the light fixture. Slide the hooked wires around the screws and hold them in place as you tighten the screws to secure them. The neutral wire is ribbed (or sometimes indented) and is connected to the nickel(silver colored) screw. The hot wire is smooth and is connected to the brass (gold colored) screw.
Step 38: Electrical – Stage 11
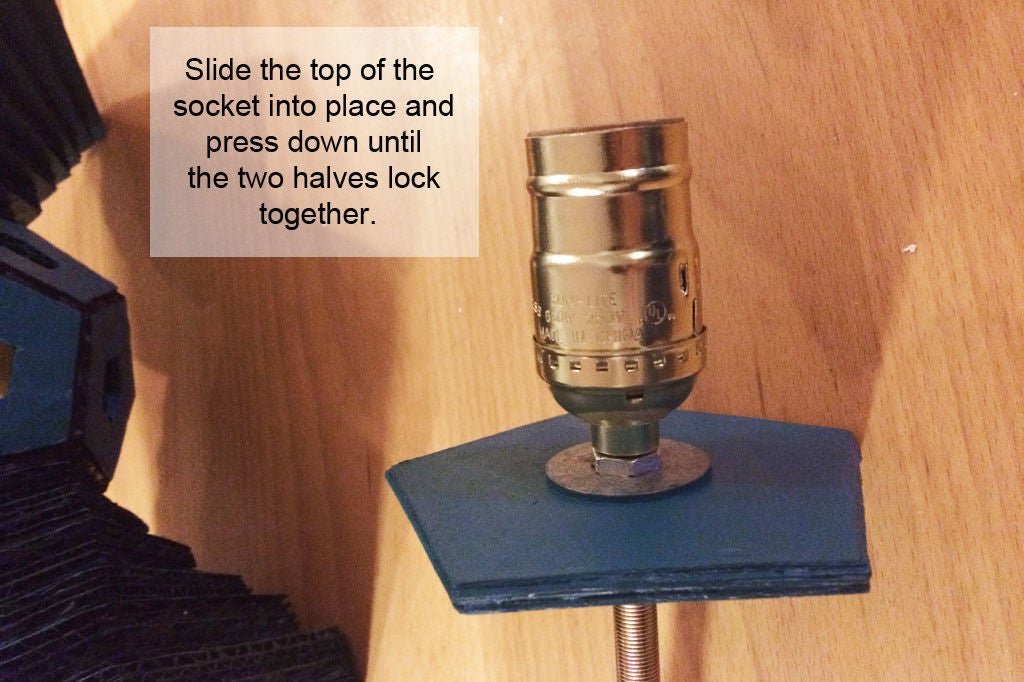
Make sure the cardboard insulator is positioned inside the top of the socket. Pull the wire back through the rod until the fixture is sitting inside the socket base. Slide the top of the socket over the fixture and press down until it connects to the socket base.
Step 39: Electrical – Stage 12
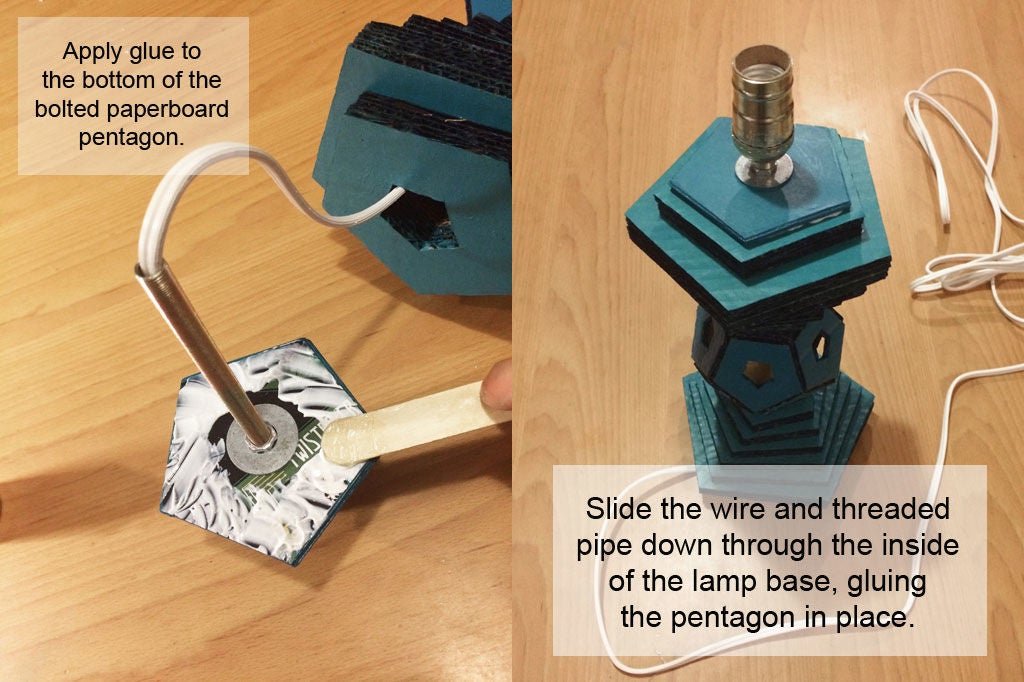
Apply glue to the bottom of the pentagon. Slide the wire and rod back down through the lamp base, and glue the pentagon in place.
Step 40: Electrical – Stage 13
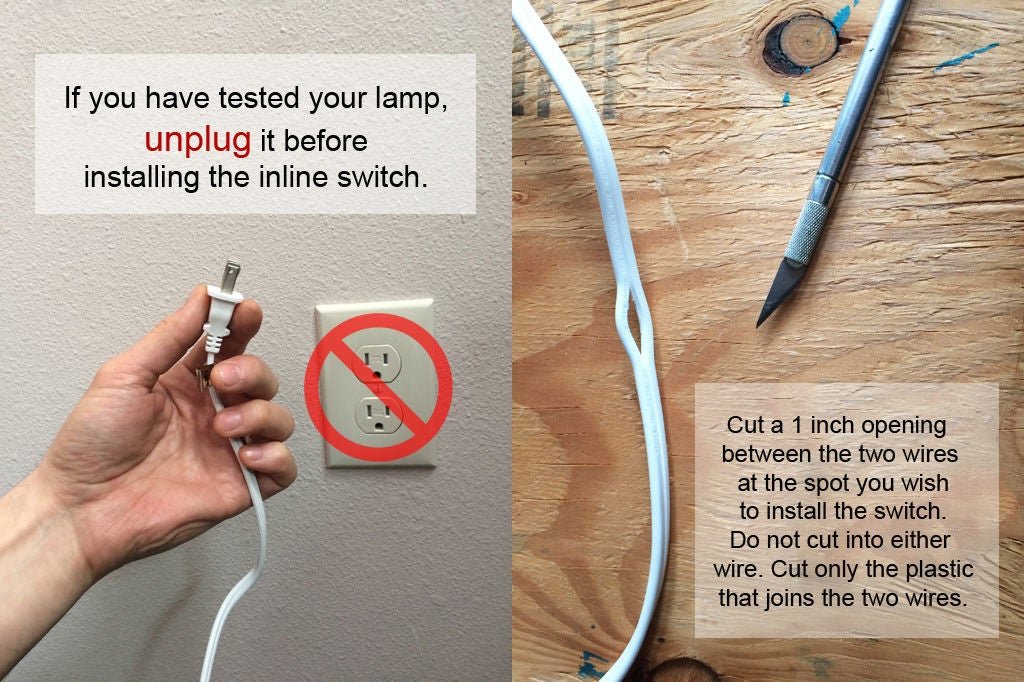
Make sure the lamp hasn’t been plugged in since completing the last step. Use an X-ACTO knife to cut a 1 inch opening between the two joined wires at the spot you wish to install the inline on/off switch. Be careful to only cut the plastic separating the two wires. Do not cut into either wire.
Step 41: Electrical – Stage 14

Use wire clipper to snip the smooth wire halfway across the slit you cut in Step 14. Do not cut the ribbed (or indented) wire. Place the wire into the switch housing so that the uncut wire lies on one side (in the opening provided), and the cut ends are tucked down into the two separated compartments on the opposite side.
Step 42: Electrical – Stage 15
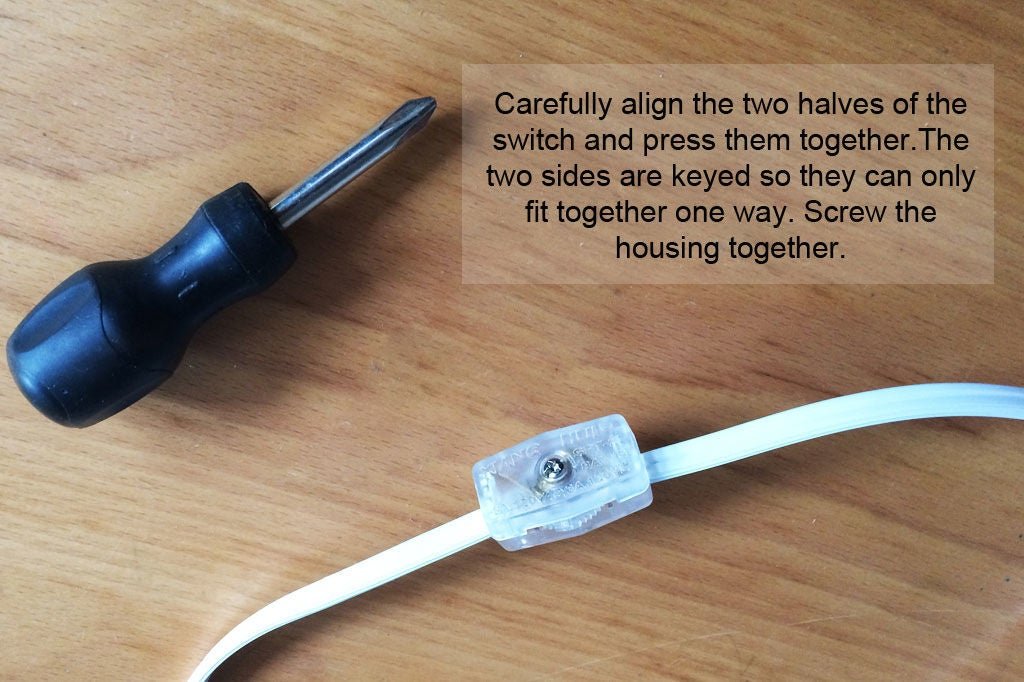
Carefully align the two halves of the switch. They are keyed so they will only fit together one way. There are two small sets of metal barbs that will pierce the ends of the cut wire. Make sure the wire is properly seated so the barbs will stab them. Firmly press the two sides together and secure it with the screw.
Step 43: Electrical – Stage 16

Put a few handfuls of gravel into a plastic bag.
Step 44: Electrical – Stage 17
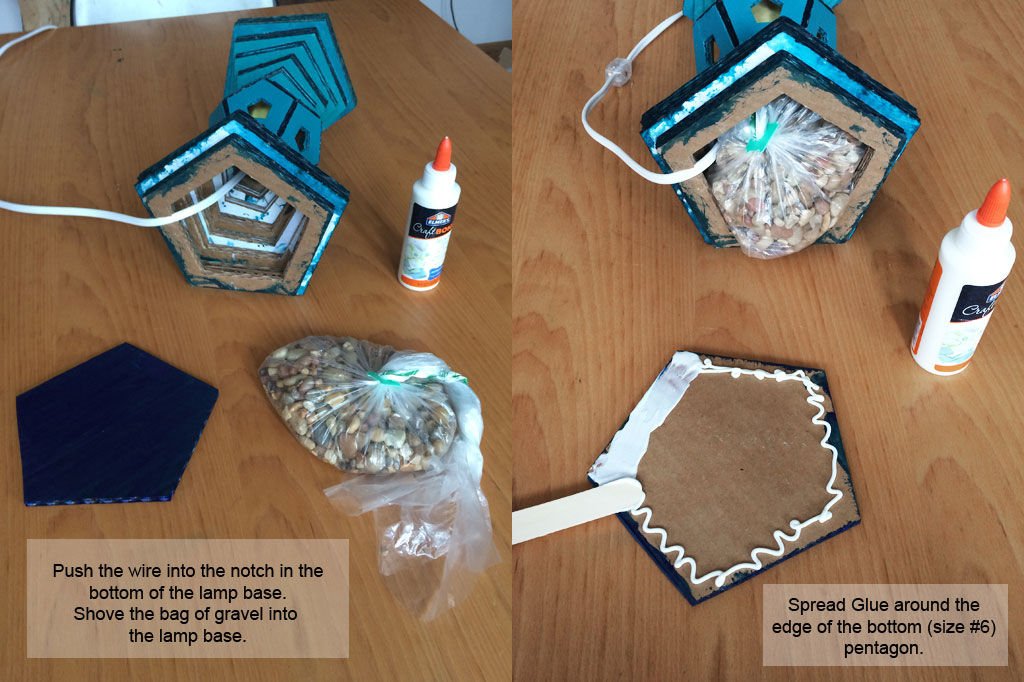
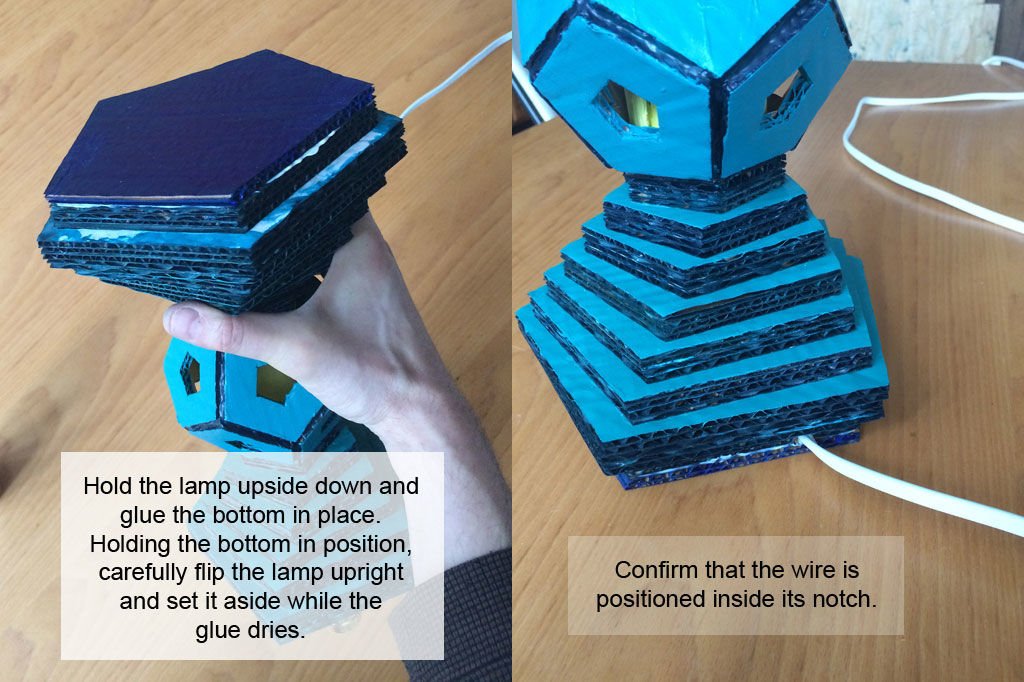
Push the wire coming out of the bottom of the lamp base into the notch you cut in Step 6. Push the bag of gravel into the lamp base. Spread glue along the edge of the size #6 pentagon you cutout and painted while making the lamp base. Hold the lamp upside down and the glue the bottom in place. Holding the bottom in position, carefully flip the lamp upright and set it aside while the glue dries.
Step 45: Electrical – Stage 18
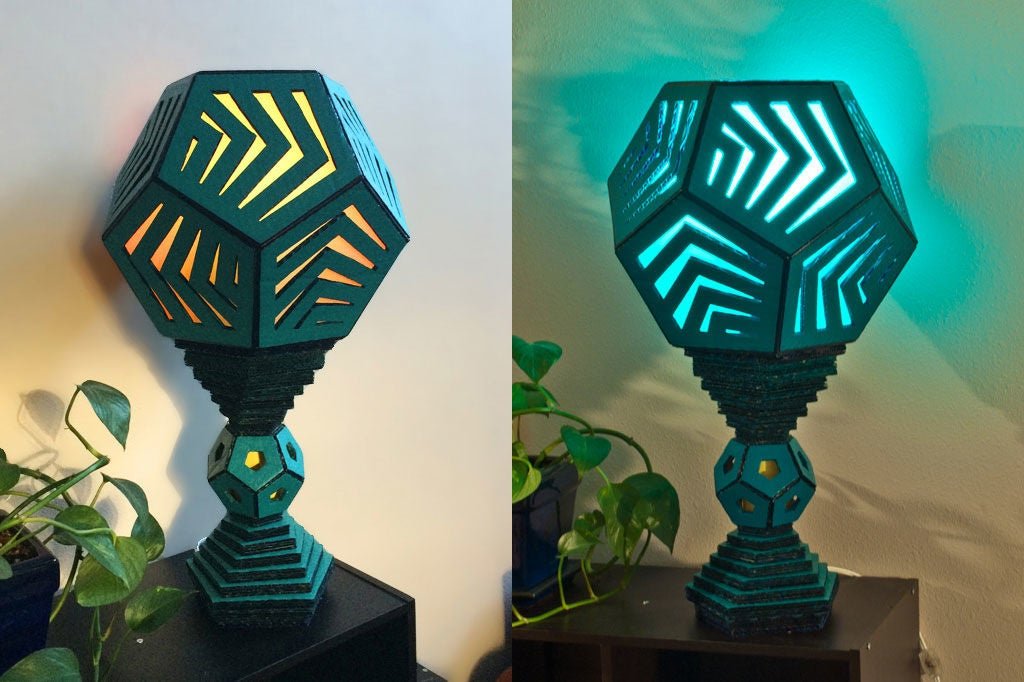
The lamp is now ready to use. Screw a low wattage LED light bulb into the socket, place the shade on top, plug it in, and turn it on. Be sure to only use low wattage LED light bulbs. Incandescent and compact florescent bulbs both get too hot and could pose a fire risk due to the flammable nature of a cardboard lamp.
courtesy: instructables