How to make fish Showpiece
I offer you a master class on making just such a fabulous fish.


To work needed:
A piece of foam; thick cardboard; PVA glue and glue “Moment”, “Titan” or “polymer”; newspapers; harvesting of plywood to stand; x / cotton fabric; wire; sandpaper; wood putty or primer (available from DIY stores); Stationery knife, scissors, a pencil; acrylic paint, gouache and watercolor; if necessary – for fixing varnish.
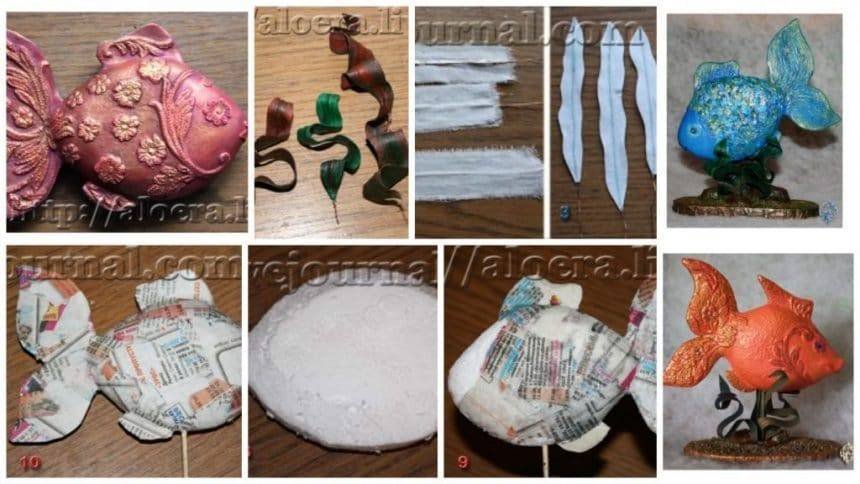
To produce the most fish take the foam, which is packaged a different home appliances – the thickness of it, we just fit. Choose the most flat area and a ballpoint pen draw a silhouette of fish without a tail and fins (Fig. 1).

Stationary knife carefully cut out (Fig. 2).
Round out the same knife edge of the workpiece (Fig. 3).
To make our procurement sleek, smooth out all the bumps large sandpaper (Fig. 4).
Take the cardboard thick enough, we are putting our procurement and pencil envisage what we would like to see the tail and fins of our magic fish (Fig. 5).

Do not forget only dorisovyvat on cardboard are the places that will be pasted directly into the workpiece fish (Figure 6 – shaded areas). Only then the tail and fins are cut out.
Make incisions in the foam blank in the same office knife. The tail and fins are smeared with glue on both sides. It is best to use for these purposes “Polymer”, “Titan” or “PVA” (but not too much liquid – tired to wait when dry). Note: “Moment” melts the polystyrene! Fig. 7 fish took the form.
An important point: do not rush – better promazhte whole fish with white glue, and you can now divorced, and let it dry. The surface of the foam from this procedure will become denser and pasting paper on it will be easier and easier.
Then, after the fish dry, or you blow dry it, proceed to the important stage: wrapping paper mache.

Knead thoroughly newspaper. When it is soft, it is best impregnated with glue and falls in form. Tear the paper into pieces (Fig. 8). Each piece coat with glue and stuck on the fish (Fig. 9). Do not forget about the fins and tail. By repeating this 4-5 times, can be and more – fish will be stronger.
Fig. 10 our fish, “dressed” in the newspaper on all sides, dried.
When our billet is dry, sandpaper, you can carefully remove any irregularities formed unexpectedly when pasting. Especially, there may be paper corners on the tail and fins.
We obtain from the bins for wood putty or primer, and cover the whole fish (Fig. 11).

Figure 12 shows that came out of it. Then dry. When dry, again check for the presence of irregularities and, if necessary, smooth out again with sandpaper.
In principle, the alignment and cleaning of sandpaper and can not do, this is an amateur))) But I do it always – a habit)))
Now begins the most important creative process – how to decorate the fish.
The first variant.
The same filler or primer again cover the fish, but a thick layer, and while this mass is not dried up, with the help of available resources – hard brushes, toothpicks – do on the surface of some intricate patterns (Figure 13-14.). You can make prints from what a relief surfaces – how prompt your imagination)

Here’s a relief fish turned out I (Fig. 15). After that, the fish thoroughly dried.
Option Two.
Small fish can be more unusual and original)))

It is possible to paste over pieces of lace, guipure lace (Fig. 16).
And it is possible and as I did in this case – took the remnants of embossed wallpaper (Fig. 17), cut out their patterns and flowers, pasted using PVA glue (Fig. 18). And I get this so unusual, “flower” fish (Fig. 19).
Then I covered her again a little primer to seal and smooth the bonding space, then they will not be as sharp and distinct. Eyes at fish in the first and second embodiment, made from a paper flower. You can glue the beads, if desired.
Painting.
I paint with acrylic paints, with the mandatory use of the “gold”. I like gold acrylic paint, I can not do anything about it))) In the absence of acrylic paints, you can use and gouache, and watercolor and oil paints.

The first fish painted in green and blue tones (Fig. 20-23).
The second – in red and pink (see Figure 24-26.).

And in fact, and in another case – finishing “gold”. You can cover the fish sparkles.
All is well dried. Acrylic paint does not require painting. But if you have used in gouache, watercolor, then of course better to fix the paint lacquer. All is well dried.
At this stage, the work can be considered complete. You can fin on the top to make a hole, insert the stretch yarn or decorative shnurochek and fish somewhere to hang. You can even on the Christmas tree.
And you can go further …
How to make a stand.
 We need a blank, cut from plywood or particle board (Figure 1).
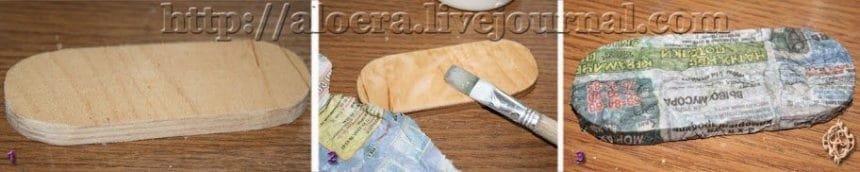
We cover it with white glue (Fig. 2).
Again a good mash paper and glue to the workpiece, making both folds. We do not have perfectly smooth sea bottom (Fig. 3).
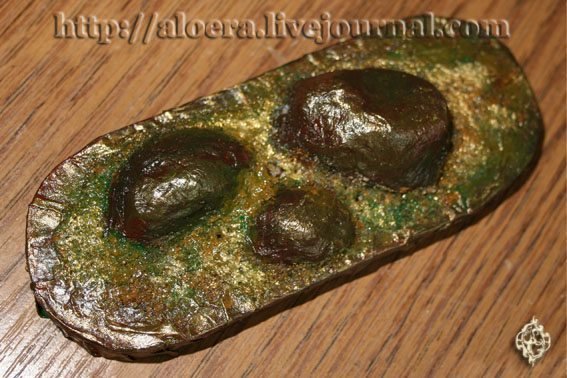
If you have a beautiful decorative pebbles, shells, they will go into play when decorating the stand.
But can these “stones” to make their own. To do this, the paper fluff with white glue or wallpaper paste, crumple and give it the shape of a stone, an arbitrary (Fig. 4).

In order to mask the newspaper folds on top of our artificial stones, we plastered wipes (Figure 5).
Dried support.
Staining stand.
How to paint the stand in any color you choose for yourself. I can only tell what I’m after painting the main color, sand stuck to the stand – sea, river – and then also painted. It turns out an interesting bottom topography.
And do not forget about the fact that in our stand must be made holes for the most fish and algae. The arrows in Fig. 6 shows a central hole (red arrow) and openings for algae (yellow arrow). You are their naturally place where you want.

Fig. 7 Our stand ready. You can glue the shells here, yantarinki, any aquarium decorations.
Those who have no possibility to make a stand made of plywood, you can come up with another way. This will require, or plaster or cement. Take cover from ordinary banks, or any other form of not very high side. Dilute plaster or cement and fill in the mold. Do not forget that in this case you need to leave holes for the fish and algae beforehand. After the preform is dry, it can be removed from the mold, and it is possible to leave and, if the shape will not longer needed.
Gypsum stand so you can paste over the paper with folds, sand, small stones, shells – give free rein to their imagination!
How to make algae.
 For algae, we need x / cotton cloth, wire and glue PVA.
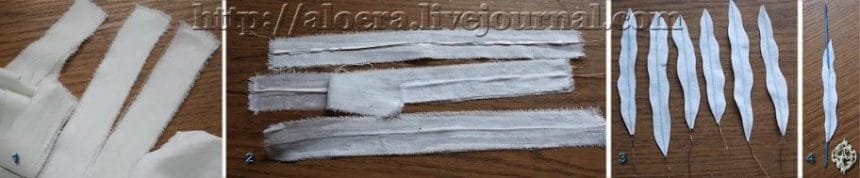
Fabric divided into strips of any length, width from 1 to 1.5 – 2 cm. It can be wider and if you do not track small (Figure 1).
Cut into the wire a little longer than strips of cloth. Coat with thick cloth with white glue, impose the wire so that the ends of her favored the edge of the fabric somewhere in the depth of the stand. Close the top of the second strip of fabric. Properly smoothed. If necessary, PVA glue may be deposited again on top of the cloth on both sides (Fig. 2).
Good dry.
The fabric will be hard, and the wire will allow algae to bend as you see fit.
If you get a long strip of cloth, and on both sides of the wire remains, as I have in the figure, it is possible to divide the fabric in half and increase the amount of algae.
After drying the algae attach the appropriate type of scissors (Fig. 3)
But one sheet of seaweed we need to do a little bit different. This central core, which will be attached very small fish. Naturally, the wire must be durable. Look at Fig. 4 and you will understand how it can be done. Then the algae paint in the colors that you want (Fig. 5).

After drying, attach algae appear as though they are in the water and gently curved in it (Fig. 6-7).
But first we fix on a stand-leaf core rod (Figure 8). Be sure to use a sufficiently strong glue for this – “Polymer”, “Titan” or the “Moment” (here it is already possible to use). Also on durable adhesive glue remaining algae, because the stand holes for them, we did beforehand. Only then glue the fish.

Our work is finished. It can give, it can decorate your interior. Rybka without stand (suspension) can be done with a child – he was happy to take part in it)))
I wish you success in your work !!
Courtesy: www.liveinternet.ru